
Let’s get straight to it. If you’re wondering how long do you press a DTF transfer, the standard answer is simple: 10–15 seconds at 300–320°F (149°C-160°C) with firm pressure. That’s the baseline most DTF pressing instructions will give you.
But here’s the catch. That’s not always enough.
Different fabrics behave differently. A thin cotton tee isn’t the same as a heavy hoodie. And if you’re working with custom DTF transfers, even small changes in adhesive or film quality can affect pressing time.
So yes, 10–15 seconds is your starting point. But getting flawless prints? That takes more than just a number.
In this guide, you’ll learn exactly how to adjust pressing time based on fabric, avoid common mistakes, and get consistent, professional-quality results—whether you’re pressing one shirt or scaling production.
What You’ll Learn (Quick Navigation)
- Why pressing time matters
- Ideal time & temperature guide
- Personalized pressing time by fabric
- Step-by-step DTF pressing instructions
- What happens if you get it wrong
- Advanced variables that affect results
- Business and production use cases
- Frequently asked questions (FAQs)
Why Pressing Time Matters
Pressing time isn’t just a number you follow blindly. It’s the difference between a print that lasts… and one that starts peeling after the first wash.
When you’re learning how to press a DTF transfer, you’re not just applying heat—you’re activating an adhesive layer that needs the right balance of time, temperature, and pressure to bond with the fabric. Most basic DTF pressing instructions only give you a fixed range. But in reality, pressing time controls how well that bond forms.
Here’s why it matters:
-
Adhesive Activation: DTF transfers use a heat-activated glue (TPU powder). Too little time, and it won’t fully melt. Too much, and it can over-cure and lose flexibility.
-
Fabric Penetration: The right pressing time allows the adhesive to sink into the fibers. This is what gives you durability and wash resistance.
-
Print Finish & Feel: Under-pressed designs feel rough and sit on top. Properly pressed prints feel smoother and more integrated with the fabric.
-
Durability Over Time: Incorrect pressing leads to cracking, peeling, or fading—especially after multiple washes.
-
Consistency in Production: If your pressing time isn’t dialed in, results will vary from shirt to shirt. That’s a nightmare in bulk orders.
If you want to understand how pressing time fits into the full application process, check out our step-by-step guide on how to apply DTF transfers correctly.
Bottom line? Pressing time isn’t just a step. It’s the foundation of a clean, durable, and professional DTF print.
DTF Pressing Sweet Spot: Time & Temperature That Actually Work
Let’s understand this properly.
If you’re asking how long do you press a DTF transfer, the real answer depends on pairing the right time with the right temperature. You can’t treat them separately. They work together. Always.
Most professionals follow a proven range for DTF transfer temp and time, but the key is knowing when to adjust.
Standard DTF Heat Press Settings
Here’s a reliable baseline you can start with:
-
Temperature: 300–320°F (150–160°C)
-
Time: 10–15 seconds
-
Pressure: Medium to firm
This is widely considered the best temp for DTF transfers across common fabrics like cotton and blends.
Fabric-Based Adjustments
Not all garments behave the same. Here’s how to tweak your settings:
-
100% Cotton:
-
305–320°F
-
12–15 seconds
-
Handles heat well. Great adhesion.
-
Polyester:
-
275–295°F
-
8–12 seconds
-
Lower heat to avoid scorching or dye migration.
-
Blends (Cotton/Poly):
-
290–310°F
-
10–13 seconds
-
Balanced settings for consistent results.
-
Heavy Fabrics (Hoodies/Fleece):
-
310–320°F
-
15–18 seconds
-
More time needed for deeper penetration.
Why These Numbers Matter
-
Too short?
Adhesive won’t fully bond. Expect peeling. -
Too long?
You risk over-curing. Prints may feel stiff or crack over time. -
Too hot?
Fabric damage. Color distortion. -
Too cool?
Weak adhesion. Poor durability.
Pro Tip: Always test before bulk production. Even small variations—fabric quality, press calibration, or transfer type—can shift your ideal timing. Check out how to test print quality before ordering big and avoid unwanted costs or bad quality output.
So yes, the answer to how long do you press a DTF transfer starts with 10–15 seconds. But mastering it? That’s about understanding how temperature, time, and material all come together. Understanding the time and temp according to the material or fabric gives you clean results.
Pressing Time Based on Real Fabric Behavior
Here’s where most DTF printing projects fail, pressing on different fabrics. Pressing looks simple, but it can be tricky due to a variety of fabrics.
Because when you’re actually pressing shirts, things don’t feel “standard.” One batch works perfectly. The next? Slight peeling. Maybe dull edges. Maybe the print just doesn’t feel right.
That’s where understanding fabric behavior changes everything.
When you’re learning how to press a DTF transfer, you start noticing patterns. Not all fabrics respond the same way—even if the label says they should. And most DTF pressing instructions don’t prepare you for that.
What Actually Changes Your Pressing Time
Instead of repeating numbers, focus on these real-world factors:
-
Fabric Thickness
Thicker garments (like hoodies or fleece) need slightly more time—not because of heat, but because the adhesive has to travel deeper into the fibers. If you rush it, the top looks fine, but the bond underneath is weak. -
Weave & Texture
Smooth fabrics are predictable. Textured ones? Not so much. Pique polos, performance wear, or anything with a rough surface may need a bit more dwell time to fully grip. -
Stretch Factor
Athletic wear stretches. A lot. If the adhesive isn’t fully set, you’ll see cracking when the fabric expands. That usually means your pressing time was just a little short. -
Moisture in Fabric
This one frustrates a lot of beginners. Humidity, storage conditions, even the room you’re in—all affect results. Moisture slows bonding. A quick pre-press helps, but sometimes you need an extra second or two. -
Transfer Quality
Not all transfers behave the same. High-quality prints bond faster and more evenly. Lower-quality ones? They’re less forgiving and often need tighter control on timing.
What This Means for You
You stop guessing. You start adjusting. That’s the shift—from following instructions to actually understanding how to press a DTF transfer for consistent results. Because in real production, especially in the U.S. market, where quality expectations are high, “close enough” doesn’t cut it. Precision does.
Step-by-Step DTF Pressing Instructions
Let’s slow this down and do it the right way. Because in real production, small mistakes don’t stay small—they turn into wasted shirts, reprints, and frustrated customers.
If you really want to know how long you have to press a DTF transfer, this process shows exactly where timing fits—and how every step affects your final result. These DTF transfer directions are practical, repeatable, and built for both beginners and high-volume workflows like bulk order printing or gang sheets.
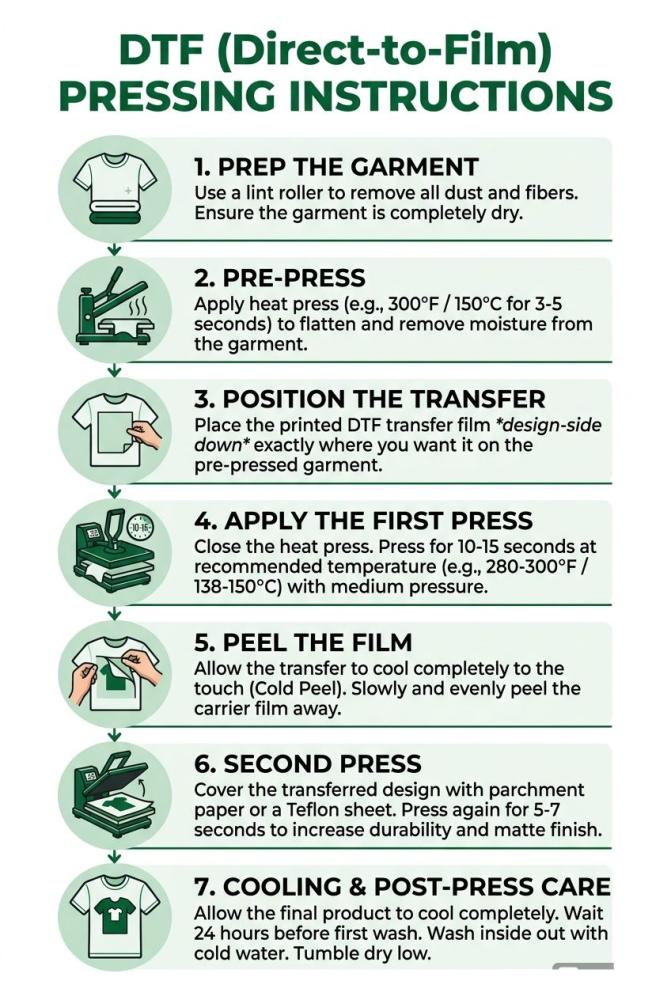
Step 1: Prep the Garment
This is where most people rush. And it shows later.
Before you even think about pressing, take a few seconds to properly prepare the garment. Lay it flat on the heat press. Smooth out wrinkles. Check for seams, zippers, or uneven areas that could block pressure.
-
Use a lint roller to remove dust, fibers, or loose threads
-
Make sure the surface is completely flat
-
Avoid pressing over thick seams or collars
Here’s the reality: one tiny fiber trapped under the transfer can create a visible bump after pressing. It’s frustrating, especially when you notice it after the job is done.
If you’re handling bulk order printing, this step becomes even more critical. A small mistake repeated across 50 or 100 shirts? That’s a costly problem.
Step 2: Pre-Press
Fabric holds moisture. You can’t see it—but it’s there. And it ruins adhesion.
A quick pre-press solves this. Place the garment on the press and heat it for 3–5 seconds. You’ll often see a bit of steam—that’s exactly what you want.
-
Removes moisture trapped in fibers
-
Flattens the fabric surface
-
Prepares fibers for better bonding
Skipping this step is one of the biggest reasons prints fail after washing. The adhesive can’t properly bond if moisture is present.
In real-world setups—especially in humid environments—this step becomes non-negotiable. Even experienced printers rely on it every single time.
Step 3: Position the Transfer
Now comes placement. And this is where precision matters.
Place the transfer with the printed side facing down. Align it based on your design position—center chest, left chest, or full front. Take your time here. Once pressed, there’s no going back.
-
Use heat-resistant tape if needed
-
Double-check alignment before closing the press
-
Keep spacing consistent across garments
A slight misalignment might seem minor on one shirt. But in bulk orders, inconsistency stands out immediately. Customers notice when logos shift even half an inch.
Also, when working with gang sheet printing, spacing and layout become even more important. Poor placement can lead to wasted designs and uneven results.
Step 4: Apply the First Press
This is the core step. This is where your question—how long do you press a DTF transfer—actually matters.
Set your press and apply:
-
Temperature: 300–320°F
-
Time: 10–15 seconds
-
Pressure: Medium to firm
Close the press with steady pressure. Don’t rush to open it early. That extra second or two can be the difference between a strong bond and a weak one.
-
Too little time → weak adhesion
-
Too much time → stiff or over-cured print
In production environments, consistency is everything. Once you dial in the right timing, stick to it across the entire batch. That’s how you maintain quality at scale.
Step 5: Peel the Film
Now it’s time to reveal the print. But don’t rush. First, check your transfer type:
-
Hot Peel: Remove immediately
-
Cold Peel: Let it cool completely
Peeling incorrectly can ruin an otherwise perfect press.
-
Peel slowly at a 45-degree angle
-
Don’t yank the film upward
-
Watch for any lifting edges
If the design starts lifting, stop. Let it cool more or re-press briefly. This step requires patience. Especially when you’re doing multiple shirts, it’s tempting to rush—but that’s when mistakes happen.
Step 6: Second Press
This is the step that most beginners underestimate. But professionals never skip it. After peeling, cover the design with parchment paper or a Teflon sheet and press again for 5–10 seconds.
This does a lot more than you think:
-
Locks the adhesive deeper into fibers
-
Improves wash durability
-
Reduces the “plastic” feel
-
Enhances overall finish
Without this step, prints may look good initially but fail over time. If you want that soft, retail-quality finish—this is where it happens.
Step 7: Cooling & Post-Press Care
You’re almost done. But this final stage matters. Let the garment cool down flat. Don’t fold it immediately. Don’t stretch it. Give the adhesive time to fully set.
-
Wait at least 24 hours before washing
-
Avoid stacking hot garments directly on top of each other
-
Let airflow help with cooling
In fast-paced environments, people often rush this step. But that’s risky. A print that looks perfect right after pressing can still fail if it hasn’t properly set.
Related: How Do You Put a DTF Transfer On a Shirt
What Happens If You Get It Wrong
DTF pressing mistakes don’t always show up immediately. That’s what makes them frustrating. You press a shirt, it looks clean, sharp, and perfectly fine. No visible issues. But then the customer wears it once. Or washes it. Or stretches the fabric slightly. That’s when the problems start creeping in. Edges begin to lift. The print feels stiff or unnatural. Sometimes it cracks. Sometimes it peels completely.
This usually comes down to one thing—imbalance. Either the pressing time was slightly off, the pressure wasn’t enough, or the heat didn’t fully activate the adhesive. The bond between the transfer and fabric never fully formed. And once that happens, the print has no long-term durability. On the flip side, applying too much heat or pressing too long can damage the adhesive in a different way. It over-cures, becomes rigid, and loses flexibility. The print may still stick—but it won’t move with the fabric. That’s when cracks start appearing after a few wears.
Even something as simple as peeling the film at the wrong moment can undo everything. Or skipping the second press. These small steps don’t seem critical at the time—but they define the final quality.
-
Prints peeling after first wash = under-pressed
-
Stiff, plastic feel = over-pressed
-
Cracking on stretch = weak bond or over-curing
-
Lifting during peel = incorrect peel timing
-
Reduced durability = skipped finishing press
Once you recognize these patterns, mistakes stop being random—and start becoming fixable.
Advanced Variables That Affect Results
Once you’ve got the basics down, this is where things really start to click. Because even when your time and temperature are correct, results can still vary. That’s not random—it’s influenced by a few advanced variables that most people overlook.
Pressure is a big one. It’s not just about closing the press—it’s about how firmly the adhesive is pushed into the fabric. Too light, and the bond stays on the surface. Too heavy, and you risk distorting the design or fabric. Finding that “just right” pressure is what creates a strong, flexible bond.
Heat consistency also matters more than people think. Not all heat presses distribute temperature evenly. The center might be perfect, but the corners slightly cooler. That leads to partial adhesion—where one side of the print holds, and the other starts lifting.
Then there’s environment. Humidity and room temperature directly affect how the adhesive reacts. In more humid conditions, fabrics hold extra moisture, which can slow down bonding. Even if your settings are correct, results can feel inconsistent.
Transfer quality plays a role too. High-quality transfers respond predictably. Lower-quality ones require tighter control and can behave differently across batches.
-
Uneven pressure = inconsistent bonding
-
Heat plate variation = partial adhesion issues
-
Humidity = slower or weaker bonding
-
Fabric storage conditions = hidden moisture problems
-
Transfer quality = variation in performance
Once you account for these variables, your results stop fluctuating—and start becoming reliably consistent.
Business and Production Use Cases
DTF pressing isn’t just about getting one shirt right. It’s about getting every shirt right—consistently, at scale. That’s where understanding how to press a DTF transfer properly becomes critical—not just for quality, but for business efficiency.
In real production, small variations can turn into big losses. One second off across 100 pieces? That’s 100 potential defects. That’s why professionals don’t guess—they standardize. Once the best temp for DTF transfers and pressing time are dialed in, they’re applied across every order to ensure repeatable results.
For businesses handling volume, consistency is non-negotiable. Whether it’s branded merch, uniforms, or event apparel, every piece must match in finish, durability, and feel.
-
Bulk order printing:
Standardized pressing ensures uniform quality across large batches -
Gang sheet printing:
Multiple designs require even heat and pressure to avoid uneven bonding -
Print-on-demand workflows:
Faster turnaround depends on reliable, repeatable pressing settings -
Brand consistency:
Proper execution of how to press a DTF transfer ensures logos and colors remain consistent across orders
At scale, pressing isn’t just a step—it’s a controlled system. And when that system is optimized, production becomes faster, smoother, and far more profitable.
Conclusion
Getting how long do you press a DTF transfer right isn’t just about numbers—it’s about control. When you combine the right timing with the best temp for DTF transfers, proper pressure, and solid technique, your results change completely.
Whether you’re using a professional heat press or tools from brands like Cricut or HTVRONT, the goal stays the same: consistent, durable prints.
Mastering how to press a DTF transfer means fewer errors, better output, and smoother production—every single time.
FAQs
How long do you press a DTF transfer?
Typically, 10–15 seconds at 300–320°F with medium to firm pressure works for most fabrics. However, slight adjustments may be needed based on fabric type and transfer quality.
What is the best temp for DTF transfers?
The right temperature for DTF transfers usually falls between 300°F and 320°F (150–160°C). Lower temperatures are used for heat-sensitive fabrics like polyester.
Can I use a home iron instead of a heat press?
Yes, but results are less consistent. A heat press provides even heat and pressure, which is critical for proper adhesion and durability.
Why is my DTF transfer peeling after washing?
Peeling usually happens due to under-pressing, low pressure, or skipping the second press. Moisture in the fabric can also affect bonding.
Do I need a second press after applying the transfer?
Yes. A second press for 5–10 seconds improves durability, reduces the plastic feel, and locks the design into the fabric.
What happens if I press too long?
Over-pressing can make the design stiff, reduce flexibility, and lead to cracking over time.