
DTF printing on tote bags is growing rapidly because businesses, Etsy sellers, and custom apparel brands want durable, full-color prints without expensive setup costs. But tote bags behave very differently than t-shirts during heat pressing. Thick seams, heavy canvas, coarse fabric texture, and trapped moisture can all affect DTF adhesion and print durability.
Most tote printing guides only explain basic heat press settings and ignore the real-world problems that cause peeling, bubbling, or uneven transfers. This guide covers everything from material compatibility and pressing techniques to troubleshooting common failures, helping you achieve cleaner, longer-lasting DTF tote bag prints on cotton, canvas, polyester, jute, and more.
Why Tote Bags Are Harder to Print Than T-Shirts
DTF printing on tote bags is very different from printing on standard t-shirts. While shirts provide a relatively flat and flexible surface, tote bags introduce thick seams, layered fabric, heavy canvas texture, and uneven pressure zones that make DTF transfer adhesion much more difficult.
Many beginners use standard shirt settings on tote bags and end up with:
-
Peeling edges
-
Bubbling transfers
-
Uneven adhesion
-
Cracked prints
-
Scorch marks on canvas
One of the biggest challenges is seam pressure. Most canvas tote bags contain folded edges, reinforced stitching, and thick handles that prevent the heat press platen from applying even pressure across the entire design area. Even slight pressure imbalance can weaken the adhesive bond.
Moisture retention is another major problem. Heavy cotton canvas absorbs and traps humidity deep inside the fibers. During pressing, this hidden moisture turns into steam and creates microscopic air pockets underneath the DTF film.
This often causes:
-
Silvering
-
Weak adhesion
-
Bubbling after cooling
-
Premature peeling
Another overlooked issue is supplier inconsistency. Two tote bags may appear identical but use different canvas weights, cotton blends, fabric coatings, or weave density. That is why the same DTF heat press settings may work perfectly on one tote and fail completely on another.
Using premium custom DTF transfers and adjusting your pressing workflow specifically for tote materials can dramatically improve print durability and consistency.
If you are new to transfer application, this guide on how to apply DTF transfers correctly covers the core heat pressing fundamentals. Also, read how to apply DTF to a canvas bag.
Understanding Tote Bag Materials Before Printing
Not every tote bag material reacts the same way during DTF printing. Fabric texture, weave density, coating, moisture retention, and heat sensitivity all affect DTF transfer adhesion, durability, and print quality. Understanding the material before pressing helps prevent peeling, bubbling, scorching, and uneven transfers.
Cotton Canvas Tote Bags
Cotton canvas is the most popular material for DTF tote bag printing because it provides strong adhesion and a natural retail look. However, canvas absorbs moisture easily, so proper pre-pressing is critical.
Heavy Canvas (10–16 oz)
Heavy canvas tote bags are thicker and more durable, but they require higher pressure and longer pre-pressing to remove trapped moisture. Thick seams and uneven surfaces also make heat distribution harder.
Recycled Cotton
Recycled cotton tote bags vary heavily in fiber quality and weave consistency. Some recycled blends may contain hidden polyester or loose fibers that affect DTF transfer bonding and wash durability.
Organic Cotton
Organic cotton tote bags usually press well with DTF transfers, but softer untreated fibers can scorch more easily under excessive heat.
Polyester Tote Bags
Polyester tote bags work extremely well for DTF printing because synthetic fibers handle heat and adhesive bonding consistently. However, low-quality polyester may experience dye migration at high temperatures.
Jute & Burlap
Jute tote bags and burlap bags are among the hardest surfaces for DTF printing. Their rough texture and loose weave make consistent adhesion difficult without heavy pressure and specialty adhesive powder.
Non-Woven Polypropylene
Non-woven polypropylene tote bags are common in promotional products and grocery totes. These materials are lightweight and heat-sensitive, so lower heat press settings are often required.
Waxed Canvas
Waxed canvas tote bags are difficult for DTF because the wax coating interferes with adhesive bonding. Transfers may peel prematurely if the coating is too heavy.
Laminated Totes
Laminated tote bags often contain protective coatings that resist heat and adhesive penetration. Testing small areas first is strongly recommended before full production.
Choosing the right tote bag material is one of the biggest factors in achieving durable, professional-quality DTF tote bag prints.
DTF Compatibility Matrix for Every Tote Material
Best Heat Press Settings for Tote Bags
Using the correct DTF heat press settings for tote bags is extremely important because every tote material reacts differently to heat, pressure, and adhesive bonding. Incorrect settings often lead to peeling transfers, bubbling, weak adhesion, scorch marks, or uneven prints.
Recommended DTF Tote Bag Settings
-
Cotton canvas tote bags:
300–320°F for 12–15 seconds with medium-firm pressure and cold peel. -
Polyester tote bags:
280–300°F for 10–12 seconds using medium pressure to reduce dye migration risk. -
Jute & burlap tote bags:
300–320°F for 15–20 seconds with firm pressure because rough textures require stronger adhesive bonding. -
Non-woven polypropylene totes:
260–280°F for 8–10 seconds using lighter pressure to avoid material warping. -
Heavy canvas tote bags (10–16 oz):
Require firmer pressure and longer pre-pressing because thick seams prevent even platen contact.
Before pressing any tote bag:
-
Pre-press for 5–10 seconds to remove moisture
-
Use pressing pillows around seams if needed
-
Test settings on small batches first
For a deeper breakdown of ideal DTF heat press temperatures, read this guide on best temperature for DTF printing.
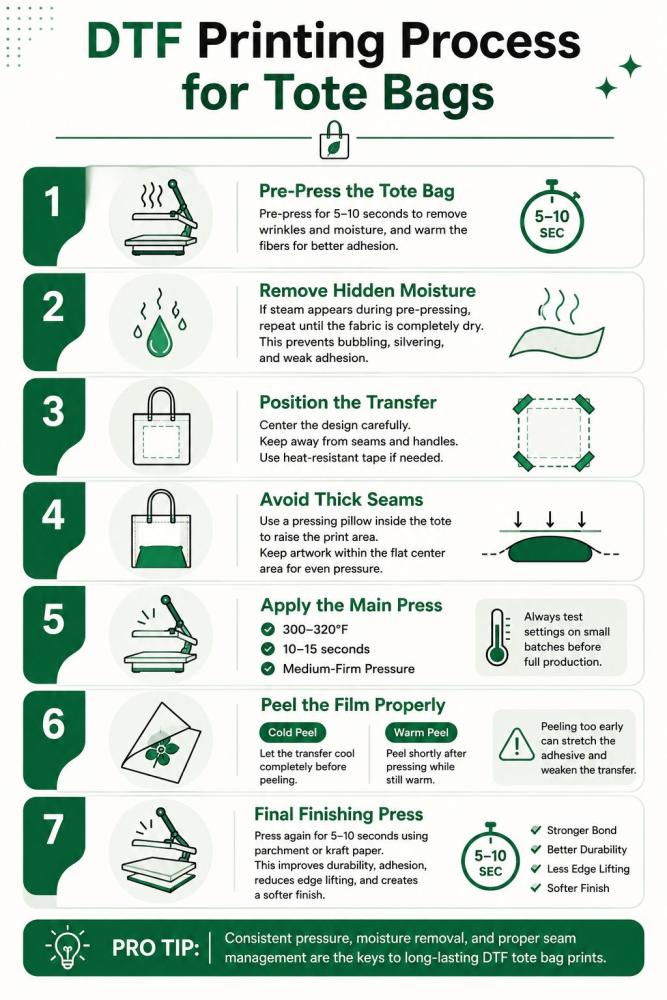
Step-by-Step DTF Printing Process for Tote Bags
DTF printing on tote bags requires a slightly different workflow than standard apparel printing. Tote bags contain thick seams, layered fabric, moisture-heavy canvas, and uneven pressure zones that can easily ruin a transfer if the pressing process is not adjusted properly.
Following the correct DTF tote bag printing process helps improve adhesion, durability, and print consistency across different materials.
1. Pre-Press the Tote Bag
Before applying the DTF transfer, always pre-press the tote bag for 5–10 seconds. This step flattens wrinkles, removes trapped moisture, and warms the fibers for better adhesive bonding.
Pre-pressing is especially important for:
-
Cotton canvas tote bags
-
Heavy canvas totes
-
Organic cotton bags
-
Recycled cotton materials
Skipping this step is one of the biggest reasons DTF tote bag transfers fail prematurely.
2. Remove Hidden Moisture
Canvas tote bags hold moisture much more aggressively than t-shirts. Even when the fabric feels dry, internal humidity can still remain trapped deep inside thick fibers.
When heat is applied, that moisture turns into steam and creates:
-
Bubbling under the transfer
-
Weak adhesive bonding
-
Silvering
-
Edge lifting
If heavy steam appears during pre-pressing, repeat the process until the moisture is fully removed.
3. Position the DTF Film Correctly
Proper DTF film positioning is critical on tote bags because seams and handles can easily throw off alignment.
When placing the transfer:
-
Keep the design away from folded seams
-
Avoid pressing directly over handles
-
Center the artwork carefully
-
Use heat-resistant tape if needed
Uneven surfaces create inconsistent pressure zones that reduce transfer adhesion.
4. Avoid Thick Seams During Pressing
One of the biggest challenges in DTF printing on tote bags is seam interference. Thick stitched edges and reinforced handles prevent the heat press platen from applying even pressure.
To improve pressing consistency:
-
Insert a pressing pillow inside the tote
-
Raise the print area above surrounding seams
-
Use a smaller platen when possible
-
Keep artwork within flat central zones
This dramatically improves transfer bonding and reduces peeling problems.
5. Perform the Primary Press
Once the tote bag is fully prepared, apply the main press using the recommended temperature, pressure, and timing for the material.
General DTF tote bag settings include:
-
300–320°F for cotton canvas
-
Medium-firm pressure
-
10–15 seconds press time
Always test settings on small batches before full production because different tote suppliers may use different fabric blends and coatings.
6. Cold Peel vs Warm Peel
The peel method depends entirely on the type of DTF film being used.
-
Cold peel DTF film: Wait until the transfer cools completely before peeling.
-
Warm peel DTF film: Peel shortly after pressing while still warm.
Peeling too early can stretch the adhesive and weaken the transfer.
7. Apply the Final Finishing Press
After peeling the film, perform a final finishing press for 5–10 seconds using parchment paper, kraft paper, or a finishing sheet.
This final press helps:
-
Improve adhesive bonding
-
Increase wash durability
-
Reduce edge lifting
-
Create a softer finish
-
Improve long-term durability
A proper finishing press often makes the difference between a professional-quality DTF tote bag print and a transfer that starts peeling after a few washes.
Print Placement Guide for Tote Bags
Mastering graphic layout across diverse dimensions ensures a clean, commercial finish. Use this structural blueprint to map out precise print positioning for your product line:
Standard Tote Sizing
The classic 15x16-inch canvas bag offers a generous canvas. The ideal print zone centers a 10x10-inch maximum graphic directly onto the panel, creating balanced visual symmetry.
Large Grocery Totes
Measuring roughly 18x15-inches with deep expansion panels, oversized totes require centered art limited to 12x12-inches. Keeping the design proportional prevents the image from warping when the bag is filled to capacity.
Solving Common DTF Tote Bag Problems
DTF tote bag printing can produce clean, detailed results, but a few common issues can appear if heat, pressure, or application steps are slightly off. Most of these problems are easy to fix once you understand what causes them. Below are the most frequent issues in DTF printing on tote bags and how to solve them using proper technique and setup adjustments.
Bubbling Transfers
Bubbling usually happens when moisture or air gets trapped under the film during heat pressing. This is common in DTF tote bag printing problems when the fabric isn’t pre-pressed properly. Always pre-press the tote bag for 5–10 seconds to remove moisture and wrinkles before applying the transfer. Also ensure even pressure across the heat press.
Peeling Corners
If edges or corners lift after pressing, the issue is usually uneven pressure or insufficient adhesive activation. In DTF transfer issues on tote bags, this often occurs on thick canvas bags. Increase press pressure slightly and ensure full coverage during pressing. A second quick press after peeling can help lock edges down.
Cracking After Folding
Cracking happens when the ink layer becomes too stiff. This is a common concern in DTF printing on fabric bags. It usually means too much adhesive powder or over-pressing. Reduce curing time slightly and avoid excessive heat. Flexible curing keeps the print soft and fold-resistant.
Press Marks
Shiny or flattened press marks appear when heat or pressure is too high. This is especially visible on smooth cotton totes. To avoid this DTF tote bag heat press issue, use a protective sheet like parchment or Teflon and reduce pressure slightly while maintaining proper adhesion.
Adhesive Halos
A visible outline around the design often comes from excess adhesive powder. In DTF printing adhesive problems, this is one of the most common issues. Shake off excess powder thoroughly before curing and avoid over-powdering fine designs.
Film Shrinkage
If the film pulls inward during pressing, it may be overheating or uneven heat distribution. Keep temperature within recommended DTF range and ensure your heat press platen is stable and evenly heated.
Scorch Marks
Scorching occurs when fabric is exposed to excessive heat. This is a risk in DTF tote bag printing on cotton canvas. Always use a protective sheet and avoid prolonged pressing times.
Handle Pressure Lines
Thick tote handles can leave indentations or uneven pressure lines near the design area. To fix this, reposition the bag so handles are away from the press zone or use a pressing pillow to balance height differences.
By controlling heat, pressure, and preparation steps, most DTF tote bag printing problems can be prevented. Small adjustments in your process can significantly improve durability, appearance, and overall print quality.
Is DTF Printing on Tote Bags Profitable?
Direct-to-Film (DTF) printing on tote bags is a massive revenue generator for modern custom apparel businesses. Because canvas blanks are incredibly inexpensive—typically costing between $1.00 and $2.50 wholesale—and a standard DTF transfer costs under $0.75 in ink and powder, your total production cost sits below $3.25 per unit. With retail prices on platforms like Etsy hovering between $15 and $25 for trendy, full-color designs, custom print shops routinely pocket 70% to 80% profit margins.
The Bottom Line
DTF printing completely removes the production barriers holding back custom tote bag fulfillment. By eliminating the messy setups of screen printing and bypassing the strict fabric limitations of sublimation, DTF allows you to press vibrant, full-color graphics onto any canvas or synthetic blend on demand.
Avoiding common production pitfalls simply requires mastering your heat press parameters and using internal pressing pillows to isolate heavy handles. When executed correctly, adding custom tote bags to your product catalog unlocks an incredibly low-overhead, high-margin revenue stream that scales effortlessly from single Etsy orders to massive corporate production runs.