
An interesting way to customize your bag, jacket, wallet, tote, or any other leather goods is using DTF transfers. DTF on leather shoes, belt, wallet, and other products makes transferring your artwork or design smooth without requiring cumbersome setups.
But if you are concerned whether DTF on leather holds or it will peel off after application, then you need not worry, as they work on leather or faux leather and are durable. You just need the right process to use DTF on leather or faux leather goods.
Proper surface preparation, heat press, and film peeling ensure durable prints for different types of leather. However, leather behaves very differently than cotton or polyester, which means applying transfers incorrectly can easily cause bubbling, cracking, poor adhesion, or heat damage.
In this blog, we will explain how you can apply direct-to-film transfers to leather items and everything you need to know to apply them correctly. No fluff. Let’s get started.
Standard DTF vs UV DTF on Leather: Choosing the Right Method First
One of the biggest mistakes beginners make when applying DTF transfer on leather is using the wrong transfer method from the start. Leather reacts very differently from cotton or polyester. Too much heat can warp, shrink, harden, or even discolor the surface. That’s why understanding the difference between standard DTF and UV DTF matters before pressing anything.
Here’s the simple breakdown most people miss:
-
Standard DTF = requires a heat press
-
UV DTF = uses UV adhesive and pressure only, with no heat press required
This single difference completely changes which leather products you can safely customize.
Standard DTF works by heat pressing a transfer film onto the leather surface at roughly 230–260°F using medium pressure. It works best on flat leather products where you can evenly control pressure and temperature. Thick genuine leather usually handles low heat better than thin synthetic leather.
Standard DTF is ideal for:
-
Leather wallet panels
-
Journal covers
-
Flat bag sections
-
Leather patches
-
Belt panels
-
Structured leather accessories
It performs especially well when the design area stays relatively flat and doesn’t flex constantly. If you already own a heat press and understand temperature control, standard DTF can produce durable, vibrant prints on leather surfaces. For a full breakdown of the process, read the DTF printing guide, which explains how traditional DTF printing works step-by-step.
UV DTF is completely different. Instead of heat, it uses UV-cured adhesive technology that transfers directly onto hard or delicate surfaces using pressure only. No heat press. No baking. No risk of overheating thin PU leather.
This makes UV printing on leather much safer for:
-
Shoes and sneakers
-
Curved bag panels
-
Keychains
-
Thin faux leather
-
PU or PVC leather under 0.5mm
-
Pre-assembled leather goods
UV DTF also works better on curved surfaces where heat presses struggle to apply even pressure. If you’re decorating finished products that cannot physically fit into a press, UV DTF becomes the smarter option. This detailed guide on what is a UV DTF transfer explains what it is and how it differs from standard DTF printing.
Leather Type Compatibility: Which Leathers Work and Which to Avoid
Not all leather reacts the same way during DTF printing. Some leather materials handle heat and adhesive beautifully, while others warp, scorch, peel, or permanently change texture after pressing.
The key is understanding how each leather type behaves under heat, pressure, and adhesive bonding. Genuine leather, PU leather, faux leather, and bonded leather all respond differently during transfer application. Using the wrong temperature or pressure can permanently damage the surface.
The table below gives safe starting points for applying DTF on PU leather, genuine leather, and DTF transfers on faux leather without ruining the material.
|
Leather Type |
Recommended Temperature |
Press Time |
Pressure |
Peel Type |
Important Notes |
|
Genuine Leather (Full-Grain / Top-Grain) |
240–250°F |
8–10 sec |
Light |
Cold Peel |
Natural oils may reduce adhesion; always test first |
|
PU Leather |
230–245°F |
5–8 sec |
Light |
Cold Peel |
Use Teflon sheet; avoid overheating |
|
Faux Leather (PVC) |
230–240°F |
5–7 sec |
Very Light |
Cold Peel |
Highest heat damage risk; use parchment buffer |
|
Bonded Leather |
230–245°F |
5–8 sec |
Light |
Cold Peel |
Durability varies by coating quality |
|
Suede / Nubuck |
NOT RECOMMENDED |
— |
— |
— |
Fibrous surface prevents proper adhesion |
Genuine Leather vs PU vs Faux Leather
Genuine Leather
Genuine leather can tolerate slightly more heat compared to synthetic materials. However, it contains natural oils and surface variations that may interfere with adhesive bonding.
Important considerations:
-
Always clean the surface before pressing
-
Avoid excessive pressure
-
Use low-temperature pressing whenever possible
-
Test hidden areas first
This material works best for:
-
Wallet panels
-
Journal covers
-
Leather patches
-
Flat bag panels
PU Leather
DTF on PU leather is very common because PU surfaces are smoother and more consistent than natural leather. The adhesive bonds more evenly, producing cleaner transfers.
However:
-
Temperatures above 250°F may cause bubbling
-
Delamination can happen under excessive heat
-
Thin PU layers deform easily
Use:
-
Teflon sheets
-
Light pressure
-
Short press cycles
Faux Leather (PVC)
Applying DTF transfers to faux leather requires the most caution. PVC-based faux leather melts faster than other leather types and can permanently wrinkle under high heat.
Key precautions:
-
Keep temperatures low
-
Use parchment paper as a heat buffer
-
Never overpress
-
Avoid double pressing unless absolutely necessary
Soft faux leather is also vulnerable to carrier-sheet imprinting.
Important Warning: Carrier Sheet Imprints
One issue most tutorials ignore is carrier-sheet edge marking. Soft faux leather can permanently emboss under heat where the carrier film touches the surface.
To prevent this:
-
Cut the DTF film 1–2 inches larger than the artwork
-
Use parchment paper between the carrier sheet and heat platen
-
Avoid excessive pressure
This small adjustment dramatically reduces visible press marks.
Why Suede and Nubuck Are Not Recommended
Suede and nubuck are poor choices for a DTF transfer on leather application because their textured, fibrous surfaces prevent consistent adhesive bonding.
Problems include:
-
Uneven transfer adhesion
-
Crushed fibers from heat
-
Permanent scorching
-
Poor durability after washing or flexing
Better alternatives include:
-
Laser engraving
-
Embossing
-
Screen printing with specialty fabric inks
Avoiding unsuitable leather types saves both material and production costs.
Before You Start: Surface Preparation for Leather
Surface preparation is one of the most important steps when applying a DTF transfer on leather. Unlike fabric, leather contains natural oils, waxes, conditioners, and protective coatings that can block the adhesive from bonding properly. Even if the leather looks clean, leftover conditioner residue can cause edge lifting, peeling, or poor durability within just a few days.
That’s why proper prep matters before any heat pressing begins.
Clean the Leather Surface Properly
Start by wiping the leather with:
-
70% isopropyl alcohol
-
A lint-free microfiber cloth
This removes:
-
Surface oils
-
Dust
-
Wax residue
-
Fingerprints
-
Conditioner buildup
After cleaning:
-
Allow the leather to dry completely
-
Wait at least 10 minutes before pressing
-
Let thicker leather dry even longer
Avoid using water on genuine leather. Water can raise the grain and permanently alter the texture.
For heavily conditioned leather, use a dedicated leather degreaser before the alcohol wipe. These products remove stubborn wax barriers that interfere with DTF adhesion.
Improve Adhesion on Smooth Leather
Lightly textured or coated leather often benefits from gentle surface abrasion.
A professional trick is using:
-
400-grit sandpaper
-
Very light pressure
-
Only on smooth leather surfaces
This creates microscopic abrasions that help the adhesive grip more effectively.
Important:
-
Never sand suede or nubuck
-
Remove all sanding dust before pressing
This small step can dramatically improve durability and reduce edge lifting on difficult leather surfaces.
Pre-Warm Before Applying the Transfer
Before placing the transfer:
-
Pre-press the leather for 2–3 seconds
This helps:
-
Remove surface moisture
-
Warm the material evenly
-
Improve adhesive bonding consistency
For faux leather:
-
Never pre-press longer than 2 seconds
-
Excess heat can warp or wrinkle synthetic surfaces
Proper surface preparation makes a huge difference in long-term adhesion, especially when working with premium leather products and high-detail DTF designs.
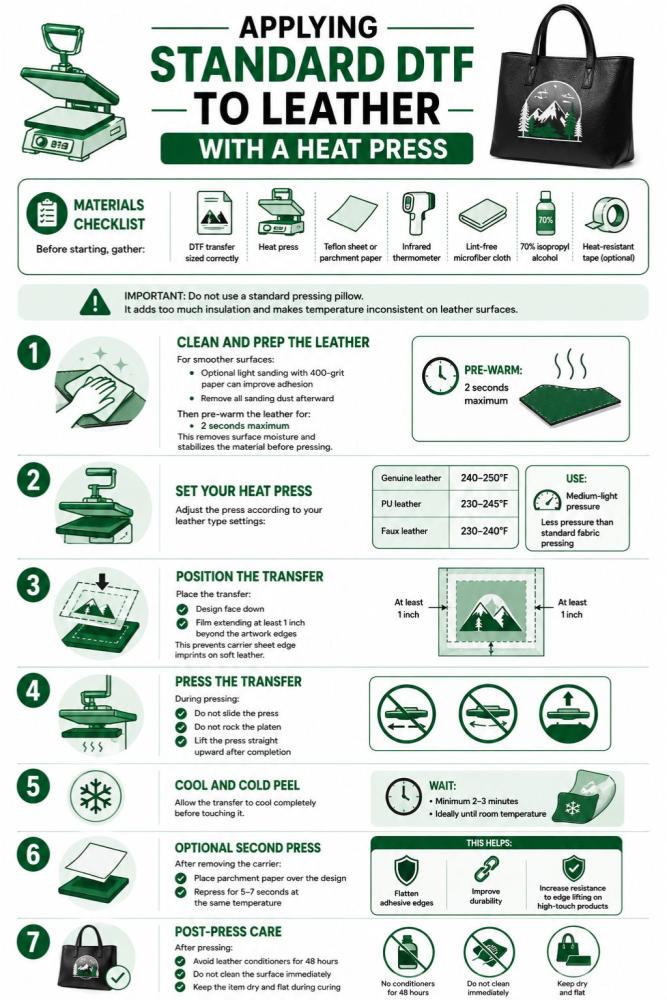
Step-by-Step: Applying Standard DTF to Leather With a Heat Press
Applying standard leather DTF printing correctly requires much more precision than fabric printing. Since leather reacts differently to heat, pressure, and adhesive bonding, too much heat can scorch or warp the surface, and too much pressure can leave permanent platen marks.
Following the correct process helps prevent peeling, bubbling, cracking, and surface damage.
Materials Checklist
Before starting, gather:
-
DTF transfer sized correctly
-
Heat press
-
Teflon sheet or parchment paper
-
Infrared thermometer
-
Lint-free microfiber cloth
-
70% isopropyl alcohol
-
Heat-resistant tape (optional)
Important: Do not use a standard pressing pillow. It adds too much insulation and makes temperature inconsistent on leather surfaces.
If you need help understanding transfer film types first, review this guide from DTFS.co on DTF transfer film.
Step 1: Clean and Prep the Leather
Wipe the surface thoroughly using isopropyl alcohol and a lint-free cloth. Allow the leather to dry completely.
For smoother surfaces:
-
Optional light sanding with 400-grit paper can improve adhesion
-
Remove all sanding dust afterward
Then pre-warm the leather for:
-
2 seconds maximum
This removes surface moisture and stabilizes the material before pressing.
Step 2: Set Your Heat Press
Adjust the press according to your leather type settings:
-
Genuine leather: 240–250°F
-
PU leather: 230–245°F
-
Faux leather: 230–240°F
Use:
-
Medium-light pressure
-
Less pressure than standard fabric pressing
Place a Teflon sheet or parchment paper on the platen first to protect the leather surface.
For additional timing guidance, see how long to press a DTF transfer and best temperature for DTF printing.
Step 3: Position the Transfer
Place the transfer:
-
Design face down
-
Film extending at least 1 inch beyond the artwork edges
This prevents carrier sheet edge imprints on soft leather.
Optional:
-
Secure edges using heat-resistant tape
Avoid wrinkles or uneven film tension.
Step 4: Press the Transfer
Close the press for the correct dwell time based on the leather type.
During pressing:
-
Do not slide the press
-
Do not rock the platen
-
Lift the press straight upward after completion
Stable pressure is critical for clean adhesion.
Step 5: Cool and Cold Peel
Allow the transfer to cool completely before touching it.
Wait:
-
Minimum 2–3 minutes
-
Ideally until room temperature
Then peel the carrier slowly at a 180-degree angle from one corner.
Important:
Hot peeling on leather can pull up the surface coating. This is a strict rule, not a recommendation.
Step 6: Optional Second Press
After removing the carrier:
-
Place parchment paper over the design
-
Repress for 5–7 seconds at the same temperature
This helps:
-
Flatten adhesive edges
-
Improve durability
-
Increase resistance to edge lifting on high-touch products
Step 7: Post-Press Care
After pressing:
-
Avoid leather conditioners for 48 hours
-
Do not clean the surface immediately
-
Keep the item dry and flat during curing
Proper curing time helps the adhesive fully stabilize on the leather surface.
For larger production runs, custom patches, or wholesale projects, many businesses use bulk wholesale DTF printing services to maintain consistent transfer quality across leather products.
This workflow works especially well for:
-
Wallet panels
-
Leather patches
-
Journal covers
-
PU leather accessories
-
Custom branding applications using leather transfer paper and DTF transfers
Step-by-Step: Applying UV DTF to Leather Without a Heat Press
UV DTF is one of the safest ways to decorate leather without exposing it to direct heat. Unlike standard DTF transfer on leather applications, UV DTF relies on adhesive bonding and UV curing instead of a heat press.
This method works especially well for:
-
Pre-assembled leather bags
-
Sneakers and shoe panels
-
Keychains
-
Thin faux leather
-
Curved leather surfaces
-
Delicate PU leather items
It is also ideal for hobbyists and small custom businesses that do not want the risks associated with high-temperature pressing.
Materials You’ll Need
Prepare:
-
UV DTF transfer
-
Squeegee or bone folder
-
UV lamp or direct sunlight
-
Transfer tape (optional)
-
Lint-free cloth
-
70% isopropyl alcohol
Unlike traditional DTF workflows that require heat settings like those explained in best temperature for DTF printing, UV DTF skips heat completely.
Step 1: Clean the Leather Surface
Wipe the leather thoroughly using isopropyl alcohol and a lint-free cloth.
This step matters even more with UV DTF because:
-
Oil residue blocks adhesion
-
Moisture causes edge lifting
-
Dust creates trapped air pockets
Allow the surface to dry completely before application.
Step 2: Peel the Backing
Carefully remove the white plastic backing from the UV DTF transfer.
Now the design remains attached to the clear carrier film.
Important:
-
Do not touch the adhesive side
-
Finger oils can weaken adhesion instantly
Step 3: Position the Design Carefully
Align the design slowly before contact.
Once the adhesive touches the leather:
-
Repositioning becomes difficult
-
Stretching can distort the artwork
For curved surfaces like shoe toe boxes:
-
Work from the center outward
-
Apply in small sections gradually
Transfer tape or alignment marks can help improve positioning accuracy, especially for detailed logos.
Step 4: Squeegee the Surface
Place protective paper over the transfer.
Using a squeegee or bone folder:
-
Press firmly from the center outward
-
Push out every air bubble carefully
Do not rush this stage.
An extra 30 seconds here prevents:
-
Silvering
-
Trapped bubbles
-
Weak adhesive zones
These cosmetic defects usually remain visible permanently after curing.
Step 5: Peel the Carrier Film
Slowly roll the clear carrier film back at a 180-degree angle.
If any part lifts:
-
Stop immediately
-
Press the section back down
-
Continue peeling slowly
Fast peeling can stretch or detach small details.
Step 6: UV Cure the Design
Expose the finished application to:
-
A UV lamp
-
Or direct sunlight
Follow the manufacturer’s curing instructions carefully.
Recommended cure window:
-
24–48 hours before heavy use
Avoid during curing:
-
Water exposure
-
Friction
-
Bending
-
Flexing
Rushing the cure process is one of the biggest reasons UV DTF designs peel within the first week of use.
6 Common Problems with DTF on Leather and How to Fix Them
DTF leather applications can fail fast when heat, pressure, or surface prep is even slightly wrong. Unlike fabric, leather reacts permanently to excessive temperature and poor adhesive bonding.
Below are the most common problems in DTF transfer on leather projects and how to fix or prevent them.
Problem 1: Carrier Sheet Imprint on Faux Leather
Cause:
The carrier sheet edge pressed directly into soft PVC or PU leather during heating.
Fix:
-
Cut the transfer film so it extends 1–2 inches beyond the design area
-
This keeps pressure away from visible artwork edges
Prevention:
-
Always place parchment paper above the carrier sheet
-
Avoid direct platen contact with faux leather surfaces
This issue is extremely common on soft synthetic leather products.
Problem 2: Transfer Not Adhering or Edges Lifting
Cause:
Leather oils, conditioners, or wax coatings blocked the adhesive bond.
Fix:
-
Re-clean the area using isopropyl alcohol
-
Allow complete drying before repressing
For already-lifted corners:
-
Apply a tiny amount of leather-safe flexible adhesive using a toothpick
-
Press the edge down carefully
Prevention:
Never skip leather prep. Even clean-looking leather often contains invisible oils.
Problem 3: Bubbling or Blistering During Press
Cause:
-
Excessive heat
-
Moisture trapped inside the leather
-
Overheating synthetic coatings
Fix:
-
Pre-press the leather for 2 seconds before transfer application
-
Lower the press temperature slightly
Important:
-
Faux leather should stay below 250°F at all times
Overheating creates permanent surface distortion quickly.
Problem 4: PU or Faux Leather Surface Delaminating
Cause:
The PVC or PU coating exceeded its heat tolerance and separated from the backing material.
This damage is permanent.
Prevention Only:
-
Follow conservative heat settings carefully
-
Never exceed 250°F on synthetic leather
-
Use medium-light pressure only
Synthetic leather fails much faster than genuine leather under heat.
Problem 5: Transfer Cracking at Flex Points
Cause:
The design was placed on high-flex areas such as:
-
Wallet folds
-
Jacket elbows
-
Shoe crease zones
-
Bag hinge points
DTF adhesive cannot tolerate repeated folding stress on leather surfaces.
Fix for Future Projects:
-
Place designs only on flat, low-flex panels
-
Avoid spine areas and bending zones entirely
Existing cracking cannot be reversed. Protective topcoats may slow additional damage but will not restore the print.
Problem 6: UV DTF Air Bubbles (Silvering)
Cause:
Incomplete squeegee pressure during UV DTF application trapped air beneath the film.
Fix:
-
Use a hard squeegee or bone folder
-
Press each section twice firmly
-
Push trapped bubbles toward the nearest edge before curing
Important:
-
Do not use a credit card
-
Once UV curing finishes, trapped bubbles become permanent
Taking extra time during application prevents most silvering issues completely.
To Wrap Up
Applying DTF transfers on leather requires the right method, proper surface preparation, controlled heat settings, and careful handling during application. Whether you choose standard heat-press DTF or UV DTF for curved and delicate surfaces, understanding leather compatibility and avoiding common mistakes makes a huge difference in durability and final appearance.
For premium-quality custom prints, DTFS.co Custom DTF Transfers offers ready-to-press transfers with vibrant color, strong adhesion, and long-lasting durability for leather products. If you need easy no-heat applications for bags, shoes, or accessories, DTFS.co also provides high-quality UV DTF transfers designed for smooth application and professional results.
FAQs
Can you put DTF on faux leather and leatherette?
Yes. DTF transfers work well on faux leather and leatherette when low heat and light pressure settings are used properly during application.
Can I use heat transfer on faux leather?
Yes, but carefully. Faux leather is heat-sensitive, so temperatures usually need to stay between 230°F–245°F to avoid melting or surface damage.
What temperature should you use to heat press faux leather?
Most faux leather materials work best around 230°F–245°F for 5–8 seconds using medium-light pressure and a parchment or Teflon protective sheet.
What adhesive or transfer method works best on faux leather?
DTF adhesive works very well on faux leather when the surface is cleaned properly. For stickers or decals, strong flexible adhesives and UV DTF transfers provide better long-term adhesion.
Can you print or apply DTF transfers on faux leather at home?
Yes. You can apply DTF transfers at home using a heat press or mini press. Clean the surface first, align the transfer carefully, and always use controlled low heat settings.