
Whether you're running a small Etsy shop or a large custom apparel business, you understand the importance of finding the right custom DTF transfers supplies. Ordering DTF transfers in bulk is a critical decision that involves huge financial risk. And when it comes to a large gang sheet, the financial risk is bigger.
One small mistake in color, sizing, or film quality can lead to wasted garments and lost profit. That’s why a DTF transfer test print is not optional. It’s essential. Smart business owners always test DTF transfers before bulk order to verify print clarity, adhesion strength, and wash durability.
A simple DTF test run helps you evaluate colors, peel quality, and overall finish. It protects your investment. It protects your brand. And most importantly, it ensures your final production run meets professional standards. It prevents reprints, ensures customer trust, and helps you find a reliable supplier for direct to film transfers.
Getting stuck with 100 or 200 bad transfers is a total nightmare that can be avoided by testing the DTF transfer print. This blog provides in-depth guidance on how to perform a DTF transfer test print, what to look for, essential signs of good quality printing, and more.
Why You Should Never Skip a DTF Transfer Test Print
Skipping a DTF transfer test print might seem like a way to save time. It’s not. It’s a risk. Even the best print designs and proper heat presses fail if you choose poor-quality DTF supplies. Issues like peeling, cracking, faded colors, and irregular adhesion are quite common with poor-quality materials.
A bulk order always brings pressure. Especially when you’re printing a full gang sheet. One design error multiplied across dozens of transfers can turn into real financial loss. That’s where a DTF test print sample protects you. Here is why it’s essential:
-
Bulk order anxiety is real. You worry about color vibrancy. You worry about sizing. You worry about how the design will actually look once pressed. A small test run removes doubt. You see the real output. Not just a screen preview.
-
Supplier inconsistency happens. Even good suppliers can have variations in film, powder, or ink batches. A DTF transfer test print lets you check peel strength, edge sharpness, and adhesion before committing to volume.
-
Customer risk is bigger than print cost. If the design cracks after one wash, your reputation suffers. Run a stretch test. Wash it. Check peel strength. Evaluate durability under real conditions.
A simple DTF test print sample gives clarity. It reduces stress. It protects profit. And it ensures your final production run delivers quality you can confidently sell. Whether you want to buy online or look for it locally, a test print is the safest way to get a good deal.
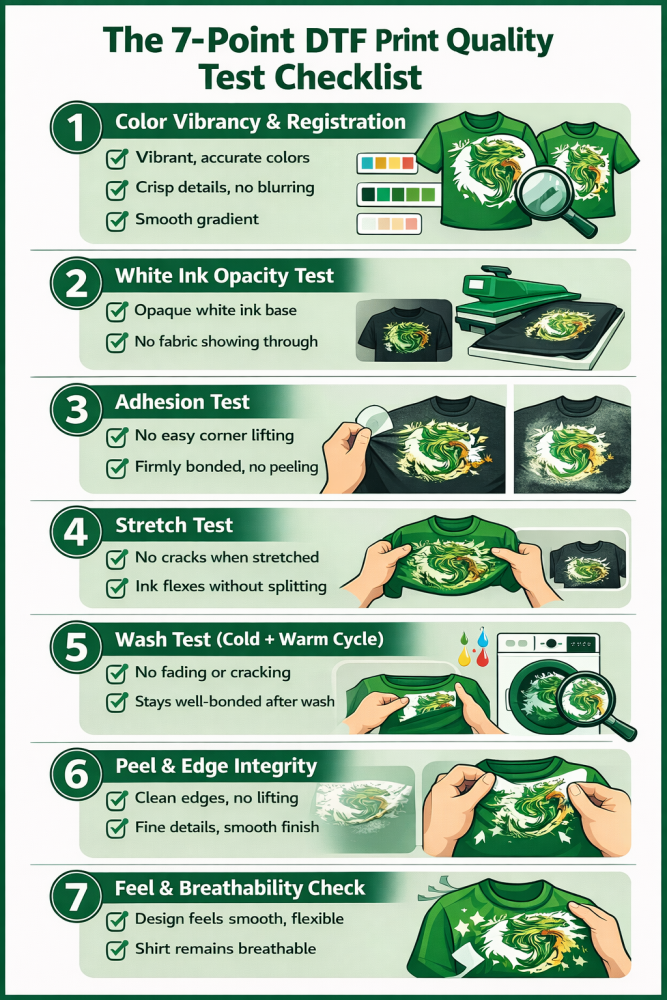
The 7-Point DTF Print Quality Test Checklist
Ordering in bulk without testing is risky. A single flaw can multiply across an entire production run. That’s why every serious apparel business should run a DTF transfer test print before committing to volume. When you test DTF transfers before bulk order, you reduce waste, protect margins, and ensure consistent output.
A DTF transfer quality test need not be a bunch of complicated steps. It must be thorough. Check the complete 7-step DTF print quality checklist that helps you assess the transfer quality for the right decision.
1. Color Vibrancy & Registration
Start with visual impact. Compare the pressed print to your original artwork. Colors should be bold. Balanced. Accurate. Blacks must look deep. Reds must pop. Skin tones must appear natural.
Next, inspect registration. Misalignment between color layers causes blurry edges or ghosting. Look closely at fine details and small text. Edges should be crisp, not doubled.
If gradients appear banded or muted, it may indicate poor ink control or printer calibration issues. A DTF transfer test print reveals these problems early—before they scale into expensive mistakes.
2. White Ink Opacity Test
DTF relies heavily on the white ink layer as a base under the color design. This layer determines brightness and contrast, especially on dark garments.
Press your sample onto a black or deep-colored shirt. If colors appear dull, grayish, or washed out, the white ink layer may be too thin.
Hold the garment under strong light. You should not see fabric color bleeding through the design. Strong opacity ensures vibrant output and professional finish.
Poor white ink coverage is one of the most common reasons businesses test DTF transfers before bulk orders.
3. Adhesion Test
Adhesion determines longevity. After pressing, allow the transfer to cool fully. Then lightly rub the surface. The design should feel bonded, not sitting loosely on the fabric.
Proper bonding depends on quality PET film and consistent TPU adhesive powder application. If edges lift easily, the adhesive layer may be uneven or under-cured.
Gently try to scratch a small hidden corner. It should resist lifting. Weak adhesion leads to early peeling and customer complaints.
A DTF transfer quality test must always include adhesion evaluation.
4. Stretch Test
Fabric stretches. Your print must stretch with it.
Grab both sides of the garment and gently stretch the design area. The print should flex without cracking. No visible splits. No white stress lines.
If cracks appear immediately, the ink layer may be too rigid or over-cured. Stretch durability is essential for athletic wear, fitted shirts, and everyday movement.
This simple stretch test helps confirm flexibility and elasticity before you approve a large order.
5. Wash Test (Cold + Warm Cycle)
A true DTF print quality check includes washing. Once is not enough. Run at least two cycles.
Start with a cold wash. Air dry or tumble dry low. Inspect fading, cracking, or edge lifting.
Then test a warm cycle. This stresses the adhesive and ink layer further. After drying, recheck color vibrancy, edge bonding, and surface texture.
If the design fades, curls, or peels after just one or two washes, it will not survive real customer use. A DTF transfer test print saves you from large-scale returns.
6. Peel & Edge Integrity
Peel quality matters. During pressing, observe how the film releases. A high-quality PET film should peel smoothly—whether hot or cold peel as specified by the supplier.
After peeling, inspect the edges. They should appear clean and sealed. No rough borders. No lifting corners.
Look closely at intricate details. Thin lines and small typography are the first areas to fail if adhesive distribution is uneven.
Edge integrity reflects both printing precision and TPU adhesive powder consistency. This step confirms professional finishing standards.
7. Feel & Breathability Check
Touch the print. It should feel smooth. Not overly thick. Not rubbery or stiff.
Heavy prints reduce garment comfort and breathability. Customers notice that immediately.
Run your hand across the surface. Does it feel flexible? Does it move naturally with the fabric? A properly balanced white ink layer and adhesive coating create a soft yet durable finish.
If the design feels like plastic sitting on top of the shirt, reconsider before scaling production. Comfort directly affects repeat purchases.
A DTF transfer test print is not an extra step. It is a smart business practice. Such a test allows you to verify color vibrancy, opacity, adhesion strength, flexibility, wash durability, peel performance, and comfort.
Skipping this DTF transfer quality test can cost weeks in reprints, refunds, and lost trust.
How to Test DTF Transfers on Different Fabrics
Not all fabrics behave the same. A design that looks perfect on one shirt may fail on another. That’s why knowing how to test DTF transfers across materials is critical before scaling production. A proper DTF sample print helps you evaluate adhesion, flexibility, and long-term wear. If you want to understand how to test DTF durability, you must test under real conditions—on real fabrics.
Here’s how to approach each major fabric type.
1. Testing on 100% Cotton
Printing on 100% cotton is common and forgiving. Cotton absorbs heat well and usually bonds strongly with DTF transfers.
Start with a standard press temperature recommended by your supplier. After pressing, let it cool fully before peeling. Check edge bonding and surface smoothness.
Next, perform a stretch test. Cotton stretches moderately, so your design should flex without cracking. Then run a wash test—cold cycle first. Inspect fading or lifting.
Cotton is ideal for evaluating base adhesion. If a DTF sample print fails here, it will likely fail elsewhere. This is your control fabric.
2. Testing on Polyester
Polyester behaves differently. It holds less moisture and can be heat-sensitive. Lower your press temperature slightly if recommended.
When testing on polyester, especially performance wear, watch for dye migration. On dark garments, heat can cause fabric dye to bleed into the white ink layer. Inspect whites carefully after pressing and again after washing.
Check flexibility. Performance wear stretches more than cotton. Your design must stretch without cracking or separating.
If you want to know how to test DTF durability properly, polyester testing is essential. It reveals stretch resistance and heat stability issues quickly.
3. Testing on Cotton-Poly Blends
Cotton-poly blends combine the properties of both fibers. They are common in retail apparel.
Press at balanced temperature settings. Not too high. Not too low. After pressing, inspect for proper adhesion and smooth edges.
Because blends often have moderate stretch, perform both stretch and wash tests. Pay attention to surface feel. The print should not feel stiff or overly plastic-like.
Blends are often where inconsistencies show up. That’s why a DTF sample print on cotton-poly blends gives you a realistic idea of everyday performance.
4. Testing on Hoodies
Hoodies introduce thickness and texture. Fleece interiors and heavy fabric weight require slight adjustments.
Pre-press first to remove moisture. Then apply the transfer with firm, even pressure. Ensure the press distributes heat evenly across the thicker surface.
After peeling, inspect edges carefully. Thick garments can cause uneven pressure, leading to partial bonding. Perform a strong stretch test around seams and chest areas.
Wash and dry the hoodie fully. Check for cracking, peeling, or fading. Heavy garments experience friction and folding. Durability matters more here.
Final Tip: When learning how to test DTF transfers, never rely on one fabric alone. Run your DTF sample print on 100% cotton, polyester, cotton-poly blends, and hoodies. Stretch it. Wash it. Inspect it. That’s how to test DTF durability the right way.
![]()
Test Print vs Full Gang Sheet – What to Order First
When starting with a new supplier, don’t jump straight into full gang sheet printing. Start small. Always. A DTF sample print gives you clarity before you invest in volume. If you're learning how to test DTF transfers, this is the safest first step.
A single test print lets you evaluate color accuracy, adhesion, and finish on different fabrics like cotton, polyester, blends, and hoodies. Press it on 100% cotton first. Then try polyester to check stretch and heat response. Test on blends for balanced performance. Finally, apply it to hoodies to examine pressure consistency and edge bonding.
If the sample passes stretch and wash checks, then scale up. That’s how to test DTF durability without risking a large order.
A full gang sheet is cost-effective—but only after validation. Test first. Approve quality. Then go big with confidence.
Red Flags That Mean “Do Not Order Bulk”
A bulk order should only happen after a proper DTF transfer test print. If you notice warning signs during testing, stop immediately. Test DTF transfers before bulk printing orders to avoid expensive mistakes.
Here are clear red flags you should never ignore:
Uneven White Base
If the white layer looks patchy or thin in areas, that’s a problem. Colors may appear dull or inconsistent, especially on dark garments. An uneven base leads to fading and poor opacity after washing.
Powder Residue
Excess adhesive powder left around the design means poor curing. It can create rough edges and weak bonding. This affects durability and overall finish.
Glossy, Thick Feel
DTF prints should feel smooth, not plastic-like. A heavy, overly glossy surface often signals too much ink or adhesive. That reduces breathability and comfort.
Cracking on First Stretch
If the design cracks during the first stretch test, do not proceed. This indicates weak flexibility and poor long-term wear.
Inconsistent Edges
Lifting corners or rough borders suggests weak adhesion. Edges are the first point of failure. If your DTF transfer test print shows any of these issues, fix the supplier—not the order size.
DTF Transfer Test Print: How to Perform Testing
A proper DTF transfer test print should follow a clear process. Rushing leads to missed flaws.
-
Start with visual inspection. Check color accuracy, sharpness, and alignment. Look closely at edges and fine details. A solid DTF print quality check begins with how the design looks before any stress testing.
-
Next comes quality and durability testing. Perform a stretch test. Run cold and warm wash cycles. Inspect for cracking, peeling, fading, or edge lifting. This step confirms real-world performance. A complete DTF transfer quality test must evaluate adhesion, flexibility, and surface feel.
-
Finally, conduct supplier testing. Compare samples from different vendors. Review consistency across multiple prints. Reliable suppliers produce stable results every time.
Conclusion
A DTF transfer test print is not optional—it’s essential. From visual checks to wash and stretch testing, every DTF print quality check protects your investment. When you test before buying in bulk, you reduce risk, prevent waste, and maintain customer trust. Choosing the right supplier plays a critical role in long-term success. Quality film, strong adhesion, and consistent output matter.
At DTFS, we provide high-quality DTF printing with reliable bulk options. Every order is produced with precision and consistency, making your DTF transfer quality test smooth and stress-free. Test small. Scale confidently. Print with certainty.
FAQs
1. How do I test a DTF transfer before bulk ordering?
Order a DTF transfer test print first and run stretch, wash, and adhesion checks before committing to volume.
2. What should I check in a DTF test print?
Check color accuracy, white ink opacity, edge bonding, peel strength, and cracking after the first stretch.
3. How can I verify DTF transfer quality and compare suppliers?
Request samples from multiple vendors and compare vibrancy, adhesion, durability, and consistency across prints.
4. Why do some DTF transfers peel or crack after washing?
Peeling usually comes from weak adhesive or incorrect press settings; cracking often indicates poor flexibility or curing.
5. What temperature and pressure should DTF transfers be pressed at?
Most DTF transfers press at 300–325°F for 10–15 seconds with medium to firm pressure, but always follow supplier guidelines.
6. Should I test a gang sheet before placing a large order?
Yes. Large gang sheets increase financial risk, so always test a smaller version first to evaluate alignment and fine details.
7. Does DTF work on cotton, polyester, and hoodies?
Yes, but always test on each fabric type to check adhesion, stretch performance, and durability—especially on dark garments and performance wear.