
Custom hats are one of the fastest-growing segments in apparel printing right now, and DTF hat transfers are making the process easier for brands, print shops, Etsy sellers, and merch businesses. But hats are tricky. Curved panels, center seams, polyester fabrics, and uneven pressure can quickly ruin a transfer if your setup is wrong.
This guide breaks down everything you need to know about DTF on hats, including proper placement, temperature settings, pressing techniques, equipment setups, seam troubleshooting, and common adhesion problems. Whether you’re applying DTF transfers on hats at home or running commercial cap production, this blog helps you get cleaner prints, stronger adhesion, and more professional results without wasting hats or transfers.
Quick Reference: DTF Hat Pressing Settings Matrix
Getting clean and durable DTF hat transfers depends on using the correct temperature, pressure, and pressing time for different hat materials. The quick-reference matrix below helps you avoid scorching, peeling, uneven adhesion, and press marks while applying DTF transfers on trucker hats, cotton caps, polyester hats, and structured headwear.
Anatomy of Headwear vs. DTF Adhesion: Why Hats Trip Up Printers
Applying Custom DTF Transfers on hats is very different from pressing transfers onto flat t-shirts. Hats introduce curves, seams, stiff panels, uneven pressure zones, and heat retention problems that can quickly ruin a transfer if your setup is wrong. Many beginners assume DTF transfers on hats behave the same as chest prints, but headwear requires a completely different approach.
The Curvature Challenge
The biggest problem with DTF on hats is curvature. A flat DTF transfer film must wrap smoothly around a rounded crown surface during pressing.
If the transfer bridges over gaps instead of conforming tightly to the hat surface, you get:
-
Wrinkled film
-
Uneven adhesion
-
Lifted corners
-
Distorted graphics
-
Cracking around curved edges
This is why flatbed thinking fails on headwear. Hat presses must distribute pressure evenly across curved surfaces while keeping the transfer aligned correctly.
Even small placement shifts become obvious on hats because the design sits directly at eye level.
Structured vs. Unstructured Crowns
Not all hats react to heat the same way.
Structured hats contain internal buckram — a stiff fabric layer inside the front crown panel. This stiffener helps the hat hold its shape, but it also traps heat longer during pressing.
That changes your dwell time significantly.
Structured hats:
-
Retain heat longer
-
Require slightly shorter repress cycles
-
Risk scorching under excessive heat
-
Hold flatter transfer surfaces better
Unstructured hats:
-
Flex more during pressing
-
Need gentler pressure
-
Cool faster
-
Are more prone to wrinkles and uneven adhesion
Understanding crown construction is critical when applying DTF transfers on hats consistently across different cap styles.
Sizing Boundaries by Hat Style
Hat artwork sizing matters more than most people realize. Oversized transfers distort badly across curved panels.
Recommended safe print zones:
Keeping designs inside these boundaries helps maintain clean adhesion, proper readability, and long-term durability on curved headwear surfaces.
Required Equipment & Desktop Workarounds
Getting clean and durable DTF hat transfers depends heavily on the equipment you use. Hats are not flat garments, so standard t-shirt pressing setups often create uneven pressure, wrinkled transfers, or lifted edges. The right tools make a massive difference when applying DTF on hats consistently.
The Professional Setup
Professional print shops usually rely on curved platen cap presses specifically designed for headwear. These presses use a rounded lower platen that matches the natural shape of the hat crown.
This helps:
-
Maintain even pressure across curved surfaces
-
Reduce transfer wrinkling
-
Improve edge adhesion
-
Prevent design distortion
High-end cap presses also include:
-
Adjustable lower tensioning levers
-
Better heat distribution
-
Stable crown positioning
-
More accurate pressure control
For structured trucker hats and bulk production, curved platen presses remain the most reliable setup for DTF transfers on hats.
The Craft or Small-Shop Setup
Small shops and hobbyists often use handheld mini heat presses instead of full cap presses. While this works, the biggest challenge becomes creating proper counter-pressure inside the hat crown.
One popular workaround is the “Tailor’s Ham” method.
This involves inserting:
-
A tightly rolled canvas towel
-
A pressing ham
-
Dense foam support
-
Curved internal support blocks
inside the hat before pressing.
The goal is simple:
Create resistance underneath the crown so the transfer receives consistent pressure during heating.
Without internal support, the crown collapses during pressing and causes poor adhesion.
Crucial Accessories
Several small accessories dramatically improve DTF on hats results.
Important tools include:
-
High-tensile heat-resistant tape to stop transfer shifting
-
Foam heat-press pillows for seam balancing
-
Parchment paper for surface protection
-
Heavy silicone guard sheets for even heat distribution
These accessories help:
-
Prevent scorch marks
-
Reduce platen lines
-
Improve pressure consistency
-
Protect delicate hat materials
Even experienced printers use these tools daily because hat pressing leaves very little room for error.
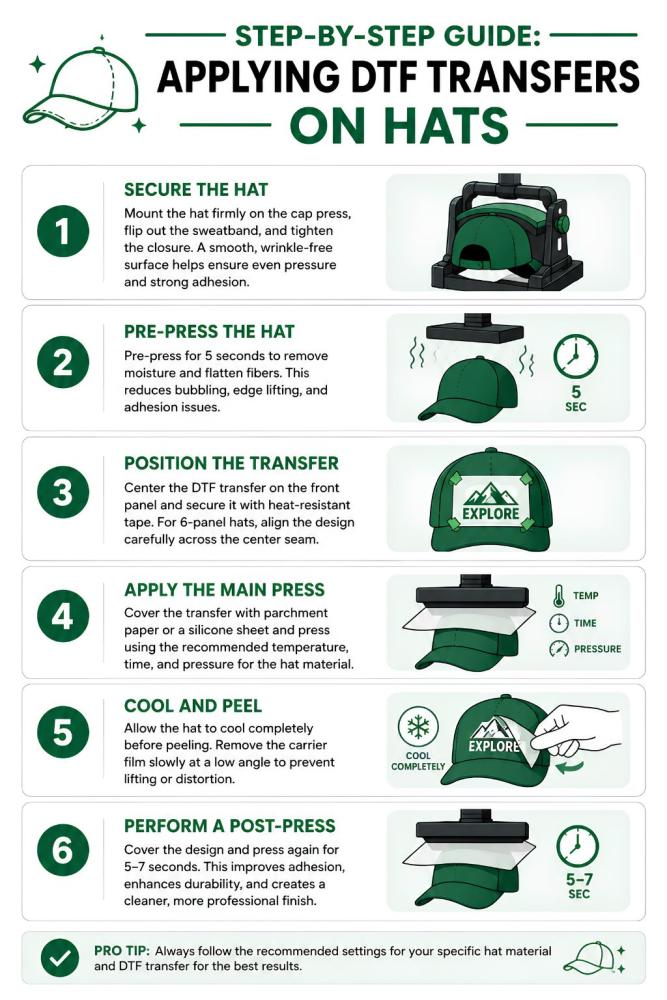
Step-by-Step Procedure: Applying DTF to Standard Hats
Applying DTF on hats successfully is all about pressure control, crown tension, moisture removal, and careful peeling. Hats behave very differently from flat garments because the curved front panel changes how heat and adhesive interact during pressing. Missing even one small step can cause wrinkling, bubbling, seam lifting, or edge failure.
Following a structured process helps create durable, clean-looking DTF hat transfers with strong adhesion and professional finish quality.
1. Load and Tension the Cap
Prep Stage
Start by preparing the hat correctly before any heat touches the fabric.
First:
-
Flip the inner sweatband fully outward
-
Remove hidden wrinkles inside the crown
-
Mount the hat securely onto the curved lower platen
The front panel must sit completely flat against the pressing surface.
Next:
-
Pull the rear strap or snapback closure tightly
-
Lock the tensioning lever firmly into place
-
Smooth the front panel by hand
The goal is creating a taut pressing surface without internal folds.
If the crown shifts during pressing:
-
The transfer may wrinkle
-
Air pockets form underneath
-
Edges may fail immediately
Structured hats usually tension more easily because the buckram stiffener helps flatten the crown.
2. The Moisture Evaporation Pre-Press
5 Seconds
Before applying the transfer, pre-press the bare hat panel for about 5 seconds.
You can:
-
Hover the upper platen closely
-
Or apply a very light direct press
This step matters more than most beginners realize.
Pre-pressing helps:
-
Remove trapped moisture
-
Flatten structural fibers
-
Stabilize crown tension
-
Eliminate microscopic steam pockets
Those hidden moisture pockets are one of the biggest causes of:
-
Weak adhesion
-
Bubbling
-
Silvering
-
Immediate edge lifting
For polyester hats, moisture removal becomes even more important because synthetic fibers trap heat differently than cotton.
3. Position and Secure the Film
Alignment
Now align the transfer carefully on the front panel.
Center the artwork visually before taping.
For 6-panel hats:
-
Ensure the transfer bridges the center seam smoothly
-
Avoid bowing or folding across the seam ridge
Poor seam alignment is one of the biggest causes of distorted DTF transfers on hats.
Once aligned:
-
Secure the transfer firmly using high-tensile thermal tape
-
Tape at least three sides
-
Prevent any movement during press closure
Even tiny film shifts during pressing can blur details or create ghosting.
If you are producing multiple hat designs together, many shops organize artwork using gang sheet printing to improve material efficiency and speed up production.
For cleaner edges and sharper logo detail, properly prepared vector artwork also matters. Many commercial printers use artwork setup and vectorization services before creating DTF transfers for curved hat surfaces.
4. The Primary Adhesive Press
Thermal Bonding
Place:
-
Parchment paper
-
Or a silicone guard sheet
over the transfer before pressing.
This protects:
-
The transfer surface
-
The hat fabric
-
The upper platen
Now apply the primary press using the exact temperature and timing recommended for the hat material.
For example:
-
Structured cotton canvas hats often press around 310°F
-
Polyester hats may require slightly lower temperatures
During pressing:
-
Bring the platen straight down
-
Avoid rocking or sliding
-
Maintain even pressure
Uneven force distribution creates partial adhesion zones that later crack or peel.
5. The Cool-Down and Precise Peel
Cooling Stage
After pressing:
-
Remove the hat carefully
-
Allow it to cool completely
Do not rush this step.
The transfer should feel fully cold to the touch before peeling.
Now peel the carrier film:
-
Slowly
-
At a sharp 180-degree angle
-
Keeping the film low and flat against the surface
Watch closely during peeling.
If any edge lifting appears:
-
Stop immediately
-
Lay the film back down
-
Spot press for another 5 seconds
Fast peeling is one of the easiest ways to ruin small lettering and fine details on DTF hat transfers.
6. The Finishing Post-Press
The Matte Finish
Once the carrier film is removed:
-
Place parchment paper
-
Or a textured finishing sheet
directly over the exposed design.
Now perform a final press for:
-
5–7 seconds
This finishing press helps:
-
Embed the adhesive deeper into the fabric grain
-
Lock down outer edges permanently
-
Improve wash durability
-
Remove excess plastic sheen
The result looks:
-
Cleaner
-
Softer
-
More professional
This final step is often what separates hobby-quality DTF on hats from true commercial-quality production results.
How to Fix Cracking the “6-Panel Mid-Seam” Problem
One of the biggest DTF transfer adhesion problems caps printers face happens on structured 6-panel hats. The center seam creates a raised ridge directly under the artwork, making even pressure almost impossible during pressing. This issue causes lifting, cracking, bubbling, and incomplete adhesion right along the middle of the design.
The Root Cause
The problem comes from geometry.
A flat DTF film tries to bridge across a raised vertical seam. During pressing, the platen touches the ridge first, leaving microscopic air gaps on both sides of the seam trench.
That means:
-
Uneven adhesive bonding
-
Weak pressure zones
-
Partial heat transfer
-
Cracking directly along the center seam
This is one of the most common failures in DTF printing on caps.
The Solution
Professional hat decorators use several techniques together to solve this problem.
Use Internal Foam Support
Place:
-
A high-density foam heat pillow
-
Or compact foam insert
inside or directly beneath the front crown panel.
This helps push the fabric upward into the seam gaps for more consistent pressure.
The Precision Crease Technique
Before pressing DTF on 6-panel hats:
-
Lightly score or fold only the transparent film margins along the seam line
Do not crease the printed artwork itself.
This gives the transfer film extra flexibility so it can conform deeper into the seam channel.
Manual Seam Finishing
During the finishing press:
-
Use the edge of a mini iron or handheld heat tool
-
Run carefully along the vertical trench
This manually forces adhesive contact directly into the seam area where standard platens often fail.
Preventing and Fixing Common DTF Hat Failures
Even experienced printers run into problems with DTF on hats. Curved surfaces, synthetic fabrics, and uneven pressure make hats far less forgiving than flat garments. The good news is most failures are preventable once you understand the root cause.
How to Avoid the “Heat Press Ring” on Polyester Caps
Polyester hats easily develop shiny press marks or circular platen outlines when the temperature is too high.
To reduce heat press rings:
-
Lower the pressing temperature to around 285°F
-
Use a thicker silicone pad to spread edge pressure evenly
-
Avoid excessive pressure on soft crown panels
This helps prevent gloss marks and crushed fabric texture on lightweight caps.
Adhesive Powder Bleeding
Glue halos around graphics usually happen because excess adhesive powder remains attached to the transfer film before curing.
To prevent adhesive bleeding:
-
Shake excess powder aggressively during curing
-
Use anti-static prep before printing
-
Keep the film surface dust-free
-
Avoid over-powdering fine artwork
Cleaner powder application creates sharper edges and more professional DTF printing on caps.
Dye Migration on Synthetic Fabrics
Dark polyester hats often release dye when exposed to heat. That dye migrates upward into white ink layers, causing discoloration or pinkish staining.
The best solution is using:
-
Carbon-backed block-out DTF films
-
Low-bleed adhesive systems
-
Reduced application temperatures when possible
These specialty films create a barrier that blocks dye migration and keeps white graphics bright on synthetic headwear.
Final Thought
Applying DTF on hats requires much more precision than standard garment printing, but the results can look incredibly clean and professional when done correctly. Proper crown tension, controlled heat settings, seam management, and finishing presses all play a major role in long-term durability.
Whether you are working with structured trucker caps, dad hats, or polyester performance headwear, understanding common DTF transfer adhesion problems helps prevent costly failures.
Using the right equipment, correct pressure techniques, and high-quality transfers makes DTF printing on caps far more reliable, scalable, and profitable for custom apparel brands, print shops, and small businesses.