
So, you have got your DTF transfer and are now looking forward to putting it on your t-shirt, team uniform, brand merchandise, or custom apparel. Great. But applying the direct to film transfers to your garment can be tricky, especially if you don’t have any prior experience.
It’s not about just putting the transfer on the shirt and heat-pressing. It’s not that simple, knowing the right process, temperature, and time matters a lot for cleaner, sharper, and quality output. And that’s when understanding how to use DTF transfers is essential.
In this guide, we are going to give the simple tips, step-by-step instructions, and best practices on how do you put a DTF transfer on a shirt, merch, uniform, or any other garment. This will help you complete the process accurately and safely to get professional results.
Let’s get started without further ado!
A Quick Overview of DTF Transfer Printing: Things You Must Know
Direct to Film (DTF) printing has opened new possibilities for businesses, brands, and hobbyists alike. It offers high-quality, vibrant prints with a dead-simple printing technique. Being a versatile printing method, it’s widely adopted for various colors, materials, and fabrics like cotton, denim, blend, nylon, polyester, and leather.
You don’t have to invest in printers, curing machine, and other equipment to start DTF transfer printing. You can order custom DTF transfers and heat-press them onto garments while avoiding equipment purchases and maintenance. While the DTF printing process is not complex, understanding the right technique is crucial for quality print results.
Transferring the DTF prints to your garment depends on a heat-activated chemical bond. So, precision plays a vital role in it. Whether you use a household iron or a commercial heat press, applying the right pressure and temperature gives you professional, durable results.
The following table shows the different temperatures and pressing time used for different fabrics in DTF transfer printing based on different heat press equipment.
|
Equipment |
Fabric Type |
Temperature |
Time |
Pressure |
|
Industrial Heat Press |
100% Cotton |
302°F – 330°F (150°C – 165°C) |
12–15 sec |
Firm (40–50 PSI) |
|
Industrial Heat Press |
Polyester / Blends |
275°F – 295°F (135°C – 145°C) |
8–12 sec |
Medium (30 PSI) |
|
Cricut EasyPress |
All Fabrics |
320°F (160°C) |
20–25 sec |
Very Firm (Manual) |
|
Home Iron |
Cotton Only |
"Cotton" Setting |
25–30 sec |
Maximum Body Weight |
|
Hat Press |
Structured Caps |
295°F – 310°F (145°C – 155°C) |
10–12 sec |
Medium-Firm |
When it comes to putting DTF transfers on shirts or other apparel, the material type also plays an important role. Different fabrics have different heat-tolerance and “melting points” that require adjusting heat and timeframe for pressing. So, how do you put a DTF transfer on a shirt varies with how do you put the transfer on a performance wear.
For example, you need different temperatures to press a polyester gym shirt than a heavy cotton hoodie. The following table shows the temperature, timing, and pressure depending on a specific type of apparel.
Related: What is the Best Temperature for DTF Printing?
|
Apparel Type |
Material |
Temperature |
Time |
Pressure |
|
Standard T-Shirts |
100% Cotton |
311°F - 320°F (155°C – 160°C) |
12–15 sec |
Firm |
|
Performance Tees |
100% Polyester |
275°F - 284°F(135°C – 140°C) |
8–10 sec |
Medium |
|
Polo Shirts |
Pique / Blends |
302°F (150°C) |
12 sec |
Medium-Firm |
|
Hoodies/Sweats |
Heavy Fleece |
320°F (160°C) |
15–18 sec |
Very Firm |
|
Tote Bags |
Canvas |
329°F (165°C) |
20 sec |
Firm |
|
Caps/Hats |
Structured Twill |
293°F - 302°F (145°C – 150°C) |
10–12 sec |
Medium |
What You Need Before DTF Transfer Printing and Applying?
Before you apply DTF transfer to your shirts or other apparel, there are several steps that are performed like printing, powdering, and curing. Each of these steps require different equipment and tools. However, the tools and equipment you will use depends on the phase you are on in DTF printing. For example, print shops need every tool from printing to pressing but hobbyists need tools used during the application. Let’s check out the required tools and equipment at different phases of DTF printing.
1. The Printing Phase (Creation)
If you are making your own transfers rather than buying them "ready-to-press," these are the core requirements:
The Hardware
-
DTF Printer: Unlike standard printers, these are built with a White Ink Circulation System. Without this, the heavy white pigment would settle and clog the printheads within hours.
-
RIP Software (Raster Image Processor): Standard print drivers can't handle DTF. You need software like CADlink Digital Factory or AcroRip to tell the printer exactly where to lay the CMYK colors and the white underbase.
-
Curing Oven or Powder Shaker: Once the ink is wet on the film, you apply adhesive powder. This powder must be "cured" (melted) using a specialized DTF oven or an automated shaker/dryer unit.
The Consumables
-
PET Transfer Film: This is a specially coated plastic sheet (available in rolls or A3/A4 sheets) that holds the ink until it's transferred.
-
DTF Specialized Inks: You need Cyan, Magenta, Yellow, Black, and a high-opacity White ink.
-
TPU Adhesive Powder: The "glue" of the operation. It comes in white (for light/dark clothes) or black (to prevent dye migration on dark polyester).
2. The Application Phase (Transferring)
This is where the "magic" happens. This phase specifically applies if you have bought pre-printed DTF transfers. After having them, you just need to understand how to use DTF transfers to apply the print on your shirt or other apparel. You need the following equipment/tools.
The Heavy Lift
-
Heat Press Machine: A high-quality industrial heat press is crucial for professional results. It must provide consistent heat and, more importantly, Firm Pressure.
-
Tip: If you need professional work, then avoid cheap "home irons" because they lack the pressure needed to drive the adhesive into the fabric fibers.
-
Infrared Thermometer: You can use a digital thermometer, but it’s often less reliable. Use a laser thermometer to ensure the platen is actually hitting your target temperature (e.g., 320°F).
The Critical Accessories
-
Teflon Sheets or Parchment Paper: These act as a heat shield, preventing the film from sticking to the metal plate and protecting the garment from scorching.
-
Heat Press Pillow: Essential for hoodies, polos, or anything with seams/zippers. It "lifts" the print area so the heat press makes flat contact.
-
Lint Roller: A single piece of lint trapped under a transfer can cause a bump or a hole in the design after the first wash.
-
Heat Tape: High-temperature resistant tape to keep your design perfectly centered so it doesn't "ghost" or shift when you close the press.
3. The Workspace Requirements
-
Ventilation: The process of curing adhesive powder releases fumes. You should always work in a well-ventilated area or use a fume extractor.
-
Climate Control: DTF ink is sensitive to humidity. Ideally, keep your workspace between 40% – 60% humidity to prevent the white ink from drying out or the powder from clumping.
How to Apply a DTF Transfer on Shirts: Step-by-Step Instructions
There are many steps to apply DTF prints for shirts and other apparel. Carefully following these steps will help you apply design to your shirts or apparel. Let’s check out these steps.
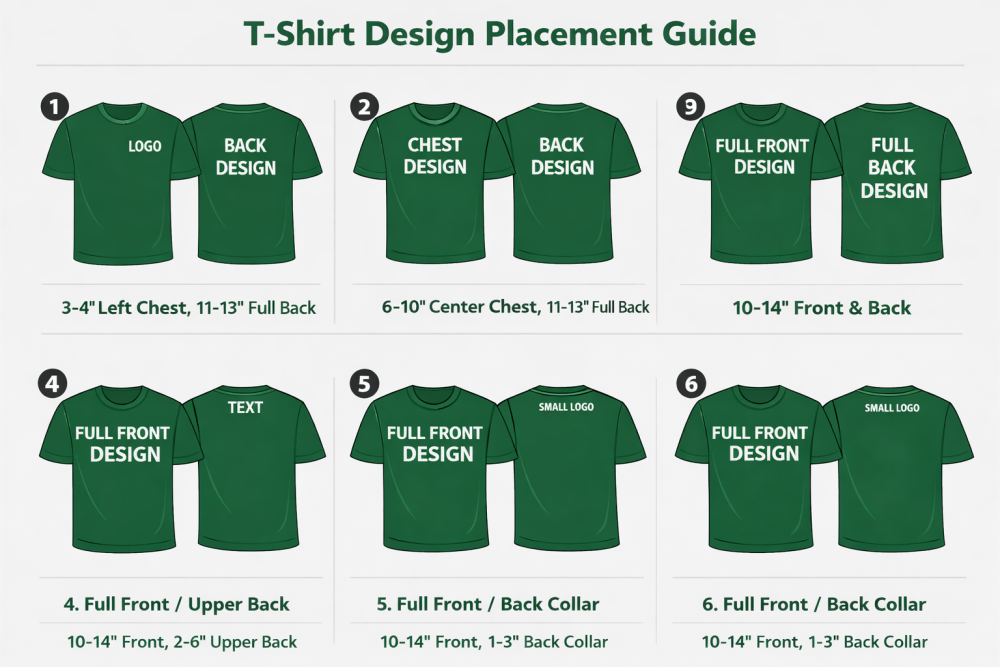
Step 1: Design Placement
First things first, start by deciding where you want to place your design on the shirt. Maybe you want to press DTF on the front and the back. Then you can try different combinations of design placement on your garment. For one side of the t-shirt, there can be placements like full front, left chest, center chest, upper back, etc.
The following images show the different placements for the design for both front and back.
Step 2. Preparation & Pre-Press
Before the transfer touches the fabric, you must remove the "hidden enemies": moisture and wrinkles. This ensures smooth DTF prints for shirts and apparel. There are ways to do this.
-
The Pre-Press: Flatten the garment on the press and heat it for 3–5 seconds. This evaporates trapped moisture that can prevent the adhesive from bonding correctly.
-
Clean the Surface: Use a lint roller to remove any stray fibers or dust that could get trapped under the ink.
Step 3: Alignment & First Press
Now is the time to apply the heat press to transfer the DTF design to your shirt. Position your transfer with the printed side (the white/adhesive side) facing down on the garment. Put parchment paper or teflon sheet on the transfer, then press at the optimal temperature.
This is a crucial step in your “how do you put a DTF transfer on a shirt” query that must be executed precisely.
This step is also crucial to ensure proper bonding with the fabric and avoid DTF transfer cracking or peeling after multiple washes.
Settings:
-
Cotton: 150°C – 160°C (300°F – 320°F) for 12–15 seconds. And for Polyester: 140°C – 145°C (285°F – 295°F) for 8–10 seconds to avoid scorching.
Pressure: Use medium-firm pressure. If the press closes too easily, tighten the pressure knob.
Step 3. The Peeling
Check whether your film is Hot Peel or Cold Peel. Carefully remove the backing of your transfer. You can use an air blower.
-
Cold Peel: Remove the garment from the press and let it cool completely to the touch before peeling.
-
Hot Peel: Remove the film immediately (within 2–3 seconds) while it is still warm.
Technique: Peel in one smooth, steady motion at a 45-degree angle. Never "yank" the film upward.
Step 4. The "Finishing" Second Press
This is what separates professionals from amateurs. A second press locks the design into the fibers and removes the "plastic" feel.
Place the garment back on the press. Cover the design with a Teflon sheet (for a glossy finish) or parchment paper (for a matte finish).
Press for another 5–10 seconds. This ensures the edges are fully sealed and significantly improves wash durability.
This second press ensures durability, reduces shine, and improves softness.
Essential Tips for DTF Transfer Printing
When you are learning how to use DTF transfers, the difference between a "good" shirt and a "professional" one often comes down to the small details that most people overlook.
Applying DTF prints for shirts isn't just about heat; it’s about environment, timing, and choosing the right allies in your production process.
To ensure your prints don't crack, peel, or fade after the first wash, keep these essential tips in mind.
Choose the Right DTF Transfer Partner
If you aren't printing the films yourself, your success depends entirely on the quality of the transfers you order. Not all DTF prints are created equal.
-
Look for High-Opacity White: A great partner uses high-quality white ink that acts as a solid "underbase." If the white layer is too thin, the color of your shirt will bleed through the design, making it look dull.
-
Stretch and Feel: Ask for samples. The best transfers should feel soft to the touch (not like a thick plastic sheet) and should stretch with the fabric without cracking.
-
Consistency is Key: Ensure your partner uses consistent TPU adhesive powder so you don't have to guess your heat settings every time a new batch arrives.
Verify Your Heat
As we discussed, heat presses can be temperamental. Digital displays often drift over time.
-
The "Cold Spot" Check: Periodically check all four corners and the center of your heating platen with a thermometer. If one corner is 15°F cooler than the center, your transfer might peel in that specific spot.
-
Ambient Conditions: If you are working in a very cold room or a garage in winter, your garment will absorb some of that initial heat. Increase your pre-press time by a few seconds to "warm up" the fabric fibers.
Master the "Moisture Escape"
Moisture is the silent killer of DTF adhesion. If there is water vapor trapped in the cotton fibers when the adhesive melts, it creates tiny bubbles that prevent a permanent bond.
-
The 5-Second Rule: Never skip the pre-press. Watch for the "steam" rising off the shirt. If you see steam, the moisture is leaving—which is exactly what you want.
-
Post-Press Breathability: After the final press, let the garment lay flat for a minute. Folding it immediately can trap heat and moisture, potentially affecting the "set" of the ink.
Alignment and Placement Hacks
Nothing ruins a great print like a "crooked" logo.
-
The "Three Finger" Rule: For standard crew neck T-shirts, the top of the design should generally sit about three fingers (2.5 to 3 inches) below the collar.
-
Use Heat Tape: If you are doing a chest pocket or a sleeve, use high-temp heat tape. The "pop" of the heat press opening can sometimes shift the film, leading to a blurry "ghosting" effect on the edges.
The "Finish" is Everything
The second press (the finishing press) is your chance to define the texture of the shirt.
-
Matte Finish: Use parchment paper for the second press to give the design a flat, screen-printed look.
-
Glossy Finish: Use a Teflon sheet if you want the colors to "pop" with a slight shine.
-
Soft Hand-Feel: For the softest possible feel, try pressing with a textured "finishing sheet" or a piece of cotton fabric over the design for the final 5 seconds. This pushes the ink deeper into the weave.
Best Practices for DTF Printing to Ensure Smooth Transfer of Design
Achieving a flawless bond between your design and the fabric requires more than just heat; it requires consistency. To ensure your DTF prints for shirts look professional and stand the test of time, follow these industry best practices:
-
Maintain Humidity Control: Keep your workspace between 40% – 60% humidity to prevent ink from clogging the printhead or the adhesive powder from clumping.
-
Always Perform a Pre-Press: Press your garment for 5 seconds before applying the film to remove hidden moisture and wrinkles that interfere with adhesion.
-
Check Your Pressure: Use a "firm" setting where the press requires significant effort to lock; light pressure is the leading cause of prints peeling after a wash.
-
Verify Film Peel Type: Always confirm if your film is Hot Peel or Cold Peel, as peeling at the wrong temperature can tear the design or leave jagged edges.
-
Execute a Finishing Press: After removing the film, press the design a second time for 5–10 seconds with a finishing sheet to lock the ink into the fabric fibers.
-
Use High-Quality TPU Powder: Ensure your adhesive powder is evenly applied and fully cured to a "sugar-like" texture to prevent the design from feeling stiff or rubbery.
-
Wait Before Washing: Instruct users to wait at least 24 hours before the first wash to allow the chemical bond to reach maximum strength.
In a Nutshell
Mastering how do you put a DTF transfer on a shirt is a game-changer for anyone looking to create high-quality, durable custom apparel. While the process may seem daunting at first, success lies in the details: precise temperature control, firm pressure, and a bit of patience during the peeling phase.
By following the right steps and using professional-grade tools, you can transform a simple garment into a retail-ready product that stands the test of time. Whether you’re building a brand or crafting unique gifts, DTF technology offers the versatility and vibrancy needed to bring any vision to life.
FAQs
1- Why is my DTF transfer peeling after the first wash?
Peeling is usually caused by insufficient pressure or trapped moisture. Always do a 5-second pre-press to dry the fabric and use firm pressure to drive the adhesive deep into the fibers for a permanent bond.
2- Can I use a regular home iron for DTF prints?
Yes, but it's less reliable. Because irons have uneven heat and steam holes, you must use maximum body weight, turn off all steam, and increase pressing time to 25–30 seconds to compensate for the lack of a mechanical press.
3- What is the difference between Hot Peel and Cold Peel?
Hot Peel films are removed immediately (within 2–3 seconds) while the design is still warm. Cold Peel films must cool completely to the touch before removal; peeling them while hot will cause the design to lift and ruin the print.
4- Do I really need a "second press"?
Yes. The finishing press is vital for durability. It flattens the ink into the fabric weave, removing the "rubbery" texture and sealing the edges so the design doesn't crack or lift over time.
5- Why are the colors on my polyester shirt bleeding into the print?
This is dye migration, where fabric dye turns into gas and tints your ink. To stop this, lower your temperature to 275°F (135°C) and use a specialized anti-migration adhesive powder.