

DTF is a versatile printing method used for a wide range of materials. From jackets to jeans, you can customize your apparel seamlessly with this printing method. DTF printing on denim has become increasingly popular because it allows businesses, brands, and creators to add vibrant, full-color designs to rugged denim garments without compromising durability.
However, denim is very different from cotton t-shirts. Its thicker weave, textured surface, seams, and varying fabric weights can make transfer application more challenging. This means DTF transfers on denim require the right temperature, pressure, and placement techniques to achieve strong adhesion and long-lasting results.
Whether you're decorating denim jackets, jeans, vests, or workwear, understanding how to use DTF transfers on denim correctly is essential. With high-quality custom DTF transfers and proper application methods, you can create professional-looking denim apparel that stands out and withstands everyday wear.
Why Applying DTF Transfers on Denim Requires a Different Approach
At first glance, denim may seem easy to decorate because it's made primarily from cotton. However, DTF printing on denim is very different from applying transfers to a standard t-shirt. Denim's thick weave, textured surface, heavy seams, and multiple fabric weights create challenges that can affect adhesion, durability, and overall print quality.
When you use DTF on denim, the transfer doesn't always sit on a perfectly flat surface. Denim jackets, jeans, and workwear often contain raised stitching, pockets, rivets, belt loops, and folded seams that can prevent even heat and pressure distribution during pressing.
Common challenges when applying a DTF transfer on denim include:
-
Uneven adhesion around seams and pocket edges.
-
Transfer lifting after washing due to insufficient pressure.
-
Incomplete bonding caused by denim's textured weave.
-
Shine marks from excessive heat or over-pressing.
-
Difficulty applying designs near rivets, zippers, and thick stitching.
-
Inconsistent results between lightweight and heavyweight denim garments.
-
Cracking or peeling when transfers are pressed over highly flexible areas.
Pro Tips Before You Start
Before you apply DTF on denim jeans or jackets, keep these simple recommendations in mind:
-
Always test your transfer settings on a sample garment first.
-
Avoid placing designs directly over thick seams or rivets whenever possible.
-
Pre-press denim to remove wrinkles and flatten the fabric surface.
-
Use a pressing pillow or pad when working around pockets and raised areas.
-
Choose high-quality transfers designed for heavier fabrics.
-
Ensure consistent pressure across the entire design area.
Why Denim Weight Matters
Not all denim is the same. Lightweight fashion denim reacts differently than heavyweight workwear denim.
-
Lightweight denim generally requires less pressure.
-
Heavy-duty denim often needs firmer pressure to achieve full adhesion.
-
Stretch denim may require additional testing to prevent cracking.
For decorators ordering large quantities of custom garments, reliable transfer quality becomes even more important. Consider professional bulk wholesale printing services to ensure consistent results across production runs.
If you're unsure whether denim is suitable for your project, review this guide on the best materials for DTF transfers. Understanding proper heat application is equally important, so it's worth reviewing the best temperature for DTF printing before pressing your first transfer.
The good news is that once you understand these challenges, DTF transfers on denim pants, jackets, and workwear can produce durable, vibrant, and professional-looking results that withstand everyday wear.
Ideal Temperature and Press Settings for DTF Transfer on Denim
Getting the correct heat press settings is essential when working with DTF transfers on denim. Unlike lightweight cotton shirts, denim is thicker and denser, which means it absorbs and distributes heat differently. Using incorrect settings can lead to poor adhesion, cracking, lifting edges, or excessive shine marks on the fabric.
For most denim garments, including DTF on jeans, jackets, and workwear, the recommended starting settings are:
-
Temperature: 310–320°F (154–160°C)
-
Press Time: 15–20 seconds
-
Pressure: Medium to firm
-
Peel Method: Warm peel (allow 5–8 seconds of cooling)
When you apply DTF transfers on denim, always pre-press the garment for a few seconds to remove moisture and flatten the textured surface. This helps the adhesive bond more evenly across the fabric fibers.
If you are trying to understand how to put DTF transfers on fabric, remember that seams, pockets, rivets, and heavy stitching can affect pressure distribution. Avoid pressing directly over these areas whenever possible.
After peeling, perform a short finishing press for 3–5 seconds using parchment paper or a finishing sheet. This improves durability and wash resistance, especially for DTF transfers on denim shirts and jackets that experience frequent wear.
If you notice cracking or lifting after washing, review these tips on preventing DTF transfers from cracking or peeling.
Applying DTF Transfer on Denim: Step-by-Step Guide
Successfully applying DTF transfers on denim requires more than simply placing a transfer and pressing it. Denim's thick weave, textured surface, heavy seams, and varying fabric weights can affect heat distribution and adhesion. By following the right process, you can achieve vibrant, durable designs on jeans, jackets, shirts, and other denim apparel.
Step 1: Prepare Your Artwork Properly
Every successful DTF printing on denim project starts with a high-quality design. So, start by preparing your artwork before printing. Make sure your artwork is properly sized, transparent, and optimized for DTF production. Also, choosing the right file type of DTF printing is also crucial to get quality print.
-
Use high-resolution artwork (300 DPI recommended).
-
Remove unwanted backgrounds before printing.
-
Choose a file format that preserves image quality.
-
Ensure text and small details remain readable after printing.
Step 2: Print and Prepare the Transfer
Once your design is ready, print it onto DTF film using the appropriate ink and adhesive powder process. Whether you're printing a single logo or multiple designs, organization matters.
-
Check color accuracy before production.
-
Ensure even powder coverage across the design.
-
Cure the adhesive powder completely.
-
Cut the design cleanly if printing multiple transfers.
For businesses producing multiple designs, gang sheet printing can help maximize material efficiency and reduce costs.
Step 3: Pre-Press the Denim Garment
Before you apply DTF transfer on denim, pre-pressing is essential.
-
Press the garment for 3–5 seconds.
-
Remove moisture trapped in the fabric.
-
Flatten textured denim fibers.
-
Smooth wrinkles and uneven surfaces.
This simple step helps create a more consistent pressing surface and improves adhesion.
Step 4: Position the Transfer Carefully
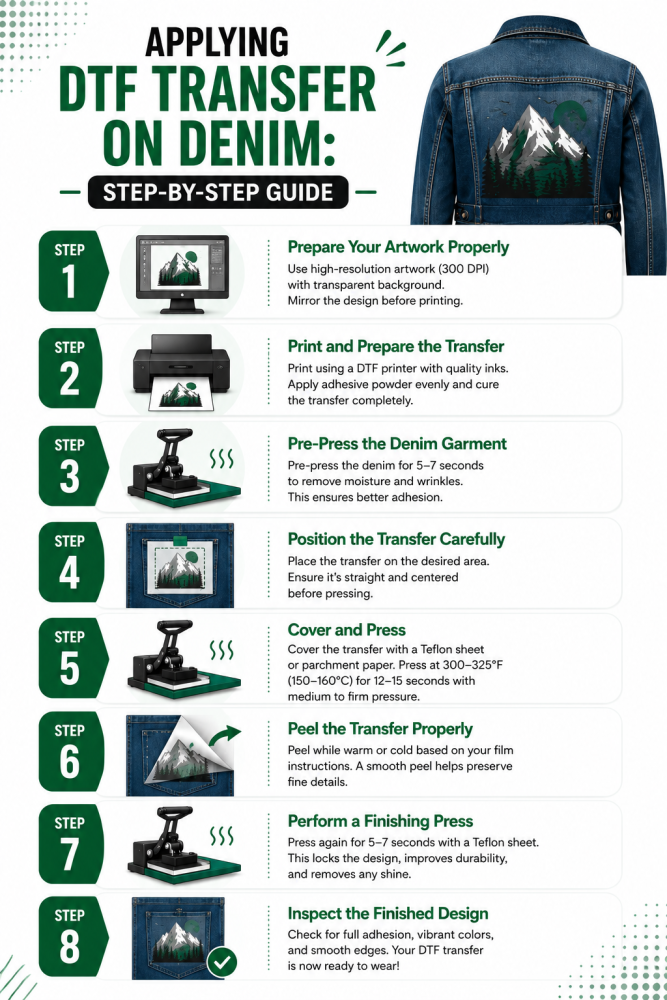
Proper placement is especially important when working with denim jackets, jeans, and shirts.
-
Avoid thick seams whenever possible.
-
Stay clear of rivets, zippers, and buttons.
-
Use alignment guides for accurate positioning.
-
Secure the transfer with heat-resistant tape if necessary.
When learning how to apply DTF transfers on denim, poor placement is one of the most common causes of failed applications.
Step 5: Cover and Press
Once the transfer is positioned correctly:
-
Cover the design with parchment paper or a Teflon sheet.
-
Press at approximately 310–320°F.
-
Use medium-to-firm pressure.
-
Press for 15–20 seconds.
Denim generally requires slightly more pressure than lightweight cotton garments because of its thicker construction.
Step 6: Peel the Transfer Properly
The peel process depends on the transfer type.
-
Warm-peel transfers should cool for several seconds before peeling.
-
Cold-peel transfers should cool completely.
-
Peel smoothly and evenly.
-
Avoid rushing the process.
If portions of the design remain attached to the carrier film, do not panic. Reposition carefully and perform another short press.
Step 7: Perform a Finishing Press
A finishing press helps lock the design into the denim fabric.
-
Cover the design again.
-
Press for an additional 3–5 seconds.
-
Use slightly lighter pressure than the first press.
This improves wash durability and overall finish quality.
Step 8: Inspect the Finished Design
Before delivering the garment:
-
Check for lifting edges.
-
Ensure complete adhesion across the design.
-
Verify color consistency.
-
Examine areas near seams and pockets.
This quality-control step helps prevent customer complaints and reprints.
Pro Tip
Always test press one sample first and adjust settings as needed. Understanding the unique behavior of denim helps ensure consistent results and allows you to fully benefit from the many advantages of DTF printing.
When done correctly, DTF transfers on denim produce vibrant, durable graphics that maintain their appearance through repeated wear and washing, making them ideal for fashion brands, workwear, custom apparel businesses, and personal projects.
Also, pay attention to preparing an image file for printing: choose the right format, and remove the image background. Learn more about how to remove image background for DTF printing.
Common DTF Issues on Denim and How to Fix Them
Even when using high-quality DTF transfers on denim, a few common issues can affect the final result. Fortunately, most problems are easy to prevent with the right setup and application techniques.
1. Transfer Peeling at the Edges
Cause: Insufficient pressure, low temperature, or pressing over seams.
Fix: Increase pressure slightly, avoid uneven areas, and perform a finishing press after peeling.
2. Cracking After Washing
Cause: Poor adhesion or excessive garment stretching.
Fix: Use recommended heat settings and ensure the transfer is fully bonded before use.
3. Uneven Adhesion on Thick Denim
Cause: Textured fabric surface or raised stitching.
Fix: Pre-press the garment and avoid placing designs directly over heavy seams.
4. Shine Marks on Denim
Cause: Excessive heat or over-pressing.
Fix: Lower the temperature slightly and use a protective sheet during pressing.
5. Lifted Areas Near Pockets and Seams
Cause: Inconsistent pressure distribution.
Fix: Use a pressing pillow or reposition the design onto a flatter section of the garment.
A quick test press before production can help identify and eliminate most denim-related DTF application problems.
Pro Tips for DTF Transfer on Denim for Quality Printing
Denim can produce some of the most eye-catching custom apparel, but achieving professional results requires more than simply pressing a transfer onto the garment. Follow these expert tips to improve the quality, durability, and appearance of your DTF transfers on denim.
1. Choose Flat Print Areas Whenever Possible
Denim jackets and jeans often contain seams, pockets, rivets, and heavy stitching. Position your design on the flattest possible section to ensure consistent heat and pressure during application.
2. Always Pre-Press the Garment
A short pre-press removes moisture and helps flatten denim fibers. This creates a smoother surface and improves transfer adhesion, especially on heavyweight denim garments.
3. Test Different Denim Weights
Not all denim reacts the same way. Lightweight fashion denim, stretch denim, and heavyweight workwear may require slight adjustments in temperature, pressure, and pressing time.
4. Avoid Overheating the Fabric
Too much heat can create shine marks or alter the appearance of the denim. Use recommended DTF settings and avoid increasing temperature unless necessary.
5. Use High-Quality Transfers
Premium DTF films and adhesive powders provide stronger bonding, better flexibility, and improved wash durability. Cheap transfers often struggle on textured fabrics like denim.
6. Perform a Finishing Press
After peeling the carrier film, apply a short secondary press using parchment paper or a finishing sheet. This helps seal the adhesive and improves long-term durability.
7. Consider Design Placement Carefully
Large back prints work well on denim jackets, while chest logos, sleeve graphics, and pocket-area designs often create a more premium fashion look.
8. Wash-Test Before Production
Before producing large orders, wash-test a sample garment. This helps verify adhesion strength and ensures your DTF printing on denim can withstand real-world wear and repeated laundering.
To Wrap Up
DTF printing has made it easier than ever to customize denim apparel with vibrant, durable, and highly detailed designs. While DTF transfers on denim require a slightly different approach than cotton due to the fabric's thickness, texture, and seams, the results can be outstanding when the correct settings and techniques are used.
From denim jackets and jeans to shirts and workwear, DTF offers excellent flexibility, color quality, and long-term durability. By understanding proper heat press settings, garment preparation, and application best practices, you can confidently create professional-quality DTF printing on denim projects that withstand everyday wear and repeated washing while maintaining their visual impact.