

DTF printing is growing rapidly across the U.S., and with that growth comes a higher demand for clean, transparent designs. Whether you’re running a print shop or managing a custom apparel business, one issue shows up again and again—messy edges and poor cutouts. And that’s a problem. Even a strong design can look cheap if the background isn’t removed properly.
Poor background removal doesn’t just hurt the look—it affects print quality, customer satisfaction, and your brand reputation. In this guide, you’ll learn how to remove backgrounds the right way, avoid common mistakes, and create clean, production-ready designs for high-quality DTF transfers.
What Does Background Removal Mean in DTF Printing?
Background removal in (Direct-to-Film) DTF printing simply means removing any unwanted or solid background from an image so only the design itself is printed. This is typically done by creating a transparent file, usually in PNG format, which is essential for custom DTF transfers.
Transparency is important because DTF technology prints exactly what you upload. If your design has a background, it will print as a solid box behind your artwork, ruining the final look. A clean, transparent background ensures sharp edges and a professional finish.
Solid Background vs Transparent PNG
-
Solid Background: Prints a visible box or unwanted color around the design
-
Transparent PNG: Prints only the design with clean, invisible edges
Using transparent files ensures your prints look clean, precise, and production-ready.
Tools You Can Use to Remove Background
Choosing the right tools can make a big difference when you need to remove background from DTF design files efficiently. Whether you're a beginner or running production for gang sheet printing, the right setup helps ensure clean, professional results. The following tools help remove DTF backgrounds effectively.
Beginner-Friendly Tools
-
Canva
Canva offers a simple one-click background remover, making it ideal for quick edits. It’s great for beginners who need fast results without complex controls. -
Remove.bg
A popular AI-powered tool designed specifically to remove DTF background instantly. Just upload your image, and it automatically creates a transparent version.
Advanced Tools
-
Adobe Photoshop
One of the most powerful DTF background removal tools, offering precise control over edges, shadows, and fine details. Ideal for complex designs. -
Adobe Illustrator
Best for vector-based designs. It allows clean cutouts and scalable graphics, especially useful for logos and detailed artwork.
AI-Based Tools
-
Automatic Background Removers
These tools use AI to quickly detect and remove backgrounds with minimal effort.
Pros and Limitations
-
Pros: Fast, beginner-friendly, saves time in bulk workflows
-
Limitations: May miss fine details, require manual cleanup for perfect results
For best outcomes, especially in gang sheet printing, combining AI tools with manual refinement ensures clean, print-ready designs.
Related: How to Prepare Image for DTF Printing? An Expert’s Guide
Step-by-Step: How to Remove Background for DTF Printing
Removing the background correctly is a critical step in DTF printing (direct to film printing). A clean cut ensures your final transfer looks sharp, professional, and ready for production. Here’s how to do it step by step:
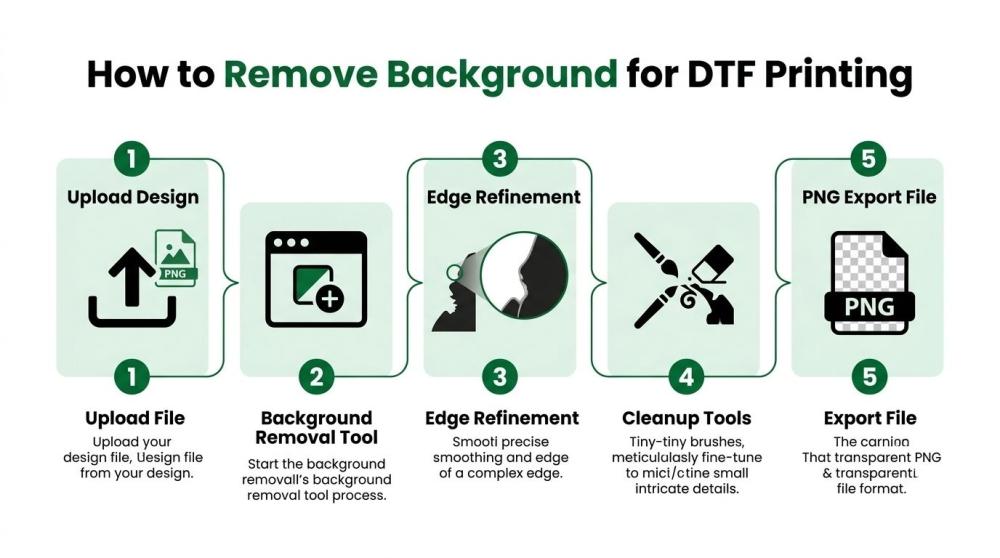
Step 1: Upload Your Design
Start by uploading your artwork into your chosen software or tool. Make sure the file is high resolution (preferably 300 DPI) to maintain quality during editing and printing.
Step 2: Select Background Removal Tool
Use a tool like Canva, Photoshop, or an AI remover to automatically detect and remove the background. Most tools offer a one-click option, which is a good starting point for basic designs.
Step 3: Refine Edges Manually
Automatic tools aren’t perfect. Zoom in and manually refine the edges, especially around text, fine lines, or detailed areas. This step ensures your design doesn’t have rough or jagged edges.
Step 4: Clean Up Small Details
Remove any leftover artifacts like white halos, shadows, or unwanted pixels. Pay close attention to corners and transparent areas. Even small imperfections can show up clearly in direct to film printing.
Step 5: Export as Transparent PNG
Once everything looks clean, export the file as a PNG with a transparent background. Double-check that no background layer remains. This format ensures your design prints correctly without unwanted boxes or outlines.
Following these steps helps you create clean, production-ready files that improve overall print quality and consistency.
Best Settings for DTF-Ready Files
Getting your file settings right is essential for high-quality DTF printing. Even a perfectly edited design can fail if exported with incorrect settings.
-
File Format (PNG Preferred)
Always use PNG with a transparent background. This ensures only your design prints, without any unwanted boxes or backgrounds. -
Resolution (300 DPI)
Set your file to 300 DPI for sharp, detailed prints. Lower resolution can result in blurry or pixelated transfers. -
Transparent Background Check
Double-check that your background is fully transparent. A quick way is to place your design over a colored background to spot any leftover areas. -
Color Mode Considerations
Use RGB for design, but ensure your colors are optimized for printing. Some RIP software will handle color conversion, but starting with accurate colors improves final output.
Manual vs Automatic Background Removal
Choosing between manual and automatic background removal depends on your workflow, design complexity, and quality expectations in DTF printing.
Speed vs Control Comparison
Automatic tools are fast and efficient. They can remove backgrounds in seconds, making them ideal for quick tasks or bulk processing. However, they often lack precision, especially with detailed or complex designs. Manual editing, on the other hand, gives you full control over edges, shadows, and fine details—but it takes more time and skill.
When to Use Each Method
-
Automatic Removal: Best for simple designs, logos, and high-volume tasks where speed matters
-
Manual Removal: Ideal for intricate artwork, detailed edges, gradients, or when high precision is required
Best Choice for Small Businesses
For most small businesses, a hybrid approach works best. Start with automatic tools to save time, then refine manually for accuracy. This balance helps maintain speed without compromising quality, especially when preparing designs for consistent, professional DTF transfers.
Tips for Cleaner and More Accurate Cutouts
Achieving clean, precise cutouts is essential for professional DTF prints. Even small imperfections can show up clearly once transferred onto fabric, so attention to detail matters.
-
Zoom-In Editing Techniques
Always zoom in while editing your design. Working at a higher zoom level helps you spot rough edges, leftover pixels, or uneven cut lines that are easy to miss at normal view. This is especially important for text, logos, and fine details where precision is critical. -
Using Feathering and Edge Refinement
Feathering slightly softens the edges of your cutout, helping it blend more naturally without creating harsh lines. Edge refinement tools in software like Photoshop allow you to smooth, contract, or expand edges for a cleaner finish. The key is subtlety—too much feathering can make your design look blurry. -
Handling Complex Designs (Hair, Gradients, Shadows)
Complex elements like hair strands, gradients, and shadows require extra care. Automatic tools may struggle here, so manual adjustments are often needed. Use selective masking and brush tools to retain fine details while removing unwanted background areas.
These techniques help ensure your designs are sharp, clean, and fully ready for high-quality DTF printing.
Related: 15 Common Direct to Film Transfer Mistakes & How to Avoid Them
How Background Removal Impacts Final DTF Prints
Background removal has a direct impact on the final outcome in DTF prints, influencing everything from visual quality to durability. Even small imperfections can become highly visible once transferred onto fabric.
-
Print Clarity and Sharpness
Clean background removal ensures crisp edges and well-defined details. If edges are rough or contain leftover pixels, the print will appear blurry or unprofessional—especially on dark garments where flaws stand out more. -
Adhesion and Transfer Quality
Properly removed backgrounds allow the adhesive to bond only where needed. Extra or unwanted pixels can interfere with the transfer process, leading to uneven adhesion, weak bonding, or peeling over time. -
Overall Professional Finish
A clean cutout results in a polished, high-quality look that customers expect. Designs without halos, rough edges, or background artifacts appear more vibrant and precise, giving your prints a premium finish.
In short, accurate background removal is essential for achieving consistent, high-quality DTF results.
Conclusion
Clean background removal is a critical step in achieving high-quality DTF prints. Even the best designs can fall short if edges are rough or transparency isn’t handled properly. Taking the time to refine cutouts, check file settings, and ensure full transparency makes a noticeable difference in the final output.
Quality control before printing is just as important. Always review your design, test files when needed, and fix small issues early to avoid costly mistakes later. The final takeaway is simple: precision in background removal leads to sharper prints, better adhesion, and a more professional finish every time.
FAQs
What is the best format for DTF printing?
PNG is the best format for DTF printing because it supports transparent backgrounds. This ensures only your design is printed, without unwanted boxes or background colors.
Can I use JPG for DTF transfers?
JPG is not recommended because it does not support transparency. It always includes a background, which will print as a solid block behind your design.
How do I remove white background from a logo?
You can use tools like Canva, Photoshop, or AI background removers to delete the white background. After removal, export the file as a transparent PNG for best results.
What resolution is best for DTF?
A resolution of 300 DPI is ideal for DTF printing. It ensures sharp, clear, and professional-quality prints without pixelation.
Do I need Photoshop for background removal?
No, Photoshop is not required. Beginners can use tools like Canva or Remove.bg, but Photoshop offers more control for detailed and complex designs.