

The DTF transfer not sticking after pressing and peeling is a frustrating issue. And, it becomes even more annoying if the adhesion problem occurs during a large production run with a tight deadline. Often, the DTF transfer adhesion issue manifests in multiple ways, such as incomplete adhesion, edge lifting after washing, cracking, and premature peeling.
While in most cases, DTF transfers work smoothly, many times an adhesion problem may occur due to temperature, pressure, technique, or anything else. Before you screw up your shirts, understanding the underlying causes is essential to troubleshooting DTF transfer adhesion issues.
In this guide, we are not just going through a list of issues but providing a practical solution to the DTF transfer adhesion problem.
Ensure Correct Pressure
Pressure is often one of the key culprits for DTF transfer not sticking properly. Adequate pressure is necessary to avoid subtle gaps between the fabric and the press, ensuring the adhesive powder penetrates deep into the fibers.
-
Too light: The design only sits on the surface and will peel after one wash.
-
Too heavy: You risk "strike-through," where the adhesive is squeezed too far into the fabric, making the design look thin and losing its vibrant white base.
So, understanding the right way of pressing helps avoid adhesion problems.
To resolve this, calibrate your heat press to a firm, even setting tailored to the fabric’s thickness—use heavier pressure for denim and medium for cotton. Consistently checking your equipment's calibration ensures a professional, high-durability finish for every garment.
The Fix: For most DTF transfers, aim for medium-heavy pressure (about 60 PSI).
Use the Right Temperature
Temperature is critical for successful adhesion. For proper activation of the adhesive powder, your pressing temperature should be dialed in at 310°F (155°C). Heat that is too low prevents the adhesive from melting, while excessive heat can scorch the fabric or thin the print. Hence, you need the right temperature to ensure clean prints.
Just because your heat press says it’s at 310°F (155°C) doesn't mean the entire heating platen is actually that temperature. Over time, heating elements can develop "cold spots" that leave sections of your design under-cured and prone to peeling.
The Fix: Periodically check your platen with a laser thermometer or a heat gun. If you have uneven heat, you may need to increase your press time or replace the heating element.
Don’t Forget the Second Press
Never skip the second press; it is the final step to ensure your design fully bonds with the garment fibers. After removing the DTF transfer sheet, cover the print with a protective guard sheet and press again. This process locks the adhesive into the fabric, significantly improving wash durability and creating a softer, professional "hand-feel" that prevents the design from lifting over time.
Don’t Rush in Peeling
Rushing the peel can ruin an otherwise perfect transfer by pulling the adhesive away before it sets. Hot peel films should be removed immediately (0–3 seconds) after pressing for maximum efficiency. Conversely, cold peel films must cool completely to room temperature to allow the design to stabilize and bond securely with the fabric.
The Fix: Match your timing to the film type.
The "Invisible" Barrier: Trapped Moisture
One of the biggest culprits for poor adhesion is moisture hiding in your fabric. Even if a shirt feels dry, natural fibers like cotton absorb humidity from the air. When you apply heat, that moisture turns to steam, creating a physical barrier that pushes the adhesive away.
The Fix: Always perform a 5-second pre-press to "gas out" the moisture and flatten the fibers before placing your design.
Look for Contaminated Transfers
Contamination is also a frequent cause of the DTF transfer not sticking issues. Dust, lint, or oily fingerprints on the film surface can create a physical barrier, preventing the adhesive powder from sticking to the ink or the ink from bonding to the fabric.
The Fix: Always handle your film by the edges and store it in a dust-free, anti-static environment. Before printing, use a lint roller on the garment to ensure a pristine surface for maximum adhesion.
Avoid Pressing on Garment Features
Seams, zippers, and buttons are frequent causes of DTF transfer adhesion failures because they prevent the heat press from making flat, even contact with the design. When these features create gaps, the adhesive cannot bond correctly to the fabric.
The Fix: Use a heat-resistant pressing pillow or foam pad to elevate the print area, ensuring uniform pressure and heat across the entire transfer.
Check Fabric Compatibility
Not all materials react equally to heat, and choosing the wrong settings can lead to DTF transfer adhesion failures. While cotton is forgiving, synthetic or coated fabrics often require lower temperatures and specific pressure adjustments to prevent melting or repelling the adhesive.
The Fix: Always tailor your temp and pressure to the specific textile; use a firm press to lock designs into heavy weaves and a lighter touch for delicate blends.
Ensure the Right Humidity
The environment in your print shop is just as important as your equipment. High humidity (above 60%) causes your adhesive powder to clump or absorb water, preventing it from melting into a smooth, tacky layer. Conversely, low humidity (below 35%) creates static electricity, which makes the powder stick to areas where there is no ink, causing "speckling".
The Fix: Maintain a "sweet spot" of 45% to 55% humidity in your workspace using a humidifier or dehumidifier.
Check Expired or Poorly Stored Film
DTF transfer films have a specialized coating that is sensitive to light and air. If the film is old (typically over 6–12 months) or has been left in direct sunlight, the coating can degrade, either refusing to release the ink or bonding too strongly to the carrier sheet. Proper storage of DTF transfers ensures longer shelf life.
The Fix: Store your film in its original anti-static bag in a dark, cool place. Use the "First In, First Out" (FIFO) method to ensure you aren't using expired stock.
Check DTF Transfer Quality
The physical quality of your film and ink can be a cause of DTF transfer adhesion failures. High-quality films feature specialized coatings that balance ink absorption with clean release properties; inferior or expired films may suffer from coating degradation, preventing the adhesive from "gripping" the print. Additionally, ensuring the ink remains wet enough to fully capture the adhesive powder is vital.
The Fix: Source premium, double-sided coated films and ensure your inks are fresh to maintain a reliable, high-performance bond.
Fabric-Specific Resistance
Not all fabrics are created equal. Highly synthetic materials or those treated with water-repellent, anti-microbial, or fire-retardant coatings can actively repel the DTF adhesive.
The Fix: If you’re working with "slippery" synthetics like nylon or coated polyesters, you may need a specialized "low-temp" or high-stretch adhesive powder specifically designed for those materials.
Perform a Pre-Heat for Flawless Bonding
Think of a pre-heat as preparing your canvas; it is an essential step to eliminate adhesion issues. Pressing your garment for 3–5 seconds before applying the transfer effectively removes trapped moisture that can turn into bond-breaking steam.
It also flattens stubborn wrinkles and clears away stray lint or debris, ensuring the adhesive makes direct, uniform contact with the fabric. This simple habit creates a clean, dry, and smooth surface, significantly reducing the risk of DTF transfer adhesion problems.
What Causes DTF Transfer Adhesion Issues?
When a design fails to stick, it is rarely due to a single factor; instead, it is usually a result of a minor disruption in the delicate balance of heat, pressure, and environmental conditions. The primary reason transfers fail is a breakdown in the physical or chemical bond between the adhesive powder and the garment fibers.
This bond requires precise calibration of your equipment and a deep understanding of the materials you are working with. Below are the most common reasons your DTF transfers might be lifting, peeling, or failing to adhere properly:
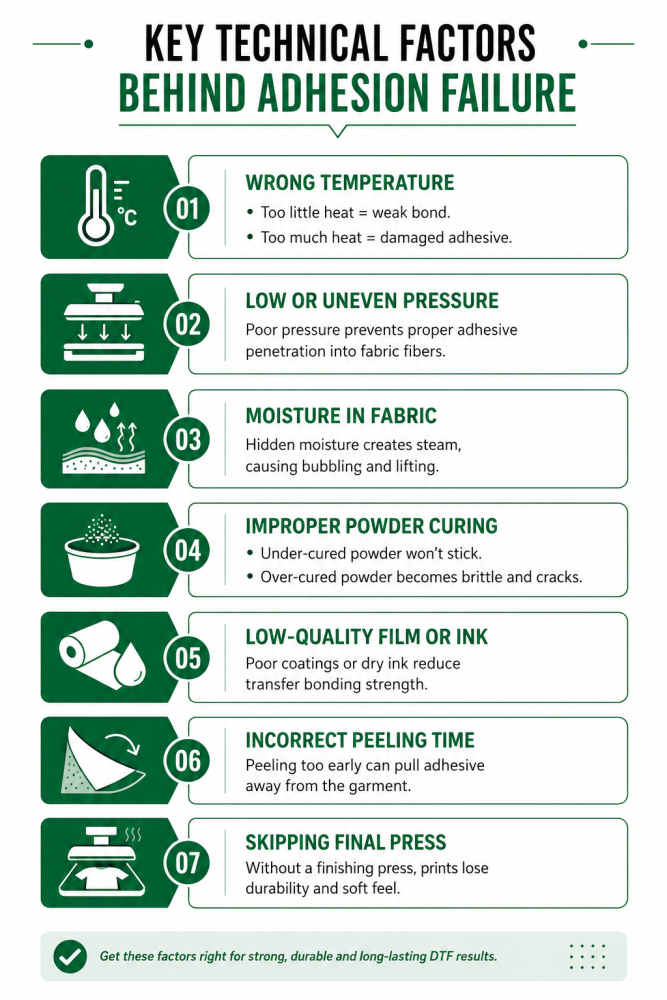
Key Technical Factors Behind Adhesion Failure
-
Inaccurate Temperature Settings: Heat is the catalyst that transforms solid adhesive powder into a tacky liquid. Without proper heat, the powder may not melt completely, resulting in a superficial bond that peels easily. Conversely, excessive heat can scorch fabric or over-liquefy the adhesive, causing it to thin out and lose its grip.
-
Inconsistent or Weak Pressure: Pressure is responsible for physically forcing the melted adhesive into the "valleys" of the fabric weave. Light pressure leaves subtle gaps between the design and the garment, while uneven pressure—often caused by seams, zippers, or buttons—prevents the heat press from making full contact with the print area.
-
Trapped Fabric Moisture: Natural fibers like cotton naturally absorb humidity. When heated, this moisture turns into steam, creating an invisible barrier that pushes the adhesive away from the fabric. This often results in bubbling or designs that lift immediately after the first wash.
-
Improper Powder Curing: The adhesive powder must be cured until it reaches a "smooth" orange-peel texture. If it is under-cured, it will feel grainy and won't stick; if it is over-cured, it becomes brittle and loses its flexibility, leading to cracks and delamination.
-
Film and Ink Quality Issues: Not all films are created equal. High-quality, double-sided coated films provide a better release and more stable ink reception. If the ink dries too quickly before the powder is applied, or if the film's coating has degraded due to age or poor storage, the transfer will fail to bond correctly.
-
Peeling in Haste: Every film has a specific "release window." Peeling a cold-peel film while it is still warm can physically pull the adhesive out of the fabric fibers before the bond has fully set.
-
Skipping the Finishing Press: The second press is essential for locking the design into the garment. Without this final step, the adhesive stays on the surface of the fibers rather than being embedded within them, significantly reducing the durability and "hand-feel" of the finished product.
Conclusion
DTF transfer adhesion issues rarely come down to one big mistake. It’s usually small things stacking up—slightly off temperature, uneven pressure, a bit of moisture, or rushing the peel. And in production, those small misses turn into big losses.
Every problem you’ve seen has a fix. Once you understand how heat, pressure, time, and materials work together, your results become predictable. Clean. Repeatable. Understanding and resolving these issues helps you save problems in bulk DTF printing.
Think of DTF as a system, not just a process. Control the variables, and the prints will follow. Dial in your settings. Stay consistent. Test before scaling.
Do that—and adhesion problems stop being a frustration. They become something you simply don’t deal with anymore.
FAQs
1. Why is my DTF transfer peeling after washing?
This usually happens due to low pressure, under-curing, or skipping the second press. The adhesive didn’t fully bond into the fabric.
2. What temperature is best for DTF transfers?
Around 155°C (310°F) works for most setups. Always verify with a heat gun to avoid cold spots.
3. Do I really need a second press?
Yes. It locks the adhesive into the fibers and improves durability and softness. Skipping it reduces lifespan.
4. Why does my DTF transfer lift at the edges?
Edge lifting often comes from uneven pressure, seams, or peeling too early—especially with cold peel films.
5. Can humidity affect DTF adhesion?
Absolutely. High humidity causes poor powder melting, while low humidity creates static issues. Keep it around 45–55%.