
September 8, 2026 · Connor McDonnell
How to Fix Pixelated or Blurry DTF Prints: A Complete Troubleshooting Guide
Your DTF design may look sharp on your computer but come out fuzzy, pixelated, or soft after printing. It can be frustrating, especially when you are working on customer orders or a large production run.
The good news is that a blurry DTF print does not always mean your printer is failing. The problem can start with the artwork, image resolution, RIP settings, white ink, printhead, film feeding, adhesive powder, curing, or heat pressing.
Learning how to fix blurry DTF prints starts with finding the actual source of the problem. Instead of changing several settings at once, work through the production process step by step.
Here is how to diagnose and fix the most common DTF print quality issues.
How to Fix Blurry DTF Prints: Start With Your Artwork
The artwork should be your first checkpoint. If the original file is already blurry or pixelated, your DTF printer cannot recreate details that are not present in the image.
Check the Image Resolution at Actual Print Size
For most DTF artwork, 300 PPI at the final print size is a good quality target.
However, simply changing a file from 72 DPI to 300 DPI does not automatically make it sharper. The actual pixel dimensions need to support the intended physical size.
For example, a 10 × 12-inch design at 300 PPI would ideally have around 3000 × 3600 pixels.
If you take a small 600 × 600 pixel image and stretch it across a large shirt, the pixels become much more noticeable. This often results in jagged edges, soft details, and a pixelated DTF transfer.
Before printing, check both:
-
The image's actual pixel dimensions
-
The final physical print size
-
The quality of edges and fine details
-
Whether the artwork has already been enlarged
-
Whether the file contains compression artifacts
Avoid Upscaling Low-Resolution Artwork
Upscaling can increase the dimensions of an image, but it cannot reliably recreate the original detail.
For example, enlarging a small logo to cover the front of a shirt may make the edges appear blocky. A better solution is to obtain a higher-resolution version or recreate the artwork.
If the only available file is low resolution, reducing the final print size may sometimes produce a cleaner result. A small left-chest logo can look sharper than the same low-resolution artwork enlarged to a full-front design.
Use Vector Artwork When Possible
Logos, lettering, icons, and simple illustrations are often better suited to vector artwork.
Vector graphics use mathematical paths rather than fixed pixels. This allows them to be resized without producing the same type of pixelation found in low-resolution raster images.
If a logo is heavily pixelated, consider recreating or tracing it using vector tools. Clean up:
-
Jagged edges
-
Uneven curves
-
Overlapping shapes
-
Small gaps
-
Thin lettering
-
Incorrectly joined elements
This can make a significant difference when printing detailed designs.
Inspect the Design Before Sending It to the RIP
Zoom into your artwork before sending it to the RIP software.
Look closely at:
-
Text edges
-
Fine lines
-
Shadows
-
Transparent areas
-
Color transitions
-
White backgrounds
-
Semi-transparent pixels
If the artwork already looks blurry at the design stage, printing it will not correct the problem.
For additional guidance, see this resource on how to prepare an image for DTF printing.
How to Fix Pixelated DTF Prints Before Printing
Once you have confirmed that your artwork has enough resolution, check how the file has been prepared for production.
Poor file preparation can create a pixelated DTF transfer even when the original artwork appears acceptable.
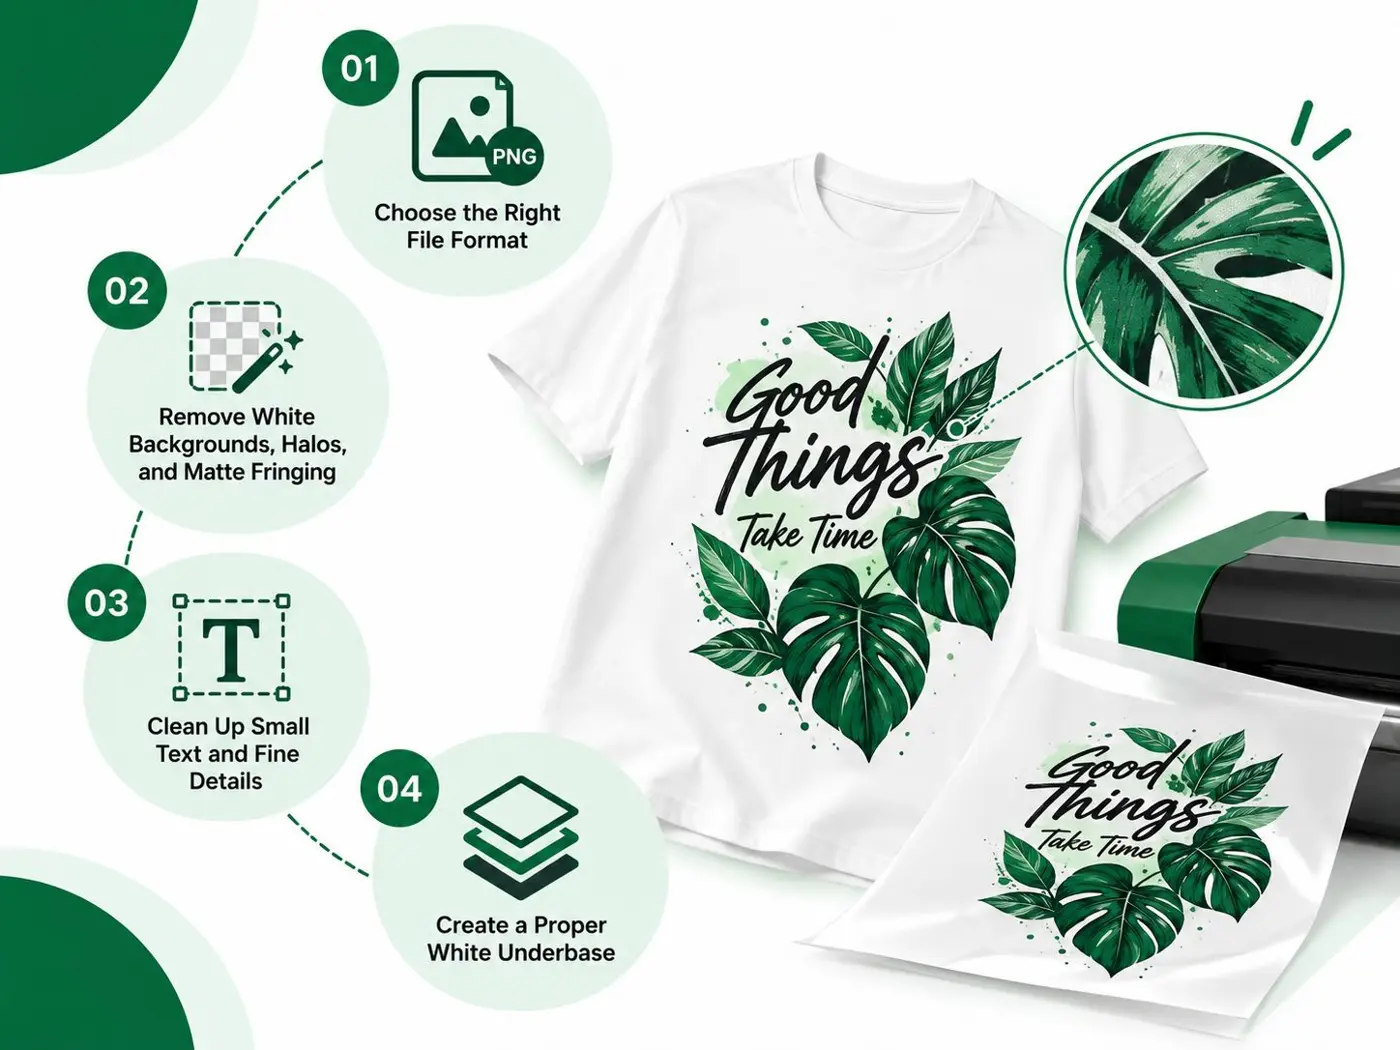
Choose the Right File Format
A high-resolution PNG with a transparent background is commonly used for DTF artwork.
PNG is particularly useful when your design needs transparency around the artwork. It also avoids some of the compression problems associated with repeatedly saving JPEG files.
Before exporting, check that:
-
The artwork is at the intended print dimensions.
-
The image has sufficient pixel density.
-
The background is transparent when required.
-
Unwanted compression artifacts are removed.
-
The design is not being automatically resized during export.
Avoid repeatedly opening, editing, and resaving the same JPEG if you are trying to preserve fine details.
Remove White Backgrounds, Halos, and Matte Fringing
Unwanted pixels around the edges can make a DTF print appear fuzzy.
This is particularly noticeable around:
-
White logos
-
Fine lettering
-
Product photos
-
Transparent artwork
-
Dark designs placed on colored garments
Inspect the edges carefully and remove unwanted halos or semi-transparent pixels before exporting.
A clean transparent background helps the printer reproduce the intended shape rather than printing unwanted edge information.
Clean Up Small Text and Fine Details
Tiny text can be difficult to reproduce clearly, particularly when the artwork contains very thin strokes.
Before printing, ask whether the details are large enough to survive the complete production process.
You may need to:
-
Increase very thin lettering.
-
Simplify complicated artwork.
-
Remove unnecessary micro-details.
-
Increase spacing between small elements.
-
Avoid extremely fine outlines.
Always inspect the design at its actual intended print size. Artwork can look perfect when viewed at 400% but become difficult to read when printed at only a few inches wide.
Create a Proper White Underbase
The white underbase helps DTF artwork maintain color and visibility on garments.
However, an improperly prepared underbase can affect edge definition. Excessive white ink around the artwork can make details look thicker or fuzzy.
White-ink choke settings can help keep the white layer slightly inside the colored layer.
For a deeper explanation, read how to create an underbase for DTF printing.
How to Fix a Blurry DTF Transfer Caused by Printer or RIP Settings
If your artwork looks sharp on your computer but the printed film looks soft, move on to the printer and RIP workflow.
Your RIP software controls important aspects of how the artwork is converted into printable information. Incorrect settings can affect sharpness, detail, color, and white-ink coverage.
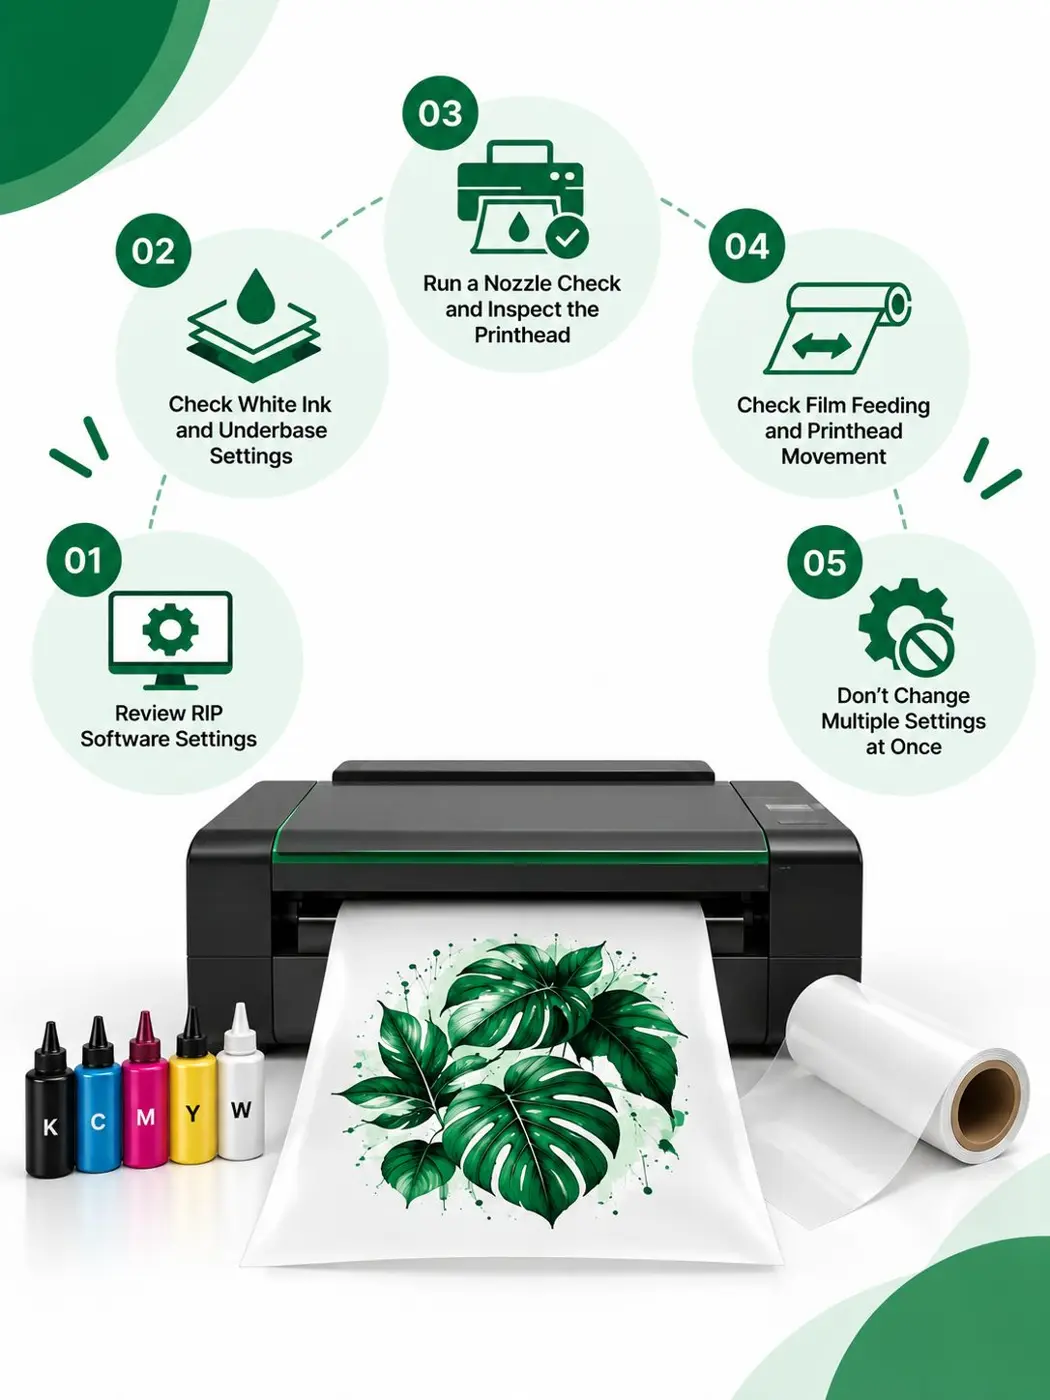
Review RIP Software Settings
Depending on your equipment and RIP software, review settings such as:
-
Output resolution
-
Print quality mode
-
Pass count
-
Color mode
-
Ink density
-
Halftone settings
-
White-ink settings
-
Choke and spread
-
Automatic image resizing
A high-resolution file can still produce poor results if the RIP is configured for a lower-quality production mode.
If your software automatically resizes artwork, make sure the design is not being enlarged or reduced unexpectedly.
Check White Ink and Underbase Settings
Too much white ink can make edges look thicker than intended.
This can be especially noticeable with:
-
Small text
-
Fine outlines
-
Intricate logos
-
Narrow gaps
-
Detailed illustrations
If the color layer is sharp but the white layer extends beyond it, inspect your underbase and choke settings.
The goal is not simply to use more white ink. The goal is to produce enough underbase coverage while preserving the detail of the artwork.
Run a Nozzle Check and Inspect the Printhead
If your digital file looks good but the physical print does not, inspect the printer.
Start with a nozzle check.
Look for:
-
Missing nozzle lines
-
Inconsistent patterns
-
Uneven ink output
-
Clogged nozzles
-
Ink buildup
-
Printhead alignment problems
A partially clogged printhead can affect color consistency and image definition.
Regular maintenance is particularly important when the printer is used frequently or sits unused for extended periods.
Check Film Feeding and Printhead Movement
A blurry print is not always caused by image quality or ink.
If the film moves during printing, you may see ghosting, shadows, or duplicated edges.
Check that:
-
The film is loaded correctly.
-
Rollers are clean.
-
Film tension is appropriate.
-
The film is not slipping.
-
Feed calibration is correct.
-
The printhead is not contacting the film.
A duplicated edge or visible shadow next to the artwork can be a strong indication of a mechanical or film-feeding problem.
Don't Change Multiple Settings at Once
This is one of the most important troubleshooting rules.
If you change resolution, ink density, white ink, pass count, and heat settings at the same time, you will not know which change solved the problem.
Instead, make one adjustment and perform another small test print.
This gives you a much clearer way to identify the actual cause.
Fix DTF Printing Problems During Powder, Curing, and Heat Pressing
Sometimes the printed film looks sharp before transfer but loses definition during the later stages of production.
That means you need to inspect powder application, curing, and pressing.
Apply DTF Adhesive Powder Evenly
Adhesive powder helps the printed design bond to the garment.
However, too much powder can affect fine details and make edges appear rough or muddy.
Uneven powder application can also create inconsistent transfer quality.
Pay attention to:
-
Powder coverage
-
Excess powder
-
Fine details
-
Edges
-
Powder distribution
-
Powder storage and handling
Remove excess powder carefully and follow the recommendations for your particular film and adhesive system.
Check the Curing Process
Curing is another important part of DTF production.
If adhesive powder is not properly cured, transfer performance can suffer. Excessive heat can also affect the finished result.
There is no single curing setting that works perfectly for every DTF film, powder, printer, and oven.
Follow the specifications recommended for your materials and equipment.
Use the Correct Heat-Press Settings
The heat press can also influence the final appearance of a transfer.
Pay attention to:
-
Temperature
-
Pressure
-
Dwell time
-
Peel instructions
-
Garment composition
-
Transfer specifications
Using excessive heat or pressure can affect how the adhesive and ink interact with the garment.
For more guidance, see the best temperature for DTF printing.
Test Before Running a Large Batch
Never assume that one successful transfer guarantees an entire production run will look identical.
Before producing a large order, press a sample and inspect:
-
Fine text
-
Edges
-
Color
-
Adhesion
-
Overall sharpness
-
Garment compatibility
A small test can save significant material, time, and rework later.
DTF Print Quality Issues: Quick Troubleshooting Chart
When you need to identify a problem quickly, use the following checklist:
|
What You See |
Most Likely Cause |
What to Check |
|
Pixelated edges |
Low-resolution artwork |
Pixel dimensions and final print size |
|
Entire design looks soft |
RIP or print-quality settings |
Resolution and quality mode |
|
Small text disappears |
Artwork or white underbase |
Design size and choke settings |
|
Fuzzy edges |
Excessive white ink or powder |
Underbase and powder application |
|
Shadow or duplicate image |
Film-feed problem |
Film tension and feed calibration |
|
Uneven detail |
Nozzle or ink-flow problem |
Nozzle check and printhead |
|
Looks good digitally but poor physically |
Printer or production issue |
RIP, printer, film, and transfer process |
|
Detail changes after pressing |
Heat-press issue |
Temperature, pressure, and dwell time |
The Best Troubleshooting Order
When dealing with DTF printing problems, work through the process in this order:
Artwork → Resolution → Export → RIP Settings → Nozzle Check → Film → Powder → Curing → Heat Press
This approach helps you isolate the problem instead of making several changes at once.
When to Use Professionally Printed DTF Transfers
Not every business needs to manage the complete DTF printing process in-house.
If you are spending significant time troubleshooting printers, maintaining equipment, preparing artwork, testing powder, or managing production settings, professionally printed transfers may simplify your workflow.
DIY Printing vs. Professionally Printed Transfers
In-house DTF printing gives you control over production, but it also requires investment in:
-
DTF printing equipment
-
RIP software
-
Film
-
Ink
-
Adhesive powder
-
Curing equipment
-
Heat-press equipment
-
Printer maintenance
-
Production testing
Outsourcing transfers can reduce some of these operational responsibilities.
It can be particularly useful for businesses that need consistent transfers without maintaining a DTF printer themselves.
When DTF Gang Sheet Printing Makes Sense
If you have multiple designs or several variations of the same artwork, gang sheets can make production more efficient.
A gang sheet allows multiple designs to be arranged on a single sheet of transfer film.
This can be useful for:
-
Apparel brands
-
Small print shops
-
Event merchandise
-
Team apparel
-
Multiple customer orders
-
Larger production runs
If you regularly print multiple designs, explore DTF gang sheet printing as a way to organize your transfer production.
When Custom DTF Transfers Are a Better Option
Custom DTF transfers can be a practical choice when you want professionally produced transfers without operating the entire printing workflow yourself.
They may be suitable for:
-
Small businesses
-
Apparel startups
-
Online sellers
-
Custom clothing brands
-
Businesses without DTF equipment
-
Companies that need repeatable production
You can learn more about custom DTF transfers when you are ready to move from troubleshooting to production.
Scaling Production With Bulk and Wholesale DTF Printing
As order volume increases, producing every transfer in-house can become more demanding.
Bulk and wholesale production may help businesses handle larger order quantities while reducing the time spent on individual transfer production.
For growing apparel businesses, bulk and wholesale DTF printing can be worth considering when production demands start increasing.
Consider White Label DTF Printing for Your Brand
Businesses that sell custom apparel under their own brand may also consider white-label production.
A white-label DTF printing service can allow you to focus more on customer acquisition, design, sales, and fulfillment while a production partner handles the transfer printing.
If this fits your business model, explore the white label DTF printing service.
For more information about why businesses use DTF, see the key advantages of DTF printing.
Conclusion
Knowing how to fix blurry DTF prints starts with identifying the source instead of immediately changing printer settings.
Begin with the artwork and confirm that it has enough resolution for the intended print size. Then check file preparation, RIP settings, white-ink coverage, printhead condition, film movement, powder application, curing, and heat pressing.
The most effective troubleshooting sequence is simple:
Artwork → Resolution → Export → RIP Settings → Nozzle Check → Film → Powder → Curing → Heat Press
Test one change at a time, especially before committing to a large production run.
And if maintaining DTF equipment or troubleshooting recurring print-quality issues is taking more time than expected, professionally produced DTF transfers can provide a more consistent alternative while allowing you to focus on your apparel business.
Frequently Asked Questions About Blurry and Pixelated DTF Prints
Why are my DTF prints blurry?
Blurry DTF prints can result from low-resolution artwork, incorrect RIP settings, printer maintenance problems, film movement, excessive white ink, poor powder application, or incorrect curing and pressing. Start by checking the original artwork and its resolution before changing printer settings.
How do I fix pixelated DTF prints?
Start with the original design. Make sure it has sufficient pixel dimensions for the final print size. A target of 300 PPI at the intended physical size is a good starting point. If the artwork is already heavily pixelated, recreate it using a high-resolution source or vector artwork rather than simply enlarging it.
What resolution should I use for DTF printing?
Around 300 PPI at the final print size is commonly recommended for high-quality raster artwork. However, the actual pixel dimensions are more important than simply changing the DPI setting. A low-resolution image does not become high quality just because its metadata is changed to 300 DPI.
Can I fix a blurry DTF transfer after printing?
If the problem comes from the printing or transfer process, you may be able to correct the settings for future transfers. However, missing detail in low-resolution artwork cannot be restored after printing. It is better to correct the source file before production.
Why does my DTF print look good on my computer but blurry after pressing?
If the digital artwork looks sharp, inspect the RIP settings, printer, film movement, adhesive powder, curing process, and heat-press settings. A transfer can look sharp before pressing but lose definition because of excessive heat, pressure, dwell time, powder, or another production issue.
Can low-resolution artwork be used for DTF printing?
It can sometimes work when printed at a small physical size. However, significantly enlarging low-resolution artwork usually creates visible pixelation. When possible, use a high-resolution source or recreate logos and illustrations as vector artwork.