

Messed up a print? It happens. One second everything looks perfect—and the next, the design is crooked, peeling, or just… wrong. Now you’re stuck wondering how to remove a DTF transfer from a shirt without ruining it.
Here’s the truth. DTF prints are made to last. That’s great for durability—but not so great when you need to fix a mistake. You can’t just peel it off and start over.
But don’t worry. There are ways to remove DTF from fabric—safely, if you know what you’re doing.
In this guide, you’ll learn exactly what works, what doesn’t, and how to fix DTF mistakes without wasting your garment.
Can You Remove a DTF Transfer from a Shirt? (Reality Check)
Short answer? Yes—but not always perfectly.
If you’re wondering “can you remove DTF from a shirt?”, the answer depends on a few key factors: how the transfer was applied, the fabric type, and how long it’s been on the garment. Custom DTF transfers are designed to create a strong, long-lasting bond using heat-activated adhesive. That durability is great for wear—but it also makes removal more challenging.
Fresh transfers are easier to handle. You can sometimes reheat and peel them before the adhesive fully sets. Older prints, however, require more effort. In those cases, learning how to remove DTF involves controlled heat, pressure, or specific removal solutions.
Also, don’t expect a perfect reset every time. Some methods may leave slight residue or marks.
So yes, you can learn how to remove DTF from a shirt—but the goal is safe removal, not always flawless results.
Why DTF Transfers Are Hard to Remove (The Science Behind It)
Before you learn how to remove DTF from fabric, it’s important to understand why it’s difficult in the first place. DTF isn’t just ink sitting on top—it’s a layered system designed to stay put.
When you remove DTF from a shirt, you’re dealing with a heat-activated adhesive (TPU powder) that melts and bonds into the fabric fibers. Once cured, it creates a flexible but strong layer that resists washing, stretching, and wear. That’s great for durability—but tough when you need to reverse it.
Here’s what makes DTF removal challenging:
-
Adhesive bonding: The glue penetrates fabric fibers, not just the surface
-
Heat curing: Once set, the bond becomes semi-permanent
-
Layered structure: Ink + adhesive + fabric = harder separation
-
Fabric interaction: Cotton absorbs differently than polyester
This becomes even more critical in gang sheet printing, where multiple designs are printed together. One mistake can affect several prints, making proper removal techniques essential.
Understanding this helps you choose the right method to remove DTF from fabric without causing damage.
Related: How to Remove Background for DTF Printing?
Which Method Should You Use? (Quick Decision Guide)
When figuring out how to remove a DTF transfer from a shirt, the best approach depends on timing, fabric, and how the transfer was applied. Use this quick decision table to choose the right method before you start:
|
Situation |
Recommended Method |
Key Tip |
|
Fresh transfer (just pressed) |
Reheat & peel |
Act quickly before adhesive fully sets |
|
Recently applied (within hours) |
Controlled heat + slow peel |
Use medium heat to loosen adhesive |
|
Fully cured / old transfer |
Heat + adhesive remover |
Expect partial residue; work in steps |
|
Polyester or delicate fabric |
Low heat + gentle peeling |
Avoid high temps to prevent damage |
|
Bulk errors (production issues) |
Heat + chemical method |
Faster for multiple garments |
In short:
-
Fresh transfer (just pressed):
→ Reheat and peel immediately while warm -
Recently applied (few hours old):
→ Apply controlled heat + slow peeling -
Fully cured/old transfer:
→ Use heat + adhesive remover solution -
Polyester or sensitive fabric:
→ Use low heat to avoid scorching -
Bulk mistakes or production errors:
→ Combine heat + chemical method for efficiency
The key to successfully removing DTF is timing and control. The earlier you act, the easier it is.
Choosing the right method first will save you time, reduce damage, and improve your chances of a clean removal.
Step-by-Step Methods to Remove DTF Transfers
Now that you know what method to use, let’s break down exactly how to remove DTF from fabric step by step. Follow these carefully to avoid damaging your garment.
1. Heat & Peel Method (Best for Fresh Transfers)
This is the easiest way to remove DTF from fabric if the transfer was applied recently.
Steps:
-
Place the garment back on the heat press
-
Apply medium heat (300–320°F) for 10–15 seconds
-
While warm, gently peel the transfer at a 45° angle
-
Repeat if needed for leftover areas
Best for: Fresh or slightly set transfers
2. Heat + Adhesive Remover Method (For Cured Prints)
For older prints, this is the most effective way when learning how to remove DTF completely.
Steps:
-
Apply heat to soften the adhesive
-
Use a DTF adhesive remover or solvent
-
Let it sit for a few seconds
-
Gently peel or wipe off the design
-
Clean residue with a cloth
Best for: Fully cured or stubborn transfers
3. Low-Heat Method (For Sensitive Fabrics)
When working with polyester or delicate materials, use controlled heat.
Steps:
-
Apply low heat (260–280°F)
-
Slowly lift edges without pulling aggressively
-
Repeat in small sections
Best for: Preventing fabric damage
Using the right method at the right time makes the removal of DTF from fabric much safer and more effective.
Related: Why is My DTF Print Cracking After Washing?
Fabric-Specific Guidance for Removing DTF
Here’s where most people mess up. They treat every shirt the same. Big mistake.
If you’re figuring out how to remove DTF from shirt, you need to think about the fabric first—not the transfer. Because the adhesive behaves differently on every material. And so does heat.
-
Cotton (your safest bet): Cotton is forgiving. It can handle higher heat, which makes removal easier. You can reheat, peel, even use adhesive removers without stressing too much. This is where a heat press really shines—consistent heat, clean results.
-
Polyester (handle with care): This one’s tricky. Polyester doesn’t like heat. Too much, and you’ll scorch or warp the fabric. Use lower temps. Slow peeling. Be patient. Rushing here ruins shirts fast.
-
Blends (the unpredictable zone): Cotton-poly blends sit in the middle. Sometimes they behave like cotton. Sometimes like polyester. Test first. Always. No exceptions.
-
Fleece & heavy fabrics: Thicker materials need more time under heat—but not more pressure. Let the adhesive soften gradually.
Bottom line? Fabric decides everything. Adjust your method—or risk damaging the garment.
Common Mistakes to Avoid During the Removal of DTF
This is where most people go wrong. Not the method—but how they apply it. Small mistakes can ruin the fabric completely.
Here’s what to watch out for when trying to remove DTF from shirt:
-
Using too much heat: More heat doesn’t mean better results. It can scorch fabric, especially polyester, and permanently damage the garment.
-
Peeling too aggressively: Yanking the transfer off might seem faster—but it can tear fibers or leave uneven patches. Always peel slowly and at an angle.
-
Skipping a test spot: Every fabric reacts differently. Not testing first is a risk you don’t want to take.
-
Overusing chemicals: Adhesive removers help—but too much can stain or weaken fabric. Use only what’s needed.
-
Ignoring timing: Waiting too long makes removal harder. Acting early improves your chances significantly.
Avoid these mistakes, and you’ll get cleaner results—with less damage and fewer ruined shirts.
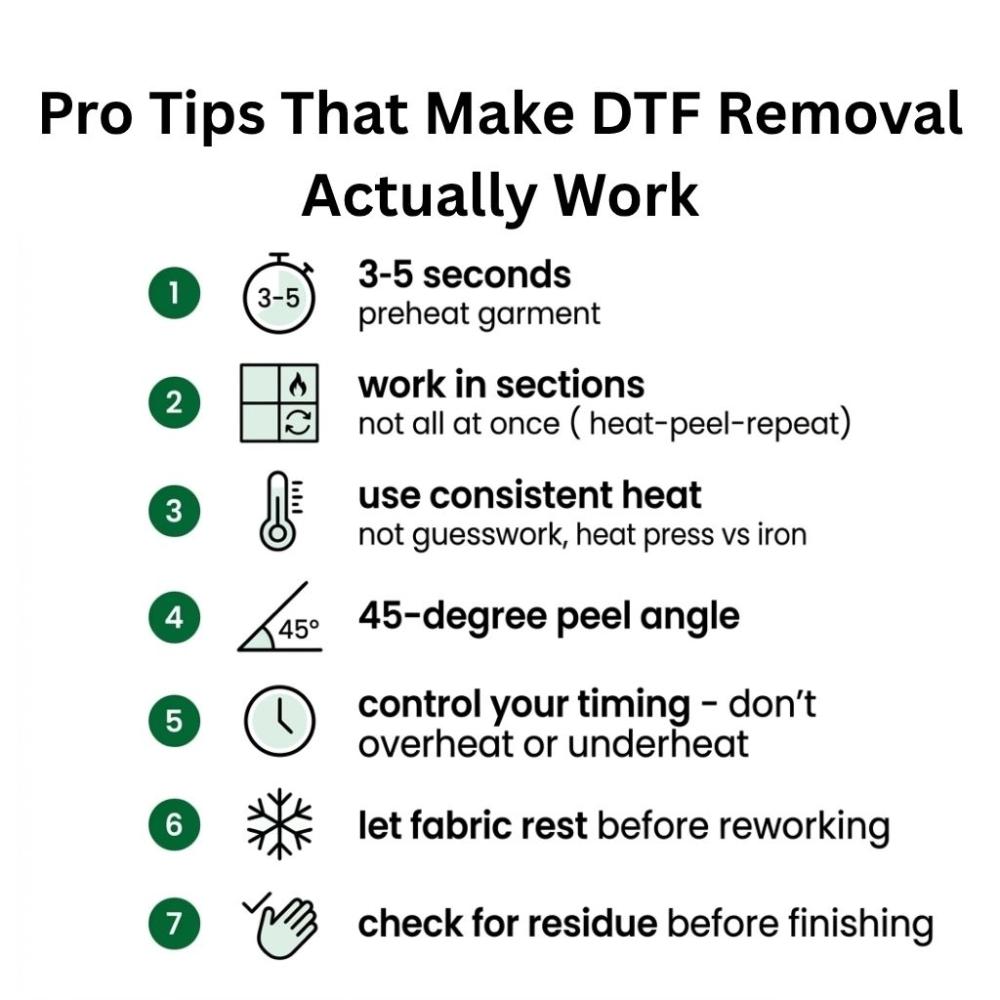
Pro Tips That Make Removal Actually Work
Want the difference between “it kind of worked” and “that looks clean and reusable”? It comes down to technique. Not force. Not luck. Just doing the small things right.
Here’s how professionals remove DTF from a shirt without damaging the fabric:
-
Always preheat the garment: Give it 3–5 seconds under heat before starting. This relaxes the fabric fibers and softens the adhesive slightly, making removal smoother and safer.
-
Work in sections, not all at once: Don’t rush to peel the entire design. Focus on small areas. Heat → peel → repeat. This gives you better control and reduces the risk of tearing or stretching the fabric.
-
Use consistent heat, not guesswork: A heat press is far more reliable than a home iron. Even temperature distribution ensures the adhesive softens evenly, which is critical for clean removal.
-
Peel at the right angle: Always peel at a 45-degree angle. Pulling straight up puts stress on the fabric and increases the chance of damage or leftover residue.
-
Control your timing: Don’t overheat or underheat. Too little heat won’t release the adhesive. Too much can bake it deeper into the fibers. Find the balance.
-
Let the fabric rest before reworking: After removal, allow the garment to cool completely. This stabilizes the fibers and prepares the surface if you plan to reprint.
-
Check for residue before finishing: Run your hand over the area. If you feel any leftover adhesive, address it before calling the job done.
These aren’t complicated tricks. But done right, they make a huge difference in results.
Business Use Cases: When DTF Removal Actually Matters
This isn’t just a “fix a mistake at home” problem. In real production environments, knowing how to remove a DTF transfer from a shirt can save time, money, and entire orders.
Print shops dealing with bulk errors
Mistakes happen—especially in gang sheet printing, where multiple designs are printed together. One wrong placement or incorrect artwork can affect dozens of garments. Instead of discarding everything, shops can remove DTF from shirts and reprint, reducing material waste and protecting margins.
Custom apparel brands fixing misprints
For brands producing limited runs or custom drops, every piece counts. A crooked logo or wrong size print can hurt brand perception. Learning how to remove DTF from shirt allows quick corrections without delaying orders or disappointing customers.
Print-on-demand businesses handling returns
Returns due to defects or customer issues are common. Instead of writing off the product, businesses can remove DTF from fabric, correct the design, and resell or reuse the garment. This improves operational efficiency and reduces losses.
Event and campaign merchandise updates
Sometimes details change—dates, names, or sponsor logos. Instead of reprinting everything, partial removal and reapplication can help salvage inventory, especially for time-sensitive events.
Sampling and prototyping
During product development, designs often go through multiple revisions. Being able to remove and reapply transfers helps brands test variations without wasting blank garments.
In short, DTF removal isn’t just a backup plan—it’s a cost-saving strategy. Businesses that master it gain flexibility, reduce waste, and maintain consistent production quality.
Related: What is the Best Temperature for DTF Printing?
Conclusion
Mistakes happen. Crooked prints. Wrong placements. It’s part of the process.
The good news? You don’t have to throw the shirt away. Once you understand how DTF works—and how to reverse it—you gain control. Real control.
Removing a transfer isn’t about force. It’s about timing, heat, and technique. Get those right, and you can fix most issues without damaging the fabric.
Will it always be perfect? Not always. But it can be clean, usable, and ready for a second chance.
Take your time. Test first. Stay precise.
Because once you master this, you’re not just fixing mistakes—you’re saving products, money, and your workflow.
FAQs
What is the best way to remove a DTF transfer from a shirt?
The best method depends on timing. For fresh prints, reheating and peeling works well. For fully cured designs, you’ll need heat combined with an adhesive remover. Understanding how to remove a DTF transfer from a shirt starts with choosing the right method based on fabric and age of the print.
Can you completely remove DTF from fabric without damage?
Not always. You can remove DTF from fabric, but complete removal without any trace depends on the material and how strongly the adhesive has bonded. Cotton gives better results, while polyester may retain slight marks if not handled carefully.
How do you remove DTF from a shirt at home?
You can use a heat press or even a household iron (with caution). Apply controlled heat, then peel slowly at an angle. For stubborn prints, use a fabric-safe adhesive remover. This is the most practical way to remove DTF from shirt without professional equipment.
Does removing DTF damage the fabric?
It can—if done incorrectly. Excess heat, aggressive peeling, or strong chemicals may weaken fibers. Following the right process for how to remove DTF helps minimize damage and keeps the garment usable.
Can you remove DTF transfers from polyester?
Yes, but it requires extra care. Polyester is heat-sensitive, so always use lower temperatures and gentle peeling. Rushing the process can scorch or warp the fabric.
What tools are best for DTF removal?
A heat press machine, Teflon sheet, and adhesive remover are the most effective tools. These ensure even heat and controlled removal, especially for bulk corrections or gang sheet errors.
Can you reprint after removing a DTF transfer?
Yes, in most cases. Once you remove DTF from fabric and clean any residue, the surface can be reused for printing. Just make sure the fabric is smooth, dry, and free from leftover adhesive before reapplying a design.