

When it comes to DTF printing, minimizing costs, material waste, and production time is a top priority for print shops and growing apparel businesses. This is where gang sheets are a game-changer.
Unlike individual DTF transfers, they are a single large sheet or a roll accommodating many different or the same designs or logos. Consequently, you can get multiple designs on a single sheet, avoid material waste, and excessive printing costs.
Given these benefits, print businesses now prefer gang sheets for DTF transfers. For this, you need to know how to make a gang sheet for your own DTF transfers. There are many ways to create gang sheets, and in this blog we are going to discuss them.
What is a Gang Sheet?
In short, a gang sheet is a large polyethylene terephthalate (PET) film where multiple designs are grouped together to maximize space. It allows you to reduce printing costs, material waste, and enhance efficiency.
But that’s just the surface. When people ask what are DTF gang sheets, they’re really asking how to scale smarter. Instead of printing one design at a time, DTF printing gang sheets let you combine logos, graphics, and other designs into one layout—saving time and boosting output.
If you’re handling bulk or repeat orders, this approach becomes essential. It allows you to reduce costs and speed up production.
Preparations Before Creating Gang Sheets for DTF Printing
Before you start working on how to make a DTF gang sheet, preparation is where most of the real work happens. This will ensure an optimized custom DTF transfer sheet that will yield quality prints.
Besides, a well-prepared file makes the entire process smoother—better alignment, cleaner prints, and less material waste. If your base setup is messy, your final DTF sheet will reflect it. Simple as that.
So instead of jumping straight into layout, take a few minutes to get these essentials right. It saves time later. It saves money, too.
Organize Your Design Files
Start by gathering all the designs you want to include. Make sure each file is clean, properly cut out, and has a transparent background. No rough edges. No leftover pixels.
Standardize Design Sizes
Decide the size of each design before placing it. Keeping consistent dimensions helps maintain uniformity—especially when creating a custom DTF transfer gang sheet for bulk order printing.
Check File Quality
Low-quality files lead to poor prints. Avoid compressed or stretched images. Use high-quality designs so your final output looks sharp and professional.
Plan Spacing & Layout
Think about the spacing between designs. Too close? Hard to cut. Too far? Wasted space. Balance is key to efficiency.
Follow Print Requirements
Every printer has different guidelines. Before finalizing your sheet, check file format, size limits, and margins.
Think in Terms of Efficiency
Group similar designs together. This improves workflow and makes gang sheet printing more practical for scaling. Because at the end of the day, a good gang sheet isn’t just designed—it’s planned.
Related: How to Prepare Image for DTF Printing? An Expert’s Guide
How to Make a Gang Sheet (Step-by-Step)?
When it comes to creating a gang sheet, there are two approaches. One for beginners using simple tools like web-based drag-and-drop applications. And, if you have prior experience in graphic design, you can try more advanced tools like Adobe Photoshop, Illustrator, and CorelDRAW. We will discuss each of these methods one by one.
Method 1: Using the Web-based Gang Sheet Builder Tool
In this method, you can use our gang sheet builder tool, which is a simple and safe web-based application. It allows you to easily upload your artwork in formats like PNG, JPEG, EPS, PDF, AI, and PSD to create gang sheets from 2 feet to 30 feet in size.
You can easily work with this user-friendly gang sheet builder without prior experience, and its intuitive features. Just upload your design, and its built-in Auto Builder feature will automatically arrange them on the sheet efficiently. No fuss, easy making of gang sheets.
This is the easiest way if you ask how to create a gang sheet for DTF printing. Just follow the steps below to make a DTF gang sheet.
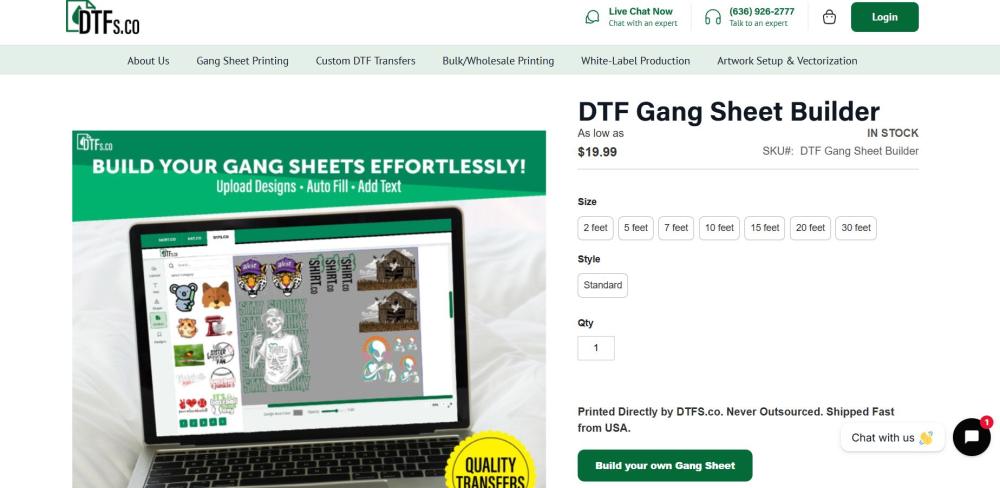
Step 1: Open the Gang Sheet Builder
Open our gang sheet builder in your web browser. You can open it in any browser on any desktop, mobile, or tablet.
Step 2: Choose the Size
Once you visit the builder, you will land on a screen as shown in the image. Choose your preferred size, style, and order quantity. You can choose a size from 2 feet to 30 feet. Once selected, click the “Build your own Gang sheet” button.
Step 3: Upload Your Images
The next step in creating your gang sheet is uploading the artwork or images. While the auto builder will automatically arrange your images on the sheet, you can simply drag and drop to arrange them accordingly. Also, you can adjust the size and other settings using the features.
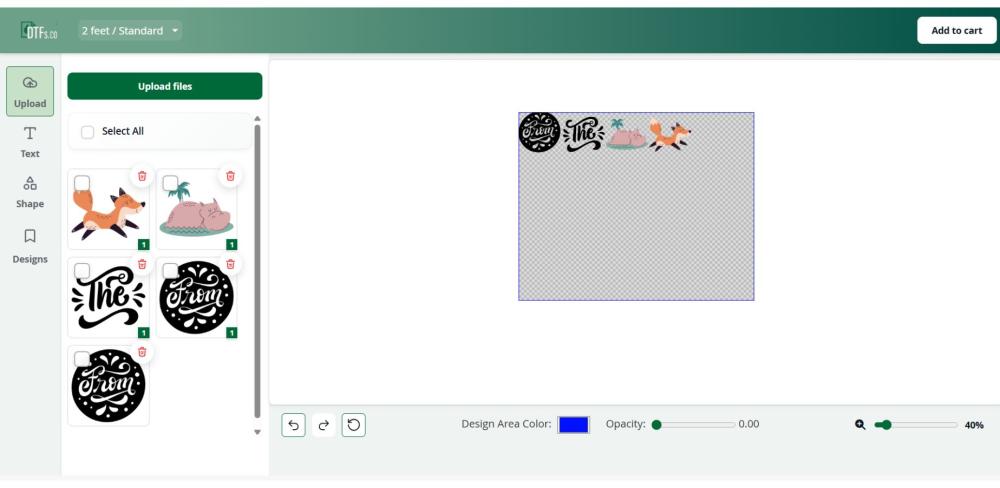
Step 4: Submit and Order Your Sheets
Once you're happy with the arrangement, you can simply click the “Add to Cart” button to order your gang sheets.
If you already have some experience in graphics design, you can use advanced graphics design tools. Here we are focusing on Adobe Illustrator, and the following method will help you make a gang sheet using this tool.
Related: How to Design Your Own DTF Transfers (Step-by-Step + Print-Ready Guide)
Method 2: Creating a DTF Gang Sheet using Adobe Illustrator
Here’s how you can create a clean, production-ready gang sheet using Adobe Illustrator.
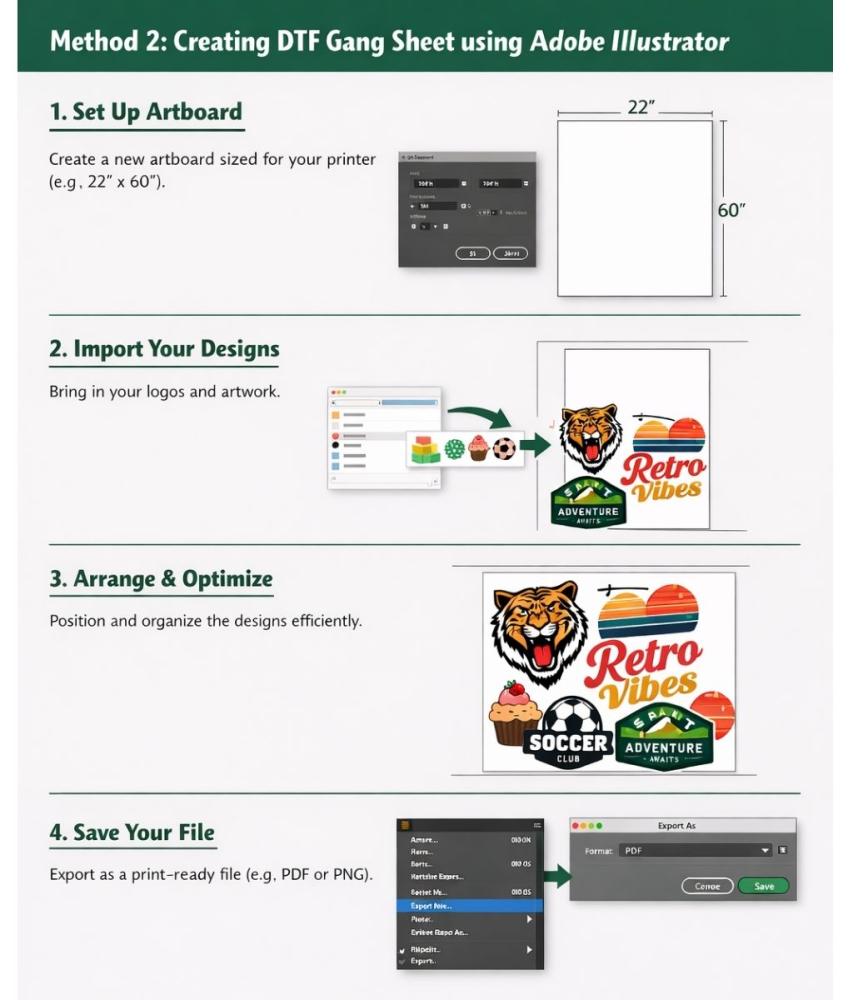
Step 1: Set Up Your Artboard
Start by creating a new document. Set the artboard size based on your printer (commonly 22” x 60” or similar). Make sure units are in inches, and your layout matches your print provider’s requirements.
Step 2: Import Your Designs
Bring in all your artwork—logos, graphics, text designs. Use File → Place and ensure each design has a transparent background. Keep everything high quality to avoid print issues later.
Step 3: Arrange & Optimize Layout
Now organize your designs across the artboard. Space them evenly. Avoid overlap. Rotate and resize smartly to maximize space. This is where you reduce waste and make gang sheet printing efficient.
Step 4: Save & Export the File
Once done, export your file in a print-ready format. Use PNG or PDF with transparent background and proper settings. Double-check alignment, spacing, and edges before final export.
Common Issues and Solutions to Make Efficient Gang Sheets
Creating a gang sheet sounds simple. Just place multiple designs on one sheet and print. Done. But in reality, this is where most people struggle. Especially when they move from single designs to bulk layouts. One small mistake—and it shows up across the entire DTF sheet. That’s wasted film, wasted time, and sometimes wasted orders.
If you’re learning how to make a DTF gang sheet, understanding these common mistakes—and how to fix them—is what separates clean production from constant rework.
1. Poor Layout Planning
One of the biggest issues is inefficient use of space. Designs are either too scattered or poorly aligned.
Solution:
Plan your layout before placing designs. Use grids or guides. Rotate elements where needed. The goal is simple—fit more without making it messy.
2. Inconsistent Design Sizes
Mixing random sizes without intention creates uneven results. One logo looks perfect, another looks off.
Solution:
Standardize dimensions wherever possible. Group similar sizes together. This is especially important when building a custom DTF transfer gang sheet for repeat orders.
3. Spacing Mistakes
Too little space? Designs overlap or become hard to cut. Too much space? You waste valuable film.
Solution:
Maintain consistent spacing between designs. Enough for clean cutting. Not so much that it reduces efficiency.
4. Low-Quality or Mixed Files
Combining high-quality and low-quality designs in one sheet leads to inconsistent prints. Some look sharp. Others don’t.
Solution:
Use only clean, high-quality files. Avoid mixing different quality levels in one DTF sheet. Consistency matters more than anything.
5. Ignoring Print Requirements
Every printer has its own rules—file formats, margins, size limits. Ignoring them leads to rejected files or bad prints.
Solution:
Always check specifications before exporting. Set your artboard accordingly. Build your sheet with those constraints in mind.
6. Overcrowding the Sheet
Trying to fit “just one more design” often backfires. Layout becomes tight. Cutting becomes difficult. Errors increase.
Solution:
Optimize, don’t overcrowd. Leave enough room for clean handling and accurate transfers.
7. Lack of Production Thinking
Most people design for visuals, not for printing. That’s where things break.
Solution:
Think beyond the screen. Consider cutting, pressing, and final application. A good gang sheet isn’t just visually correct—it’s production-ready.
Key Note:
A successful gang sheet isn’t about cramming designs together. It’s about balance. Precision. Efficiency. Once you understand these challenges, the question “how to make a DTF gang sheet” becomes less about trial and error—and more about control.
Related: 15 Common Direct to Film Transfer Mistakes & How to Avoid Them
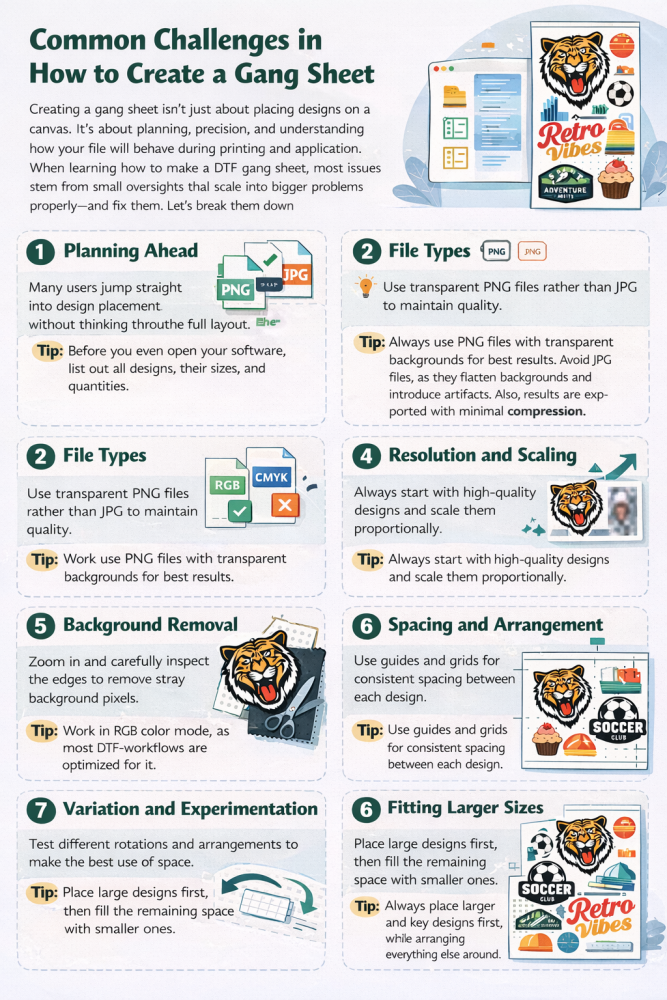
Common Challenges in How to Create a Gang Sheet
Creating a gang sheet isn’t just about placing designs on a canvas. It’s about planning, precision, and understanding how your file will behave during printing and application. When learning how to make a DTF gang sheet, most issues come from small oversights that scale into bigger problems. Let’s break them down properly—and fix them.
1. Planning Ahead
Many users jump straight into design placement without thinking through the full layout. This leads to wasted space, inconsistent sizing, and inefficient sheets.
Tip:
Before you even open your software, list out all designs, their sizes, and quantities. Think about how many pieces you need per design and how they can be grouped. Planning ahead helps you avoid rearranging everything later and ensures your DTF sheet is optimized for both space and production efficiency.
2. File Types
Using incorrect file formats is a common mistake. Files without transparency or with compression issues can create unwanted backgrounds and reduce print quality.
Tip:
Always use PNG files with transparent backgrounds for best results. Avoid JPG files, as they flatten backgrounds and introduce artifacts. Also, ensure files are exported with minimal compression. This becomes even more important when building a custom DTF transfer gang sheet, where multiple designs must maintain consistent quality.
3. Color Modes
Color inconsistency is a frequent frustration. What looks vibrant on screen may appear dull or slightly off when printed.
Tip:
Work in RGB color mode, as most DTF workflows are optimized for it. However, don’t rely solely on screen appearance. Increase contrast slightly and avoid very subtle tones. Test your designs on both light and dark backgrounds to ensure they remain visible and impactful across different garments.
4. Resolution and Scaling
Scaling designs improperly can lead to blurry or pixelated prints. This often happens when small images are enlarged to fit larger spaces.
Tip:
Start with high-quality designs and maintain proportional scaling. Never stretch images beyond their original quality limits. If you need larger prints, design them at the required size from the beginning. This ensures consistency across the entire DTF sheet and prevents uneven output.
5. Background Removal
Even a tiny leftover background can ruin a print. These imperfections are often invisible on screen but become obvious once transferred onto fabric.
Tip:
Zoom in closely and inspect edges carefully. Place your design on contrasting backgrounds (black, white, colored) to spot hidden pixels or halos. Clean edges thoroughly before adding designs to your sheet. This step is critical for achieving professional-looking results.
6. Spacing and Arrangement
Improper spacing can either waste valuable film or make cutting difficult. Overlapping or tightly packed designs often lead to production issues.
Tip:
Maintain consistent spacing between each design. Use guides or grids to align everything neatly. Leave enough room for cutting and handling, but not so much that it reduces efficiency. A balanced layout improves both usability and output quality.
7. Variation and Experimentation
Many users stick to a rigid layout, missing opportunities to optimize space. This limits how much you can fit onto a single sheet.
Tip:
Experiment with rotating designs, mixing orientations, and rearranging layouts. Sometimes a slight rotation or repositioning can help you fit additional elements without overcrowding. Smart variation is key when building a custom DTF transfer gang sheet for bulk printing.
8. Fitting Larger Sizes
Large designs can disrupt the entire layout if not handled properly. They often force awkward spacing or reduce the number of smaller designs you can include.
Tip:
Always place larger designs first, then arrange smaller ones around them. This approach helps you utilize space more effectively and prevents last-minute adjustments. It also ensures your final layout looks structured and production-ready.
Conclusion
Creating a gang sheet isn’t just a design task. It’s a production decision. One that directly impacts cost, efficiency, and final output.
If you understand the fundamentals—planning, spacing, file quality, and layout—you’re already ahead of most people. Small details matter. A lot. Because in a DTF sheet, one mistake doesn’t stay isolated. It repeats.
Take your time. Build with intention. Test when needed.
Whether you’re working on a single order or scaling with a custom DTF transfer gang sheet, the goal stays the same—clean designs, efficient layouts, and consistent results.
Get that right, and everything else becomes easier.
FAQs
1. What is a DTF gang sheet?
A DTF gang sheet is a single film where multiple designs are arranged together for printing. It helps reduce cost, save material, and improve production efficiency.
2. How do I make a DTF gang sheet properly?
To make a DTF gang sheet, you need clean design files, proper sizing, balanced spacing, and an optimized layout that maximizes the usable area of the sheet.
3. What file format is best for gang sheet printing?
PNG with a transparent background is the most preferred format. It ensures clean edges and prevents unwanted backgrounds during printing.
4. How much space should I leave between designs?
You should leave enough space for easy cutting and handling—typically small, consistent gaps. Avoid placing designs too close or too far apart.
5. Can I mix different designs on one gang sheet?
Yes, that’s the main advantage. You can combine multiple logos, graphics, and sizes into one sheet for better efficiency and cost savings.
6. Why is my gang sheet print not coming out correctly?
Common reasons include poor file quality, incorrect sizing, bad spacing, or unclean edges. Small design issues often become visible after printing.