

Curing is a critical step in the DTF printing process, where adhesive powder is melted and bonded to the printed design before heat application on fabric. Understanding how to cure DTF powder with heat press directly impacts print durability, adhesion, and overall finish.
If curing is done correctly—with the right time and temp for DTF transfers—the result is a flexible, long-lasting print that resists cracking and peeling.
However, many small businesses struggle with inconsistent results due to under-curing or overheating. These common mistakes can lead to weak adhesion or brittle prints, ultimately affecting product quality and customer satisfaction. Mastering curing ensures professional, reliable outcomes every time.
In this blog, we’ll break down the complete process, best practices, and expert tips to help you get consistent results with custom DTF transfers.
What Does “Curing DTF Powder” Mean?
Curing DTF powder is the process of applying heat to melt the adhesive powder onto the printed design, creating a bond that allows the transfer to stick permanently to fabric during heat pressing. It’s a crucial step that prepares the design for final application.
Drying vs Curing: What’s the Difference?
-
Drying: Removes moisture from the ink after printing
-
Curing: Activates and melts the adhesive powder to enable proper bonding
While drying happens naturally or during printing, curing requires controlled heat and the correct temperature for DTF transfer to ensure the adhesive performs effectively.
Role of Adhesive Powder in Bonding
The adhesive powder acts as the glue between the printed design and the fabric. When exposed to the right heat:
-
It melts evenly across the design
-
Creates a flexible bonding layer
-
Ensures durability, stretchability, and wash resistance1
Without proper curing, even high-quality prints can fail during application or washing, making this step essential for long-lasting results.
Tools & Materials Required for Heat Press Curing
To cure DTF powder effectively, you need the right tools and a controlled setup. A heat press machine is essential—both clamshell and swing-away types work well, as long as they deliver even and consistent heat across the platen. Consistency is key when managing the correct time and temp for DTF transfers.
You’ll also need printed PET film coated with adhesive powder, prepared and ready for the curing stage. This film carries the design and plays a critical role in achieving clean results.
A temperature gun is optional but highly recommended. It helps verify that your heat press is reaching and maintaining accurate temperatures, reducing the risk of under- or over-curing.
For small businesses, workspace setup matters more than expected. Keep the area clean, dust-free, and well-ventilated. Use stable surfaces and organize materials efficiently to streamline workflow and maintain consistent curing quality across every batch.
Also read: DTF Transfer Curing: What It Is and How It Affects Print Durability
What is the Ideal Heat Press Settings for Curing DTF Powder?
Getting the settings right is crucial when learning how to cure DTF powder with heat press, as even slight variations can affect adhesion and durability. The goal is to melt the adhesive powder evenly without overexposing it to heat.
Here are the ideal settings to follow:
-
Temperature: 160–180°C (320–356°F)
Ensures the powder melts properly without burning or over-curing -
Time: 2–5 minutes
Depends on your heat press consistency and film thickness -
Pressure: No direct pressure applied
Use the hover method, where the heat press hovers slightly above the film without closing fully
The hover method allows heat to circulate evenly, preventing smudging or flattening the adhesive. Maintaining these settings consistently ensures a smooth, gel-like finish and prepares the transfer perfectly for final application.
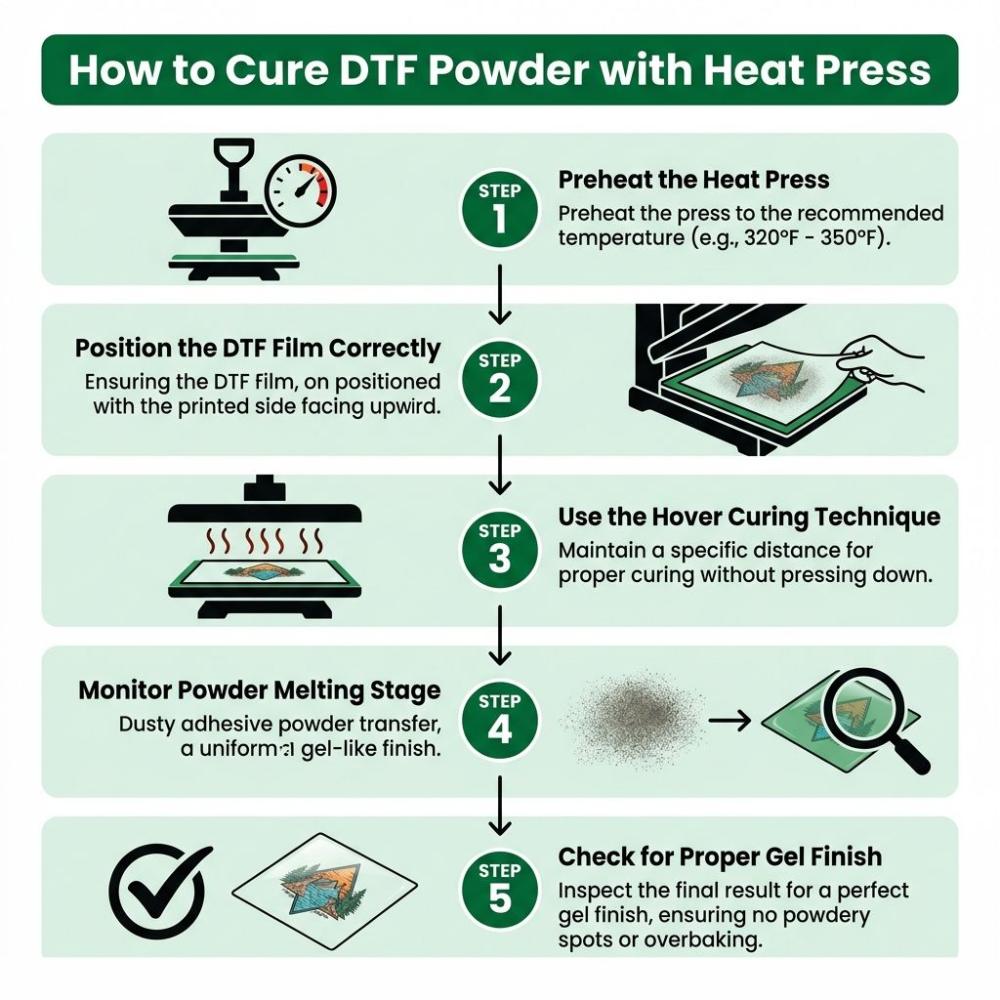
Step-by-Step: How to Cure DTF Powder with Heat Press
Mastering how to cure DTF powder with heat press comes down to following a consistent, step-by-step process. The right approach ensures proper adhesion, flexibility, and long-term durability.
Step 1: Preheat the Heat Press
Set your machine to the correct temperature for DTF transfer (typically 160–180°C / 320–356°F). Allow it to fully stabilize before starting.
Step 2: Position the DTF Film Correctly
Place the printed PET film on a flat, heat-resistant surface. Ensure the powdered side is facing up and remains undisturbed.
Step 3: Use the Hover Curing Technique
Instead of closing the press, let it hover slightly above the film. This prevents pressure from disturbing the adhesive powder.
Step 4: Monitor Powder Melting Stage
Watch closely as the powder transitions from a grainy texture to a smooth, melted coating.
Step 5: Check for Proper Gel Finish
A properly cured transfer will have a consistent, semi-gloss (gel-like) finish without dry or overly shiny spots.
Visual Cues for Perfect Curing
-
Even, glossy coating across the design
-
No visible loose powder
-
Smooth, slightly raised texture
Common Beginner Errors
-
Too low temperature: Powder remains grainy
-
Too high heat: Adhesive becomes brittle
-
Applying pressure: Distorts design and bonding
-
Uneven heating: Leads to patchy curing
Following these steps ensures consistent, professional-quality results every time.
Heat Press vs Curing Oven: Which Is Better?
Choosing between a heat press and a curing oven depends on your production scale, budget, and workflow needs. Both methods can deliver good results when the correct time and temp for DTF transfers are maintained, but they serve different business stages.
For small businesses or beginners, a heat press is the most practical option. It’s affordable, space-saving, and effective for low to medium volumes. With proper control of temperature for DTF transfer, the hover method can produce consistent curing results without major investment.
On the other hand, a curing oven is designed for efficiency and scalability. It allows multiple transfers to be cured at once, ensuring even heat distribution and reducing manual effort. This makes it ideal for growing apparel businesses handling bulk orders.
Cost vs Efficiency Breakdown:
-
Heat Press: Low cost, manual process, slower output
-
Curing Oven: Higher upfront cost, automated workflow, faster batch production
-
Use Gang Sheet Printing: Combine multiple designs on a single sheet to reduce waste, speed up curing, and improve workflow—especially useful for bulk orders.
When to Upgrade:
-
Increasing order volume
-
Need for consistent large-batch curing
-
Reducing labor time and errors
In short, start with a heat press and upgrade to an oven as your production scales.
Common Mistakes While Curing DTF Powder
Curing DTF powder may seem simple, but small mistakes can significantly impact print quality and durability. Inconsistent curing often leads to issues that show up after pressing or even after a few washes. Understanding these common errors helps avoid wasted materials and poor results.
Here are the most frequent mistakes:
-
Over-curing → brittle transfers
Excess heat or time can harden the adhesive, making the print stiff and prone to cracking -
Under-curing → weak adhesion
Insufficient heat prevents the powder from fully melting, leading to peeling or lifting -
Uneven heat distribution
Hot and cold spots in the heat press can cause patchy curing and inconsistent bonding -
Incorrect powder application
Too much powder creates a thick, heavy feel, while too little results in weak adhesion
Avoiding these mistakes ensures smoother finishes, better flexibility, and long-lasting prints.
Also read: Why is My DTF Print Cracking After Washing?
How to Know If DTF Powder Is Properly Cured
Knowing whether your DTF powder is cured correctly is essential for achieving strong adhesion and long-lasting prints. Even if you’re following the right temperature for DTF transfer, small inconsistencies can affect the final result. Here’s how to check if you’re using the right way to cure DTF powder with heat press:
Texture Test (Smooth vs Grainy)
-
Properly cured powder feels smooth and slightly rubbery
-
Under-cured powder remains rough or grainy to the touch
Visual Signs (Matte vs Glossy Balance)
-
A well-cured transfer has a consistent semi-gloss or gel-like finish
-
Dull areas indicate under-curing, while overly shiny spots may signal over-curing
Adhesion Performance Indicators
-
Powder should be fully melted and bonded to the design
-
No loose particles or uneven patches
-
Transfer holds firmly during handling without flaking
These simple checks help ensure your curing process is consistent, reliable, and ready for high-quality application.
How Curing Affects DTF Transfer Durability
Curing plays a direct role in determining how well a DTF print performs over time. When you understand how to cure DTF powder with heat press correctly, you ensure the adhesive layer is fully activated—this is what ultimately controls durability, flexibility, and wash resistance.
A properly cured transfer forms a strong bond between the design and fabric fibers. This bond is what helps the print withstand repeated washing without peeling, cracking, or fading. Poor curing, on the other hand, leads to early failure, even if the print looks fine initially.
Curing also impacts how the design behaves during wear.
When done right:
-
The print remains flexible and stretches with the fabric
-
It doesn’t feel stiff or break under tension
-
It maintains a smooth finish even after multiple washes
From a long-term perspective, consistent curing ensures reliable performance across batches. It reduces returns, improves customer satisfaction, and helps maintain professional-quality output—making it a critical step in the entire DTF workflow.
Pro Tips to Improve Consistency (For Small Businesses)
Consistency is what separates average prints from professional results. For small businesses, refining your process not only improves quality but also speeds up production—especially when handling bulk DTF transfer orders.
Here are some practical tips to stay consistent:
-
Batch Curing Strategies
Cure multiple transfers in one cycle (if using an oven) or follow a fixed sequence with your heat press to maintain uniform results across batches -
Workspace Temperature Control
Keep your environment stable and low in humidity. Fluctuations can affect powder behavior and curing consistency -
Using Gang Sheets Efficiently
Arrange multiple designs on a single sheet to maximize output and reduce material waste, especially for bulk orders -
Workflow Optimization
Create a step-by-step system—from printing to curing—to minimize delays and human error
By standardizing your setup and process, you can achieve reliable, repeatable results while scaling your production smoothly.
Can You Cure DTF Powder Without a Heat Press?
Yes, it’s possible to cure DTF powder without a heat press, but it comes with limitations. While a heat press offers controlled and consistent heat, alternative methods can work in certain situations—especially for beginners or low-volume setups.
Alternatives to a Heat Press
-
Heat Gun
Can melt adhesive powder, but requires careful movement to avoid uneven curing -
Curing Oven
A more reliable alternative, ideal for batch processing and consistent heat distribution
Limitations and Risks
-
Uneven heat can lead to patchy curing
-
Higher risk of under- or over-curing
-
Less control compared to a heat press
-
May affect durability and adhesion quality
When It’s Acceptable
-
Small test runs or sampling
-
Low production volume
-
When a heat press is not immediately available
Read more: What Makes a Good DTF Transfer: A Complete DTF Printing Quality Checklist
Conclusion: Mastering Curing for Better Print Quality
Mastering the curing process is essential for achieving consistent, high-quality DTF results. Understanding how to cure DTF powder with heat press ensures that every transfer bonds correctly and performs well over time. Precision in settings—especially the right temperature for DTF transfer—directly impacts adhesion, flexibility, and overall print durability.
Even small inconsistencies can lead to major quality issues, making attention to detail critical. For growing businesses, proper curing isn’t just a technical step—it’s a key part of quality control and brand reliability. By refining your process and maintaining consistency, you can reduce errors, improve customer satisfaction, and scale production with confidence.
FAQs
1. Can I cure DTF powder too long?
Yes, over-curing can make the adhesive brittle. This leads to stiff prints that may crack over time instead of staying flexible.
2. What happens if DTF powder is not cured properly?
Under-cured powder results in weak adhesion. The design may peel, lift, or fail after pressing or washing.
3. Can I use a home iron for curing?
A home iron is not recommended. It cannot provide consistent heat control, which is essential for proper curing and reliable results.
4. Why is my DTF powder not melting evenly?
This usually happens due to uneven heat distribution, incorrect temperature settings, or inconsistent powder application.
5. Is curing required before heat pressing on garments?
Yes, curing is a necessary step. It activates the adhesive powder so the design can properly bond during heat pressing.
6. What is the ideal temperature for curing DTF powder?
Typically, curing is done between 160–180°C (320–356°F), depending on your setup and materials.