

Planning to print on wood, glass, metal, or any other non-fabric material? Direct to film printing makes it possible with UV DTF transfers. Ever fought with a curved glass bottle? It’s a total pain. But what is UV DTF?
Think of it like a pro-grade sticker that never comes off. Seriously. You get vibrant, 3D-like prints. No heat press needed. Just rub it on with your thumb. It's the future of hard-surface branding. It’s a specialized film process using UV-cured inks. It’s tough. Waterproof. Perfect for small businesses who needs to brand everything.
It just simplifies the whole workflow. Why bother with old school methods? It's fast, high-quality, and it works. Honestly, it’s like magic for your merch.
We're diving into what is UV DTF in this blog and help you understand their uses, applications, and essential guide to leverage UV DTF transfer for branding on hard surfaces. You'll learn step-by-step how it works to get that 3D look on glass, wood, and more—without the usual headache.
What is UV DTF Transfer?
So, what is UV DTF? Basically, it’s a total game changer for hard surfaces. Think of it like a super-powered sticker that actually stays put. It uses specialized UV-curable ink. We print it on a film and it gets this cool, raised 3D texture you can feel.
No heat press required. Zero. You just peel the back and rub it onto your product with your hands. It sticks to glass, metal, even wood. Its tough, too. Waterproof and scratch-resistent. For small brands who needs professional gear fast, this is huge.
You can brand a flask or a laptop in seconds. It simplifies your whole workflow. It’s a permanent solution for your merch. High-end look without heavy machines. Just peel, stick, done.
Related: DTF (Direct to Film) Printing: A Complete Guide
What are the Key Features of UV DTF Transfer?
If you’re already familiar with how custom DTF transfers revolutionize apparel, then UV DTF is going to blow your mind for hard surfaces. It’s basically the same "no-weeding" magic but for things that can't go in a heat press. Think mugs, flasks, and even windows. The features are what makes this tech a complete winner for small brands.
Here are the key features that makes these transfers a must-have:
-
Tactile 3D Texture: This isn't a flat sticker. The ink is layered. It creates a raised, embossed feel that you can actually touch. It looks high-end. Honestly, it makes your merch look like it was printed in a factory, not a home office.
-
No Heat Required: This is the biggest relief. You don't need a bulky press. You just peel the film and apply it with your hands. It’s perfect for materials that melt or warp under heat. Just rub it on and peel the carrier. Simple.
-
Extreme Durability: These things are tough. They are waterproof, scratch-resistant, and don't fade in the sun. You can put them on a car window or a water bottle. It stays put through the dishwasher, mostly. It's a permanent solution.
-
Versatility on Any Surface: It sticks to almost everything. Glass, metal, wood, plastic, ceramic—you name it. If the surface is hard and relatively smooth, it will bond. Even curved surfaces are easy once you get the hang of it.
The UV DTF process is what creates this level of quality. Basically, the design is printed onto a "Transfer A" film with specialized UV-curable inks. A high-intensity UV light cures the ink instantly, making it rock solid. Then, a "Transfer B" laminating film is applied on top. When you’re ready to brand your product, you just remove the A film and press the design down.
It’s just efficient. No more dealing with messy vinyl or limited sublimation colors. You get full-color, high-resolution graphics that pops. For small businesses who needs to brand their own packaging or products fast, this is a lifesaver. It cuts down your production time and keeps your quality high. It’s a smart move for anyone looking to scale their custom product line without adding more heavy machinery. Just peel, stick, and you're good to go.
What is the Process of UV DTF Printing?
Here is the step-by-step breakdown of how this works in the real world. No fluff. Just the moves you need to make to get that 3D finish. Whether you want a single transfer or looking for bulk DTF printing, these are the steps you can follow.
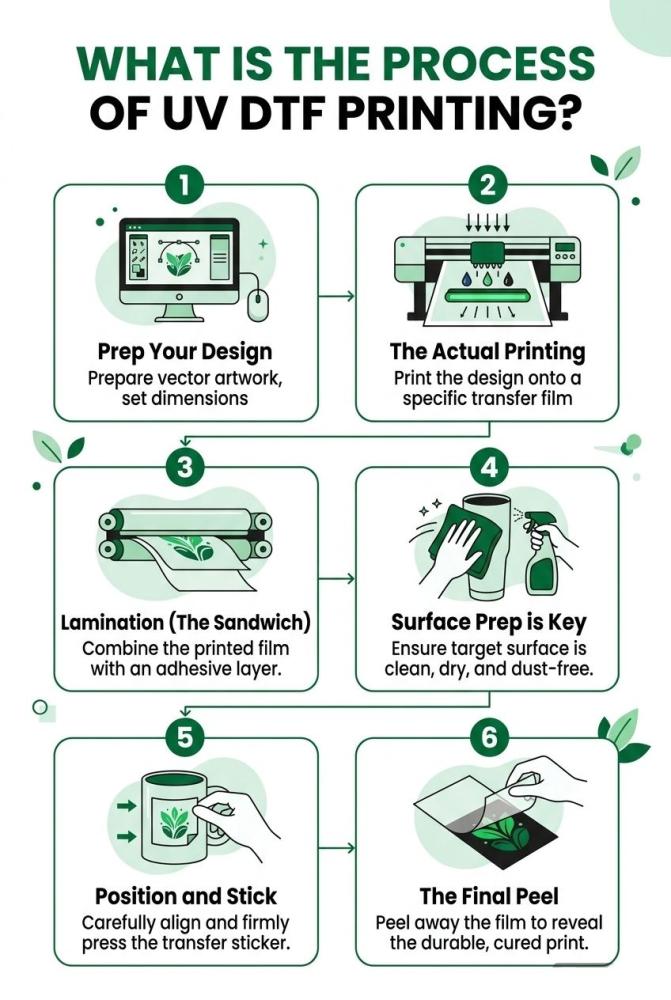
Step 1: Prep Your Design
First, get your artwork ready. Use 300 DPI. If it’s blurry on the screen, it’ll look like trash on the bottle. Make sure you have a transparent background. You don't want a big white box around your logo. This is where you decide the "height" of your 3D effect. More ink layers mean more texture.
Step 2: The Actual Printing
This is the heart of what is UV DTF. The printer lays down a layer of specialized glue first. Then the white ink. Then your colors. A UV lamp follows right behind the carriage. It "cures" the ink instantly. Every thing turns from liquid to a solid, raised plastic layer on "Film A." It happens fast.
Step 3: Lamination (The Sandwich)
Once the printing is done, you run Film A through a cold laminator. This applies "Film B" (the carrier sheet) onto the top of your design. Now you have a transfer sandwich. Your design is protected in the middle. You can cut these out with scissors now. Or use a plotter if you’re fancy.
Step 4: Surface Prep is Key
Don't skip this. Grab some isopropyl alcohol. Wipe down your glass, metal, or wood surface. Dust and finger oils are the enemy here. If the surface is dirty, the transfer won't bond. It’ll just peel off later. A clean surface is a permanent surface.
Step 5: Position and Stick
Peel the backing (Film A) away. Your design should be stuck to the clear carrier film (Film B). Line it up carefully. Once it touches the surface, it’s basically permanent. No room for "oops." Use a squeegee or your thumb to rub it down hard. Start from the center. Push the air bubbles out to the edges.
Step 6: The Final Peel
This is the satisfying part of the UV DTF process. Peel back the top carrier film very slowly. Keep it flat against the surface while you pull. If a tiny corner lifts, stop. Rub it back down. When you’re done, the design stays on the product. It’s waterproof. It’s scratch-resistent. You’re ready to ship.
Quick Reality Check: If you’re doing this for the first time, start with a flat surface. Curves take a bit of practice to avoid wrinkles. But once you get it? You'll be sticking these on every thing in your office. It's addictive.
What is the Difference Between DTF and UV DTF?
Understanding the difference between DTF and UV DTF is the first step toward choosing the right technology for your business. While both share the "Direct to Film" name, they are built for entirely different worlds. One lives on fabric; the other lives on hard goods. If you use the wrong one, your prints will either peel off in the wash or crack on the mug.
Here are the core technical and practical differences you need to know:
The Material Matchup
The most obvious difference between UV DTF and DTF is the target surface. Standard DTF is designed specifically for textiles. It creates a flexible, breathable bond with cotton, polyester, and blends. UV DTF, however, is strictly for non-porous hard surfaces like glass, metal, wood, and acrylic. Because UV ink cures into a hard, plastic-like layer, it has zero flexibility. If you try to use UV DTF on t shirts, the design will feel like a stiff board and shatter the moment the fabric stretches.
The Application Method
The UV DTF process is a "peel and stick" operation. You don't need a heat press or any specialized machinery at the point of application. You simply rub the transfer onto the object with your hands and peel the carrier sheet. Standard DTF requires a heat press to melt the adhesive powder into the fabric fibers at high temperatures (310°F).
-
DTF: Requires a heat press, adhesive powder, and specific curing temperatures.
-
UV DTF: Requires only pressure (your thumb or a squeegee) and a clean surface.
Comparison at a Glance
|
Feature |
Standard DTF |
UV DTF |
|
Best For |
Apparel (Shirts, Hoodies, Hats) |
Hard Goods (Mugs, Tumblers, Laptops) |
|
Heat Needed? |
Yes, for curing and pressing |
No, it is a cold application |
|
Finish |
Soft, matte, and flexible |
High-gloss, 3D raised texture |
|
Durability |
High washability (100+ washes) |
Scratch and water resistant |
|
Workflow |
Print, Powder, Cure, Press |
Print, Laminate, Stick |
Production Efficiency and Cost
When it comes to scaling, both methods benefit from gang sheet printing. This allows you to combine multiple designs onto a single roll, significantly reducing your cost per print. However, the difference between DTF and UV DTF in production is the lamination step. UV DTF requires a "sandwich" of two films (A and B) that must be laminated together after printing. Standard DTF skips lamination but requires an automated powder shaker or manual powdering to create the glue layer.
Why the Distinction Matters
Choosing the difference between UV DTF and DTF effectively means understanding your customer's needs. If a client wants branded water bottles and matching hoodies, you’ll need both. Using standard DTF on a bottle won't work because the powder won't bond to the glass without extreme heat, which could break the glass. Using UV DTF on a hoodie will result in a print that peels off in the first laundry cycle.
In summary, keep your standard DTF for anything that goes in a closet and your UV DTF for anything that sits on a desk or a shelf. Both technologies use the UV DTF process logic of transferring a pre-printed design, but their "DNA"—the ink and the adhesive—is tuned for completely different environments. Mastering both allows you to brand literally anything your customer brings to your shop.
Related: DTF vs Vinyl Printing: Which Is Right for Your Apparel Business?
Benefits of Using UV DTF Transfers
If you're looking for a way to brand items that can't handle a heat press, understanding what is UV DTF is your biggest competitive advantage. This technology isn't just a new trend; it’s a massive upgrade for anyone tired of the limitations of vinyl or sublimation. It takes the "Direct to Film" logic and applies it to the world of hard goods with industrial strength.
The benefits of moving your production to this method are immediate and obvious. Here’s why small businesses are making the switch:
-
No Equipment Overload: The biggest win is the lack of machinery needed at the finish line. You don't need a mug press, a hat press, or a $500 heating element. You just need your hands and a squeegee. It’s a "cold" process, which means you can brand heat-sensitive plastics that would otherwise melt.
-
The Premium "Feel": Unlike flat stickers, UV DTF has a raised, embossed texture. This 3D effect makes your products look like they were manufactured in a high-end factory. It adds perceived value, allowing you to charge more for your custom merch.
-
Unmatched Versatility: It sticks to almost anything—glass, metal, wood, ceramic, and acrylic. Whether it's a curved wine glass or a flat laptop lid, the bond is permanent, waterproof, and scratch-resistant.
-
Time Efficiency: There is zero weeding. If you’ve ever spent an hour picking tiny bits of vinyl out of a logo, you’ll appreciate that the UV DTF process transfers only the ink. Your workflow goes from minutes to seconds.
One thing to keep in mind is that these benefits are specific to hard surfaces. We often get asked about using UV DTF on t shirts, but that is one area where the benefits disappear. Because the ink cures into a hard resin, it doesn't have the "give" needed for fabric. For clothes, you want the soft flexibility of standard DTF.
By sticking to hard goods, you unlock a world of professional branding that’s fast, durable, and looks incredible. It’s the easiest way to turn a generic $5 tumbler into a $25 branded masterpiece. High-resolution colors, white ink that actually pops on dark backgrounds, and a finish that lasts—that’s the real power of this technology. It’s about working smarter and delivering a product that your customers can’t find at a local craft store.
Related: What are the Key Advantages of DTF Printing?
To Wrap Up
UV DTF is the ultimate "cheat code" for branding the un-printable. We’ve broken down what is UV DTF and why its 3D, tactile finish beats traditional stickers every time. While it’s tempting to try UV DTF on t shirts, remember to keep this tech on hard surfaces like glass and metal for the best results.
Pro Tip: For maximum adhesion, let your transfer "cure" on the surface for 24 hours before heavy use or washing. If you’re ready to scale, check out our sample packs to feel the quality yourself. Stop weeding vinyl and start sticking. Your workflow—and your margins—will thank you.
FAQs
Is UV DTF dishwasher safe?
Mostly, yes. It’s tough and waterproof. But high heat in a dishwasher can eventually weaken the bond over time. For the longest life, tell your customers to hand wash. It keeps that 3D shine looking brand new for years.
Can I use UV DTF on t shirts or hoodies?
Just don't. We get asked this a lot. UV ink cures into a hard, stiff plastic. Fabric needs to stretch and breathe. If you put UV DTF on t shirts, it’ll crack and peel off in the first wash. Stick to apparel-specific DTF for clothes.
Do I need a heat press for application?
Nope. That’s the best part. It’s a "cold" process. No heat, no heavy machines. You just need a clean surface and a little bit of thumb pressure. It’s perfect for items that would melt under a heat press, like thin plastics.
How long do these transfers last on hard surfaces?
They are basically permanent. Once the adhesive bonds to a clean surface, it’s scratch-resistant and very hard to remove. It handles sun, rain, and daily handling without fading. It’s industrial-grade quality for your small business.
Can I apply it to curved surfaces like wine glasses?
Yes, but go slow. Start from the center and work your way out to the edges. This prevents air bubbles and wrinkles. For tight curves, a bit of patience is all you need. Once it’s on, it looks like it was printed directly on the glass.