

DTF printing is a popular method to decorate a myriad of apparel today. You can customize almost any fabric surface with vibrant, durable graphics, but successful DTF transfer application on curved or seam-heavy areas requires extra care. Unlike flat surfaces, seams, collars, sleeves, pockets, caps, and other uneven areas can create pressure inconsistencies that affect adhesion and print quality.
Without the right technique, you may experience lifting edges, wrinkles, cracking, or incomplete transfers. This guide explores practical tips for applying DTF transfers on curved surfaces and DTF transfers on seams, helping decorators, apparel brands, and print shops achieve professional results.
Whether you're using small logos or full-size graphics, quality custom DTF transfers combined with proper application methods can dramatically improve consistency and durability.
Why Curved and Seamed Surfaces Are Challenging for DTF Applications
Successful DTF transfer application depends on consistent heat, pressure, and contact between the transfer and the garment surface. Most DTF transfers are designed to be applied on flat areas where the heat press can distribute pressure evenly across the entire design. However, when applying DTF transfers to curved or uneven areas, achieving that same level of consistency becomes much more difficult.
Curves, seams, pockets, collars, sleeves, and bags create high and low points across the pressing area. These variations interfere with heat distribution and can prevent certain sections of the transfer from receiving enough pressure to activate the adhesive properly.
As a result, decorators often encounter problems such as:
-
Edge lifting and corner peeling
-
Wrinkling during application
-
Cracking after washing
-
Incomplete adhesion
-
Distorted or stretched artwork
-
Uneven transfer appearance
These challenges are especially common when working with DTF transfers on curved surfaces such as caps, tote bags, duffel bags, and jacket sleeves. Similarly, DTF transfers on seams can experience adhesion failures because the raised seam prevents the transfer from making full contact with the fabric.
Understanding proper DTF transfer placement is critical when working on non-flat garments. Even a high-quality transfer can fail if pressure is distributed unevenly. Many common application issues are caused by setup errors rather than transfer quality itself. Learning how to avoid these mistakes can significantly improve results, as explained in our guide on DTF transfer mistakes and how to avoid them.
The good news is that with the right techniques, tools, and preparation methods, decorators can successfully handle DTF printing on difficult surfaces. Whether you're working with pockets, sleeves, or specialty fabrics like denim, proper application practices make a significant difference. For additional garment-specific techniques, our guide on how to put a DTF transfer on a shirt.
Understanding How DTF Adhesion Works
A successful DTF transfer application depends on more than simply pressing a design onto a garment. Every transfer relies on a combination of heat, pressure, and time to create a strong bond between the printed design and the fabric.
When one of these variables is inconsistent, adhesion problems can occur—especially when working with DTF transfers on curved surfaces or DTF transfers on seams.
The 3 Factors That Control DTF Adhesion
1. Heat
Heat activates the TPU adhesive powder located on the back of the transfer.
Without sufficient heat:
-
Adhesive remains partially melted
-
Bonding stays weak
-
Transfers may peel after pressing or washing
2. Pressure
Pressure forces the melted adhesive into the fabric fibers.
Proper pressure helps:
-
Create stronger adhesion
-
Improve wash durability
-
Reduce edge lifting
Poor pressure often causes:
-
Partial bonding
-
Corner peeling
-
Uneven transfer appearance
3. Dwell Time
Dwell time refers to how long the transfer remains under heat.
If pressing time is too short:
-
Adhesive may not fully activate
-
Designs can crack or peel prematurely
How TPU Adhesive Bonds to Fabric
The TPU adhesive acts as the connection layer between the printed design and the garment.
During pressing:
-
Heat melts the adhesive.
-
Pressure pushes it into the fabric structure.
-
Cooling locks the adhesive around the fibers.
This process creates the durable bond that makes DTF transfers resistant to washing and wear.
Why Seams Create Adhesion Problems
DTF transfers on seams are difficult because seams create raised areas that interfere with even pressure.
Common seam-related issues include:
-
Incomplete adhesive activation
-
Edge lifting
-
Uneven bonding
-
Premature peeling
The raised stitching prevents portions of the transfer from making full contact with the heat press.
Why Curved Surfaces Are More Challenging
When applying DTF transfers on curved surfaces, the transfer cannot sit perfectly flat.
This reduces:
-
Contact area
-
Pressure consistency
-
Heat distribution
As a result, decorators often experience:
-
Wrinkles
-
Distorted artwork
-
Weak edge adhesion
-
Transfer lifting
Real-World Production Challenges
Print shops regularly encounter adhesion issues on products such as:
-
Caps
-
Sleeves
-
Denim jackets
-
Backpacks
-
Tote bags
-
Leather accessories
For example, textured fabrics require specialized techniques, as explained in our guide to DTF transfers on denim.
Similarly, decorators working with specialty materials can improve results by following the best practices outlined in our guide on applying DTF transfers to leather or faux leather.
Understanding how adhesion works is the first step toward achieving consistent, professional-quality DTF applications across difficult garment surfaces.
Best Garments and Products for DTF Transfers on Curved Areas
Not every curved or uneven surface creates the same level of difficulty during a DTF transfer application. Some products provide enough flat space for successful pressing, while others require specialized techniques, pressing pillows, or multiple press cycles to achieve proper adhesion.
The key is understanding how the shape of the product affects heat distribution and pressure consistency. Businesses using custom transfers from well-organized gang sheet printing services often encounter these products regularly and benefit from adjusting their application process accordingly.
Common Products Suitable for DTF Transfers on Curved Surfaces
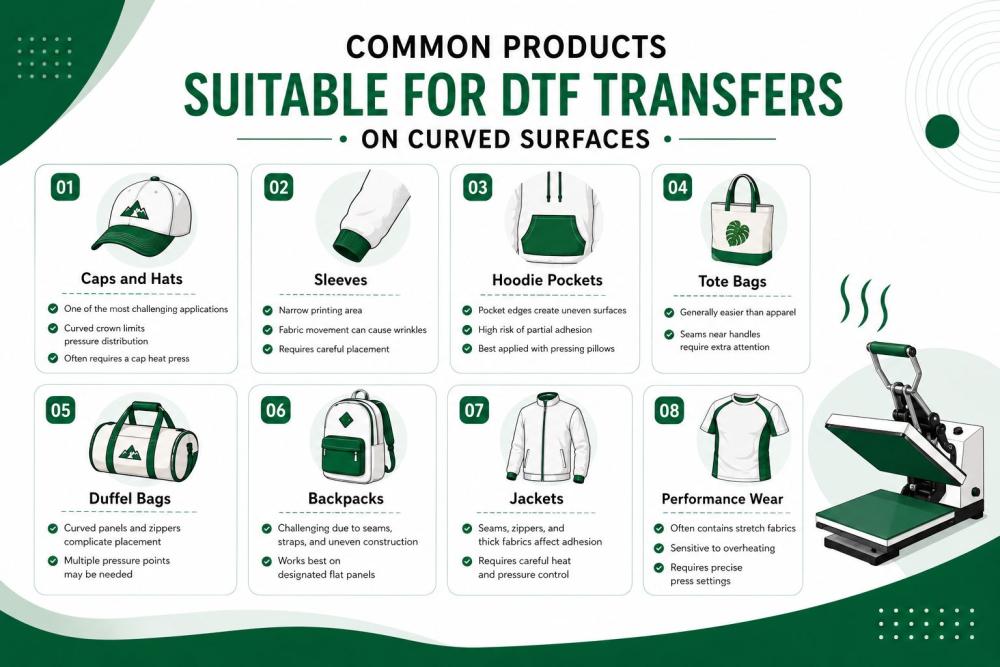
Caps and Hats
-
One of the most challenging applications
-
Curved crown limits pressure distribution
-
Often requires a cap heat press
Sleeves
-
Narrow printing area
-
Fabric movement can cause wrinkles
-
Requires careful placement
Hoodie Pockets
-
Pocket edges create uneven surfaces
-
High risk of partial adhesion
-
Best applied with pressing pillows
Tote Bags
-
Generally easier than apparel
-
Seams near handles require extra attention
Duffel Bags
-
Curved panels and zippers complicate placement
-
Multiple pressure points may be needed
Backpacks
-
Challenging due to seams, straps, and uneven construction
-
Works best on designated flat panels
Jackets
-
Seams, zippers, and thick fabrics affect adhesion
-
Requires careful heat and pressure control
Performance Wear
-
Often contains stretch fabrics
-
Sensitive to overheating
-
Requires precise press settings
Difficulty Comparison Table
Choosing the correct application method for each product dramatically improves adhesion, reduces peeling, and helps maintain professional-quality results on challenging surfaces.
Essential Tools for Applying DTF Transfers on Curved or Seamed Surfaces
Successful DTF transfers on curved surfaces and seams depend heavily on using the right equipment. Even with perfect transfer quality and correct press settings, uneven surfaces can prevent proper adhesion if you don't use the appropriate DTF transfer tools and DTF heat press accessories.
The following tools help improve heat distribution, pressure consistency, and transfer durability on difficult garment areas.
1. Heat Press Pillows
Heat press pillows are one of the most important accessories for uneven surfaces.
Why They Matter:
-
Raise the print area above seams
-
Reduce pressure interference from zippers and pockets
-
Improve contact between the transfer and garment
Best For:
-
Hoodies
-
Jackets
-
Tote bags
-
Backpacks
2. Pressing Pads
Pressing pads provide a firm but flexible surface beneath the garment.
Why They Matter:
-
Help create even pressure
-
Support curved areas during pressing
-
Reduce transfer distortion
Best For:
-
Sleeves
-
Performance wear
-
Lightweight garments
3. Silicone Pads
Silicone pads help distribute pressure more evenly across difficult surfaces.
Why They Matter:
-
Absorb minor surface irregularities
-
Improve adhesion on textured fabrics
-
Reduce pressure gaps
Best For:
-
Thick garments
-
Structured bags
-
Curved panels
4. Cap Presses
Standard flat heat presses struggle with hats and caps.
Why They Matter:
-
Match the curve of the cap crown
-
Provide uniform pressure
-
Prevent edge lifting
Best For:
-
Baseball caps
-
Trucker hats
-
Curved-brim headwear
5. Sleeve Platens
Sleeve platens are narrow press attachments designed for small print areas.
Why They Matter:
-
Eliminate fabric bunching
-
Improve transfer alignment
-
Deliver more accurate pressure
Best For:
-
Long sleeves
-
Youth apparel
-
Narrow garment sections
6. Teflon Sheets
Teflon sheets protect both the transfer and heat press.
Why They Matter:
-
Prevent scorching
-
Create smoother finishes
-
Support secondary pressing
Best For:
-
Finishing presses
-
Delicate fabrics
-
High-temperature applications
7. Parchment Paper
Parchment paper is commonly used during post-press finishing.
Why It Matters:
-
Helps seal transfer edges
-
Improves durability
-
Creates a softer hand feel
Best For:
-
Final pressing stage
-
Edge reinforcement
-
High-wear garments
8. Infrared Temperature Gun
A temperature gun verifies actual platen temperature.
Why It Matters:
-
Detects hot and cold spots
-
Improves application consistency
-
Prevents under-curing
Best For:
-
Production environments
-
Troubleshooting adhesion issues
-
Quality control checks
Preparing the Garment Before Application
Proper DTF transfer preparation is one of the most important steps when applying transfers to curved or uneven surfaces. Even the highest-quality transfer can fail if the garment is not prepared correctly before pressing.
Taking a few extra minutes before application can significantly improve adhesion, reduce peeling, and help achieve cleaner results.
Pre-Press the Garment
Before placing the transfer, always pre-press the garment for 3–5 seconds.
Why Pre-Pressing Matters
Removes Moisture
-
Eliminates trapped humidity from the fabric
-
Prevents steam from interfering with adhesion
-
Improves transfer durability
Flattens Fabric Fibers
-
Creates a smoother application surface
-
Helps the adhesive bond more evenly
-
Reduces the risk of wrinkles beneath the transfer
Benefits of Pre-Pressing
-
Better transfer adhesion
-
Cleaner artwork appearance
-
Reduced lifting and peeling
-
More consistent pressing results
Identify Problem Areas
Before positioning the design, inspect the garment carefully for areas that may interfere with pressure distribution.
Common Problem Areas
Thick Seams
-
Shoulder seams
-
Side seams
-
Pocket seams
Zippers
-
Hoodie zippers
-
Jacket closures
-
Bag compartments
Pockets
-
Hoodie kangaroo pockets
-
Chest pockets
-
Utility pockets
Ribbed Fabric
-
Cuffs
-
Waistbands
-
Collar areas
These raised surfaces often create pressure gaps that can lead to incomplete adhesion.
Position the Transfer Correctly
Proper placement is critical for successful application on difficult garments.
Best Placement Practices
Avoid Direct Seam Placement
-
Do not position artwork directly over thick seams whenever possible
-
Shift the design slightly to a flatter area
Leave Safe Spacing
Maintain a small buffer between the transfer and raised elements such as:
-
Seams
-
Zippers
-
Pockets
-
Ribbed sections
Recommended Spacing
-
Small designs: at least 0.25 inches from raised areas
-
Large designs: 0.5 inches or more when possible
Quick Tip
Before pressing, run your hand across the application area. If you can feel a seam, zipper, or raised section beneath the transfer, your heat press will likely encounter the same obstruction. Adjusting placement beforehand helps prevent adhesion problems and improves overall transfer performance.
Step-by-Step Guide to Applying DTF Transfers on Curved Surfaces
Learning how to apply DTF transfers on curved surfaces requires more than simply using standard heat press settings. Curves, contours, and raised sections create pressure inconsistencies that can affect adhesion and durability.
Follow this process to improve your DTF transfer application results and reduce failures when applying DTF transfers to challenging products.
Step 1: Level the Surface
Before placing the transfer, create the flattest surface possible.
What to Do
-
Open zippers when possible
-
Flatten pockets
-
Insert pressing pillows under uneven sections
-
Remove wrinkles with a quick pre-press
Why It Matters
A level surface improves heat distribution and allows the adhesive to bond evenly.
Step 2: Use Pressing Pillows Correctly
Pressing pillows help compensate for seams and raised areas.
Best Practices
-
Place the pillow directly beneath the print zone
-
Ensure seams sit outside the pressing area
-
Choose a pillow size that matches the artwork dimensions
Benefits
-
Better pressure consistency
-
Improved adhesion
-
Reduced edge lifting
Step 3: Adjust Pressure Settings
Curved garments often require pressure adjustments.
Recommendations
-
Increase pressure slightly when pressing over curved areas
-
Avoid excessive pressure that may distort the transfer
-
Test pressure settings before large production runs
Why It Matters
Proper pressure is critical for successful DTF printing on difficult surfaces.
Step 4: Apply Heat Evenly
Heat consistency becomes even more important on curved products.
What to Check
-
Correct temperature settings
-
Full platen contact
-
No cold spots across the application area
Pro Tip
Use an infrared temperature gun to verify actual platen temperature.
Step 5: Perform a Post Press
A second press helps lock the transfer into the fabric.
Process
-
Remove the carrier film
-
Cover with parchment paper or a Teflon sheet
-
Press for an additional 5–10 seconds
Benefits
-
Improved edge sealing
-
Softer finish
-
Better long-term durability
Step 6: Inspect Edge Adhesion
Before completing the garment, inspect the transfer carefully.
Look For
-
Corner lifting
-
Edge separation
-
Uneven bonding
-
Wrinkles around the design
Catching problems immediately prevents customer complaints later.
Practical Example: Applying a Logo to a Curved Cap Panel
Caps are one of the most difficult products for DTF transfer placement because the crown naturally curves away from the heat source.
Recommended Process
-
Use a dedicated cap press whenever possible.
-
Position the logo in the flattest section of the front panel.
-
Pre-press the cap to remove moisture.
-
Apply moderate, even pressure across the transfer.
-
Perform a secondary finishing press after peeling.
-
Inspect the edges carefully before packaging.
For businesses producing high-volume promotional apparel, branded merchandise, or team gear through bulk wholesale printing programs, following these steps helps maintain consistent quality across curved and difficult application surfaces.
Step-by-Step Guide to Applying DTF Transfers on Seams
Printing over rough areas doesn't have to be a guessing game. When you need to place designs over thick stitches and fabric folds, following a simple routine ensures your prints melt perfectly into the shirt without lifting or peeling later.
1. Level the Surface (Working Around Thick Seams)
Never let a heavy, raised seam take all the weight of your heat press. Before placing DTF transfers on seams, slide a soft heat press pillow or silicone pad directly underneath the print area. This smart setup lets the thick stitching sink down into the foam, pushing the surrounding fabric up to create a completely flat, even surface for your press.
2. Clear the Boundaries (Handling Pocket Areas & Cuffs)
When you work near hoodie pockets, zippers, or sleeve cuffs, move your design slightly away to keep a safe buffer zone. Try to leave at least a quarter-inch to a half-inch of space between your design and any thick fabric edges. Keeping your artwork clear of major seam intersections prevents uneven pressure zones and protects your print from peeling.
3. Lock Down the Print (Avoiding Uneven Pressure)
-
The Pre-Press: Clamp the empty shirt for 3 to 5 seconds to remove hidden moisture and flatten the fabric fibers.
-
The Application: Position your design, cover it safely, and press at 300°F (149°C) for 12 seconds with firm pressure. The pillow underneath guarantees the heat press makes solid contact across the entire image.
-
The Final Seal: Wait for the film to cool down completely before peeling it away smoothly. To lock in the best wash durability, finish with a 7-second post-press using parchment paper to seal the edges tightly into the fabric for a soft, retail-ready finish.
Common Mistakes That Cause DTF Failures on Curved and Seamed Surfaces
Achieving a flawless print on tricky areas requires avoiding a few hidden traps. Many common DTF transfer application problems come down to setup errors rather than the quality of the transfer itself.
-
Skipping the Pre-Press: Placing your graphic on a cold garment traps hidden moisture and wrinkles inside the fabric, which instantly disrupts the chemical bond of the adhesive powder.
-
Using Standard Pressure Settings: Relying on default pressure profiles over raised areas leaves deep gaps. Without custom adjustments, you will experience immediate edge lifting and corner peeling.
-
Applying Over Thick Seams: Forcing a solid design directly over heavy stitching blocks the platen from making solid contact, causing the transfer to split apart during its first wash.
-
Not Leveling the Platen: Forgetting to slide a pressing pillow beneath hoodies or bags leaves uneven pressure zones, resulting in partial adhesion.
-
Incorrect Transfer Placement: Placing artwork too close to pocket folds or zippers causes the film to bunch up and wrinkle under heat.
-
Overheating Curved Products: Baking hats or sleeves at extreme temperatures scorches the delicate fibers and distorts your artwork.
-
Skipping the Post-Press: Skipping that final finishing press prevents the ink from sealing deeply into the fabric, leaving your DTF transfers on curved surfaces and DTF transfers on seams vulnerable to premature cracking.
Taking an extra moment during your DTF transfer application routine to fix these simple missteps will keep your production line running smoothly and your prints looking sharp.
Troubleshooting Guide: When DTF Transfers Fail on Curves or Seams
Even with careful preparation, production variables can sometimes cause alignment or adhesion issues. If you run into trouble on tricky sections, use this quick guide to spot the cause and fix it fast.
1. If Edges Lift Immediately
-
The Cause: The raised stitching on a seam blocked the heat press platen from touching the film, leaving the adhesive cold and un-melted.
-
The Fix: Insert a foam pressing pillow directly beneath the print zone to raise the fabric above the seam, then re-press with firm pressure.
2. If Corners Peel After Washing
-
The Cause: Incomplete bonding caused by skipping the final finishing pass, leaving the fine corners exposed to wash friction.
-
The Fix: Never skip the finishing step. Always apply a 7-second post-press with parchment paper after peeling to seal the edges safely into the shirt fibers.
3. If the Transfer Wrinkles
-
The Cause: Trapped moisture evaporated during heating, creating steam bubbles that pushed the film upward.
-
The Fix: Give every garment a thorough 3 to 5-second pre-press to dry the fabric completely before positioning your artwork.
4. If the Design Cracks Along Seams
-
The Cause: Solid fields of ink were stretched too tightly across a thick, moving fabric joint.
-
The Fix: Shift your artwork slightly to sit clear of heavy intersections, or use lower-profile, minimalist designs near moving joints.
Best Press Settings for Curved and Seamed Applications
Achieving a permanent bond on difficult surfaces requires adjusting your parameters to match the garment material and shape. Because seams and curves create natural pressure drops, maintaining accurate temperature and timing is essential to ensure the TPU adhesive melts completely without scorching the fabric.
To Wrap Up
While managing curves and seams can be challenging, it is completely manageable with the right approach. Mastering the art of applying DTF transfers to uneven terrain simply requires shifting away from automated habits and focusing on proper preparation, firm pressure control, and smart DTF transfer placement.
Making small, deliberate adjustments on your shop floor—like sliding a pressing pillow under a pocket or drop-testing your platen heat—will dramatically improve both the wash durability and final appearance of your garments.
Ultimately, pairing high-quality custom films with a precise DTF transfer application routine ensures you achieve professional, retail-ready results every single time, making DTF printing on difficult surfaces a smooth and profitable addition to your workshop.