


Gang sheets are goldmines in DTF printing that increase production efficiency and reduce costs. But if you are not using them optimally, you waste space and reduce margins. A poorly arranged gang sheet can lead to material waste, uneven production flow, longer cutting time, and unnecessary printing expenses.
The real advantage of gang sheet printing comes from smart layout planning. Proper sizing, spacing, artwork organization, and sheet selection directly affect profitability and turnaround speed. Whether you are printing small logos, sleeve graphics, neck labels, or full-size designs, choosing the right gang sheet dimensions helps maximize every inch of film.
In this guide, we’ll break down the best gang sheet sizes, layout strategies, spacing recommendations, and cost-saving techniques for efficient DTF production. Whether you are an Etsy/POD seller, print shop, small apparel brand, or growing boutique, this guide offers DTF gang sheet recommendations to maximize profits.
TL;DR
A gang sheet is a large DTF transfer film that holds multiple designs arranged optimally. An optimal layout strategy is to choose a gang sheet that is closest to your total print area, keep designs spaced around 0.25-0.5 inches apart, use puzzle-style nesting instead of rigid grid layouts. This approach minimizes empty space, reduces cutting time, improves workflow, and reduces material waste by 20%. Proper arrangement of designs on gang sheets also reduces cost per transfer which is beneficial if you plan for bulk DTF printing.
What is a Gang Sheet and Why Does Its Layout Matter?
A gang sheet is a single DTF transfer film that contains multiple designs printed together in one production run. Instead of printing one logo, graphic, or label at a time, multiple artworks are arranged on the same sheet to maximize film usage and reduce production costs. This is one of the biggest reasons gang sheet printing has become essential in modern DTF workflows.
Now if all the artworks are printed on a single sheet, it will take only one curing cycle, one sheet, and a single setup shared across designs. As a result, it reduces film wastage, improves production speed, minimizes printer downtime, and slashes the cost per transfer.
But here comes a catch: layout is an essential part of gang sheet printing. It matters a lot to get more advantages. DTF gang sheet layout isn’t just about how to place designs on the sheet but it also focuses on how you can maximize the usage of the sheet.
Often businesses or small shops unknowingly waste around 15-20% of film per roll due to poorly arranged gang sheets. It reduces your profits over time, especially in case of wholesale DTF printing.
For example, If a print shop runs hundreds of gang sheets weekly, even a 10% reduction in wasted film can save thousands of inches of printable material every month. That directly improves profit margins. Not slightly. Significantly.
A smart gang sheet layout helps you:
-
Fit more designs per sheet
-
Reduce unused film space
-
Lower cost per transfer
-
Improve cutting efficiency
-
Speed up production workflows
-
Increase profit margins without raising prices
Gang Sheet Size Recommendations
One of the biggest mistakes people make when learning how to make a gang sheet for DTF is choosing the wrong sheet size. Some users order oversized sheets for tiny jobs and waste film. Others squeeze too many graphics into small layouts and create cutting, spacing, and alignment problems.
The right DTF gang sheet layout depends on your order size, artwork dimensions, production workflow, and printing goals. A properly sized gang sheet improves DTF printing efficiency, lowers cost per transfer, speeds up production, and reduces unused film space.
The following table is a practical reference designed specifically to solve that problem.
DTF Gang Sheet Recommendations by Job Type
|
Gang Sheet Size |
Typical Use Case |
Approx. Standard Designs Fit |
Approx. Cost Per Transfer |
Best For |
|
11" × 17" |
Small custom orders, Etsy shirts, test runs |
1–5 standard designs |
Higher per-transfer cost |
Beginners, hobby sellers, Etsy stores |
|
13" × 19" |
Left chest logos + sleeve prints, small apparel batches |
6–10 designs |
Moderate cost efficiency |
Small businesses, startup apparel brands |
|
22" × 34" |
Small shop production runs, multiple shirt graphics |
10–20 designs |
Lower cost per transfer |
Growing print shops, regular production |
|
Roll-Width Custom Sheets |
High-volume bulk printing, commercial production |
20+ designs |
Lowest per-transfer cost |
Large-scale DTF operations, wholesale production |
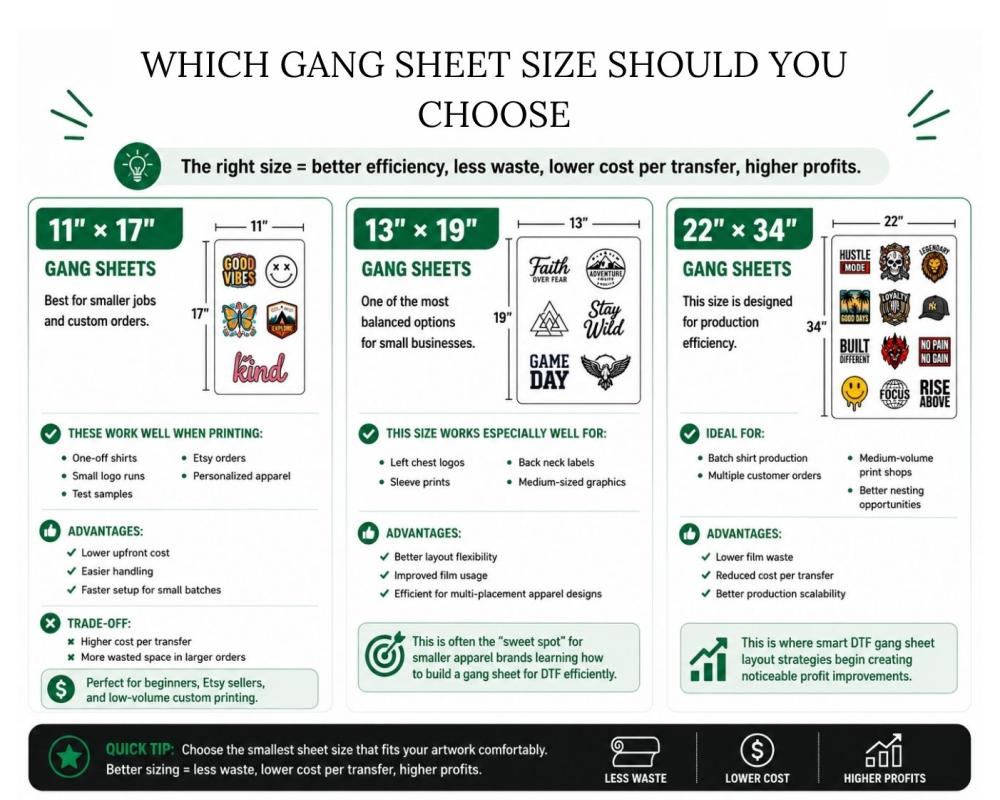
Which Gang Sheet Size Should You Actually Choose?
11" × 17" Gang Sheets
Best for smaller jobs and custom orders.
These work well when printing:
-
One-off shirts
-
Small logo runs
-
Test samples
-
Etsy orders
-
Personalized apparel
Advantages:
-
Lower upfront cost
-
Easier handling
-
Faster setup for small batches
Trade-off:
-
Higher cost per transfer
-
More wasted space in larger orders
13" × 19" Gang Sheets
One of the most balanced options for small businesses.
This size works especially well for:
-
Left chest logos
-
Sleeve prints
-
Back neck labels
-
Medium-sized graphics
Advantages:
-
Better layout flexibility
-
Improved film usage
-
Efficient for multi-placement apparel designs
This is often the “sweet spot” for smaller apparel brands learning how to build a gang sheet for DTF efficiently.
22" × 34" Gang Sheets
This size is designed for production efficiency.
Ideal for:
-
Batch shirt production
-
Multiple customer orders
-
Medium-volume print shops
-
Better nesting opportunities
Advantages:
-
Lower film waste
-
Reduced cost per transfer
-
Better production scalability
This is where smart DTF gang sheet layout strategies begin creating noticeable profit improvements.
Roll-Width Custom Gang Sheets
This is the commercial production level.
Used heavily in:
-
Bulk wholesale printing
-
Large production facilities
-
High-volume custom apparel operations
Advantages:
-
Maximum printable efficiency
-
Lowest transfer cost
-
Continuous production workflows
When optimized correctly, roll-width gang sheets dramatically improve DTF printing efficiency and reduce overall production expenses.
Recommended Spacing, Margins & Bleed Settings
Even the perfect gang sheet size can fail if the spacing is poor between artworks on the sheet. Proper margins prevent cutting errors, overlapping adhesive, and trimming mistakes, resulting in clean and optimized gang sheet.
|
Layout Element |
Recommended Setting |
|
Design Spacing |
0.25" – 0.5" |
|
Bleed Area |
3mm on all sides |
|
Outer Margin |
Minimum 3mm |
|
Safe Zone |
Keep artwork 3mm from trim edge |
Pro Layout Tips for Better Gang Sheet Efficiency
Instead of rigid rows, use puzzle-style nesting whenever possible. This fits more artwork into the same printable area and significantly reduces wasted film.
For better DTF gang sheet recommendations in real production workflows:
-
Group similar-sized designs together
-
Keep high-ink designs balanced across the sheet
-
Avoid oversized empty gaps
-
Leave proper cutting space between graphics
-
Rotate smaller elements to fill dead space
Small layout improvements often create massive savings over time — especially in bulk DTF printing environments where every inch of film directly affects profitability.
Gang Sheet by Buyer Type: Etsy Seller vs Boutique vs High-Volume Shop
Not every DTF workflow needs the same gang sheet strategy. A small Etsy seller has completely different production goals than a high-volume print shop. That’s why the best gang sheet setup depends less on “maximum sheet size” and more on your actual business model, production speed, order volume, and workflow limitations.
Below is a practical breakdown of DTF gang sheet recommendations based on real buyer types and production needs.
Etsy & POD Sellers (1–20 Prints Per Week)
Best recommendation: Use 11" × 17" or 13" × 19" gang sheets and prioritize design variety over maximum density.
For smaller Etsy shops and print-on-demand sellers, flexibility matters more than squeezing every inch of film space. Most orders involve multiple small designs, custom names, or low-volume shirt runs. Overcomplicated layouts usually create more stress than savings.
Here’s what works best:
-
Use smaller gang sheets for easier handling and lower upfront costs
-
Combine multiple small customer orders onto one sheet whenever possible
-
Prioritize quick production over aggressive nesting strategies
-
Order pre-made gang sheets if layout building slows down production
Many small sellers waste time trying to manually optimize every layout. In reality, simpler layouts often improve workflow consistency and reduce production mistakes.
The goal at this stage is not perfect density. It’s reliable fulfillment.
Growing Boutique Brands (20–100 Prints Per Week)
Best recommendation: Move to 22" × 34" gang sheets and start building repeatable layout systems.
At this stage, production efficiency starts affecting profitability directly. You’re likely printing repeat designs, seasonal collections, logo placements, and multiple garment variations regularly.
This is where a smarter DTF gang sheet layout becomes essential.
Best practices for boutique brands:
-
Invest in a gang sheet builder or layout automation tool
-
Create reusable templates for repeat logo positions and sizing
-
Group similar designs together to improve cutting efficiency
-
Organize layouts by garment type, print size, or collection
This is also the stage where puzzle-style nesting becomes valuable. Small spacing improvements across hundreds of prints create meaningful film savings over time.
For growing apparel brands, gang sheets become less of a printing tool and more of a production system.
High-Volume Print Shops (100+ Prints Per Week)
Best recommendation: Use roll-format gang sheet workflows with automated nesting and batch sequencing.
At high production volumes, manual layout building becomes inefficient quickly. Every unnecessary inch of film waste directly impacts margins. Workflow automation becomes critical.
High-volume operations should focus on:
-
Roll-width custom gang sheets for continuous production
-
Auto-nesting software to maximize printable space
-
Batch sequencing by ink coverage to stabilize production consistency
-
Grouping orders by garment color to reduce workflow interruptions
Advanced production shops also optimize layouts based on curing efficiency, cutting speed, and print sequencing, not just design placement.
For example:
-
High-ink designs are grouped strategically
-
Similar garment colors run together
-
Repeated graphics are nested automatically
-
Large dead spaces are minimized aggressively
This level of organization dramatically improves DTF printing efficiency while lowering film waste, labor time, and overall transfer costs.
At scale, gang sheet optimization is no longer optional. It becomes a core profitability driver.
Layout Strategy: Puzzle Nesting vs Grid Alignment
One of the key factors affecting DTF printing efficiency is how designs are arranged on the film. Most people focus on sheet size, but the real optimization happens in the layout itself. In DTF gang sheet printing, two primary layout methods dominate: grid alignment and puzzle nesting. Understanding the difference can significantly reduce film waste and improve profitability.
Grid Alignment
Grid layouts arrange designs in equal rows and columns with consistent spacing. This method is simple, organized, and easy to cut after printing.
Advantages of grid layouts:
-
Faster manual setup
-
Cleaner organization
-
Easier trimming and cutting
-
Ideal for similarly sized graphics
However, grid layouts waste a surprising amount of corner and edge space when designs are irregularly shaped. Logos, sleeve prints, neck labels, and oddly sized graphics often leave unusable gaps throughout the sheet.
This makes standard grid layouts less efficient for maximizing film usage.
Puzzle Nesting
Puzzle nesting arranges designs by rotating and interlocking shapes to maximize printable density. Instead of rigid rows, artwork fits together like puzzle pieces.
Advantages of puzzle nesting:
-
Fits more designs per sheet
-
Reduces dead space significantly
-
Improves DTF gang sheet layout efficiency
-
Lowers cost per transfer
While puzzle nesting is difficult manually, modern auto-nesting software makes it much easier for high-volume production workflows.
Here’s a real-world example:
-
A 22" × 34" sheet using grid alignment may fit 12 standard designs
-
The same sheet using puzzle nesting may fit 16 designs
That’s roughly 33% more transfers using the same amount of film. Same curing cycle. Same print pass. Same material cost. Higher output.
When Should You Use Each Strategy?
Use Grid Layouts When:
-
Designs are rectangular or square
-
Fast cutting matters most
-
You need quick manual setup
-
Orders are smaller or simpler
Use Puzzle Nesting When:
-
Designs have irregular shapes
-
Maximizing film usage matters
-
You run bulk DTF gang sheet printing
-
Production efficiency affects margins directly
Small layout improvements create major long-term savings. In large-scale DTF production, smarter nesting strategies often make the difference between average margins and highly optimized profitability.
10 Gang Sheet Layout Mistakes And What They Cost You
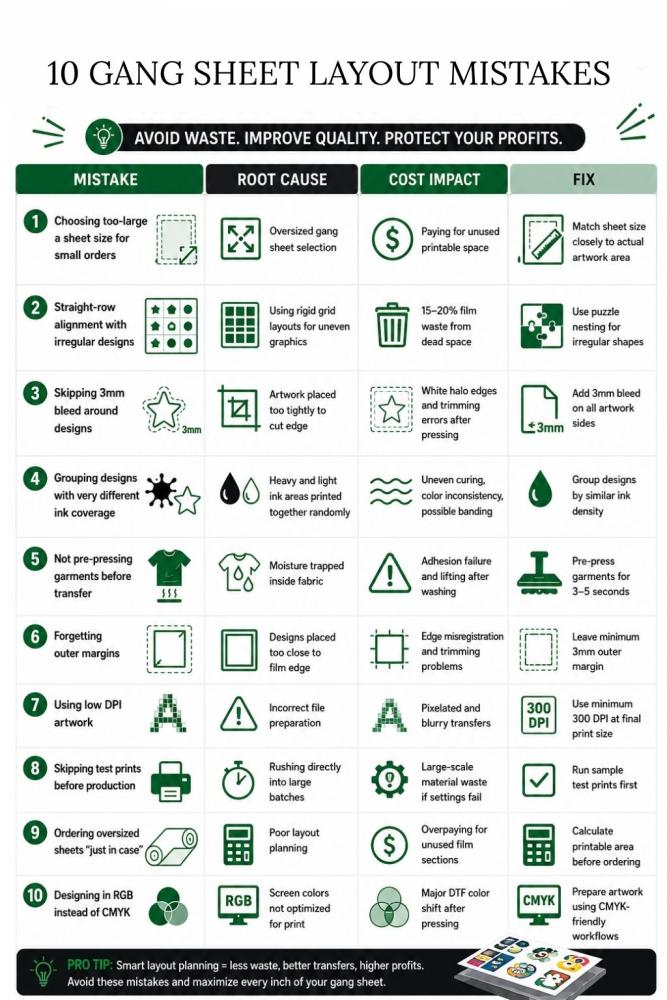
Even small layout mistakes can quietly destroy profitability in DTF gang sheet printing. Wasted film, failed transfers, poor alignment, color issues, and unnecessary production costs usually come from preventable workflow errors. The table below breaks down the most common gang sheet mistakes, their root causes, their real production impact, and how to fix them before they affect your margins.
|
Mistake |
Root Cause |
Cost Impact |
Fix |
|
Choosing too-large a sheet size for small orders |
Oversized gang sheet selection |
Paying for unused printable space |
Match sheet size closely to actual artwork area |
|
Straight-row alignment with irregular designs |
Using rigid grid layouts for uneven graphics |
15–20% film waste from dead space |
Use puzzle nesting for irregular shapes |
|
Skipping 3mm bleed around designs |
Artwork placed too tightly to cut edge |
White halo edges and trimming errors after pressing |
Add 3mm bleed on all artwork sides |
|
Grouping designs with very different ink coverage |
Heavy and light ink areas printed together randomly |
Uneven curing, color inconsistency, possible banding |
Group designs by similar ink density |
|
Not pre-pressing garments before transfer |
Moisture trapped inside fabric |
Adhesion failure and lifting after washing |
Pre-press garments for 3–5 seconds |
|
Forgetting outer margins |
Designs placed too close to film edge |
Edge misregistration and trimming problems |
Leave minimum 3mm outer margin |
|
Using low DPI artwork |
Incorrect file preparation |
Pixelated and blurry transfers |
Use minimum 300 DPI at final print size |
|
Skipping test prints before production |
Rushing directly into large batches |
Large-scale material waste if settings fail |
Run sample test prints first |
|
Ordering oversized sheets “just in case” |
Poor layout planning |
Overpaying for unused film sections |
Calculate printable area before ordering |
|
Designing in RGB instead of CMYK |
Screen colors not optimized for print |
Major DTF color shift after pressing |
Prepare artwork using CMYK-friendly workflows |
In a Nutshell
A well-optimized gang sheet is more than just a layout file — it’s a profitability tool. The right sheet size, smarter nesting strategy, proper spacing, and accurate artwork preparation can dramatically improve DTF printing efficiency while reducing film waste and production costs.
Whether you run a small Etsy shop or a high-volume print operation, efficient DTF gang sheet layout planning helps maximize every inch of printable space. Small adjustments in organization, bleed settings, DPI, and design placement often lead to significant long-term savings.
The goal is simple: fit more usable transfers onto every sheet without sacrificing print quality, workflow speed, or consistency.
FAQs
What is gang sheet DTF printing?
Gang sheet DTF printing is the process of placing multiple designs on one transfer film sheet and printing them together in a single pass. This improves production efficiency, reduces film waste, and lowers overall transfer costs.
How many designs fit on a gang sheet?
The number depends on the gang sheet size and artwork dimensions. A standard 22" × 34" sheet can typically fit 10–20 medium-sized designs, while roll-format gang sheets can hold significantly more with optimized nesting.
What is the best DTF gang sheet layout strategy?
The best DTF gang sheet layout depends on your artwork. Grid layouts work well for square designs and faster cutting, while puzzle nesting helps maximize DTF gang sheet efficiency by reducing empty film space.
What is the recommended spacing and bleed for gang sheets?
A proper DTF gang sheet spacing guide recommends keeping designs 0.25–0.5 inches apart with 3mm bleed margins and at least 3mm outer margins to prevent cutting and alignment issues during production.
How can you maximize a DTF gang sheet and reduce cost per transfer?
To maximize DTF gang sheet efficiency, use puzzle nesting, group similar-sized designs together, avoid oversized sheets, maintain correct bleed spacing, and choose the right sheet size for your order volume. This helps reduce film waste and lowers gang sheet cost per transfer.