
August 11, 2026 · Connor McDonnell
How to Build a Perfect Gang Sheet for Maximum Savings?
DTF gang sheet printing is one of the simplest ways for apparel businesses to reduce transfer costs without sacrificing full-color printing. Instead of printing each design separately, multiple graphics can share the same DTF film sheet, spreading material and production costs across more usable transfers.
This approach is particularly useful for Etsy sellers, print-on-demand businesses, apparel brands, promotional companies, sports organizations, and commercial print shops. But simply placing designs onto a sheet does not guarantee savings. Poor spacing, oversized sheets, weak artwork preparation, and inefficient layouts can turn a cost-saving strategy into wasted film.
This guide explains how to build a more efficient gang sheet, choose the right dimensions, calculate utilization, and avoid common mistakes.
Key Takeaways
-
A well-planned gang sheet can lower the effective cost of each DTF transfer.
-
The best sheet size is the smallest one that comfortably fits your required artwork.
-
Leave enough spacing between designs for clean cutting and handling.
-
Puzzle-style nesting can use irregular spaces more efficiently than rigid grids.
-
Small logos and labels are useful for filling otherwise unusable gaps.
-
The cheapest sheet is not always the cheapest production option; utilization matters more than sticker price.
DTF Gang Sheet Printing: What Makes a Sheet “Perfect”?
A gang sheet is a single sheet of DTF PET film containing multiple individual designs. Each design is eventually cut apart and heat-pressed onto a garment or other compatible textile.
The basic economics are straightforward: when several transfers occupy the same printable area, you avoid repeatedly paying for unused film around individual designs. Current supplier pricing illustrates why sheet dimensions matter. DTFS, for example, currently lists gang sheets beginning at 30" × 24" for $12.99, with longer sheets priced progressively higher.
The goal, however, should not be to fill every possible pixel. A perfect layout balances film utilization, cutting space, artwork quality, handling time, and production requirements.
That distinction matters because a sheet that saves 5% in film but takes twice as long to cut may not actually improve your overall margin.
For businesses producing multiple designs at once, gang sheet printing can spread film and production costs across a larger number of usable transfers.
DTF Gang Sheet Size: Choose the Smallest Practical Sheet
Choosing the correct DTF gang sheet size is the first major cost decision.
Common formats include:
|
Sheet Size |
Best Use |
|
11" × 17" |
Samples and very small orders |
|
13" × 19" |
Small logos and short runs |
|
22" × 24" |
Small-to-medium production |
|
22" × 34" |
Multiple apparel designs |
|
22" × 48"+ |
Larger batches |
|
Roll/long-format sheets |
High-volume production |
The exact dimensions available depend on your supplier or printer. Many commercial DTF workflows use approximately 22" wide film, while some current suppliers offer wider formats.
The mistake is assuming that the biggest available sheet automatically provides the best value.
Suppose you have enough artwork to occupy only 15" × 20" of printable space. Ordering a substantially larger sheet can leave unused area that you paid for but cannot monetize. A smaller sheet with good utilization may therefore produce a lower DTF gang sheet cost per usable transfer.
A simple rule
Choose the sheet based on:
Required artwork area + cutting space + safe margins = practical sheet area
Do not select the sheet first and then try to force the artwork into it.
Gang Sheet Printing: Measure Your Artwork Before Layout
Before opening a Order Transfers, make an inventory of every transfer you need.
For each design, record:
-
Width
-
Height
-
Quantity
-
Intended garment placement
-
Whether rotation is acceptable
-
Whether it is a repeat design
-
Whether it needs special cutting space
For example, a small apparel batch might contain:
-
10 × 4" × 4" left-chest logos
-
5 × 3" × 12" sleeve graphics
-
5 × 11" × 15" front graphics
-
10 × 2" × 2" neck labels
Treating these as four separate groups makes the layout easier to plan.
The next step is to identify which designs can safely rotate. A 4" × 4" logo offers little opportunity for rotation, while a 3" × 12" sleeve graphic can potentially be turned to occupy unused horizontal space.
This is where a DTF gang sheet builder becomes useful. Modern builders can let users upload, move, resize, rotate, and preview artwork before finalizing the sheet. DTFS currently describes a workflow that allows users to upload PNG artwork, move and rotate designs, preview the layout, and save the finished sheet.
DTF Gang Sheet Layout: Grid vs Puzzle Nesting
There are two common ways to arrange artwork: a straightforward grid or more aggressive nesting.
Grid layout
A grid places designs in predictable rows and columns.
It works well when:
-
Designs are rectangular
-
Artwork has similar dimensions
-
Fast cutting is important
-
The order is relatively simple
-
You want an easy-to-repeat production template
The advantage is speed and predictability.
Puzzle nesting
Puzzle nesting places irregular designs together like pieces of a puzzle. Larger artwork is positioned first, while smaller graphics fill the remaining spaces.
For irregular artwork, this can substantially improve sheet utilization. One recent DTF guide gives an illustrative example in which a 22" × 34" sheet that fits 12 standard designs in a grid could fit 16 with more efficient nesting.
That does not mean every job will achieve a 33% improvement. Actual results depend on the dimensions and shapes of the artwork.
The important principle is simple: measure usable area instead of assuming a fixed number of transfers per sheet.
Optimize DTF Gang Sheets With Proper Spacing
One of the biggest mistakes in gang sheet optimization is packing artwork so tightly that cutting becomes difficult.
Current production guidance commonly recommends approximately 0.25"–0.5" between designs, while some decorators use smaller gaps depending on their cutting method and workflow.
Use enough space to:
-
Cut between designs cleanly
-
Prevent accidental edge damage
-
Handle individual transfers
-
Avoid touching neighboring graphics
-
Maintain consistent production
More spacing is not automatically safer. Excessive gaps create waste.
A practical starting point is around 0.25" spacing, then increasing the gap if your cutting process requires more room.
DTF Gang Sheet Optimization: Fill the Dead Space
After placing the largest designs, inspect the empty areas around them.
This unused space can often accommodate:
-
Neck labels
-
Sleeve logos
-
Small icons
-
Care-label graphics
-
Names
-
Numbers
-
Small promotional logos
-
Repeated brand marks
This is one of the easiest ways to improve DTF printing cost savings.
For example, imagine a 22" × 24" sheet containing a large 12" × 16" front graphic. Instead of leaving the surrounding area empty, smaller 3" × 3" logos can potentially occupy portions of the remaining space.
Those small designs effectively turn otherwise wasted film into sellable output.
DTF Transfer Gang Sheet: Put Large Designs First
A reliable layout workflow is:
-
Place the largest artwork.
-
Add medium-sized graphics.
-
Rotate designs where appropriate.
-
Fill remaining gaps with small transfers.
-
Check spacing.
-
Check outer margins.
-
Inspect for overlaps.
-
Confirm final dimensions.
-
Preview the complete sheet.
-
Export the production-ready file.
For a more detailed walkthrough of the actual layout process, see how to make a gang sheet for DTF transfers before finalizing your artwork.
Starting with small artwork can create a false sense of efficiency because large graphics may later force the entire layout apart.
Large “anchor” designs should therefore establish the structure of the sheet.
DTF Gang Sheet Cost: Understand the Math
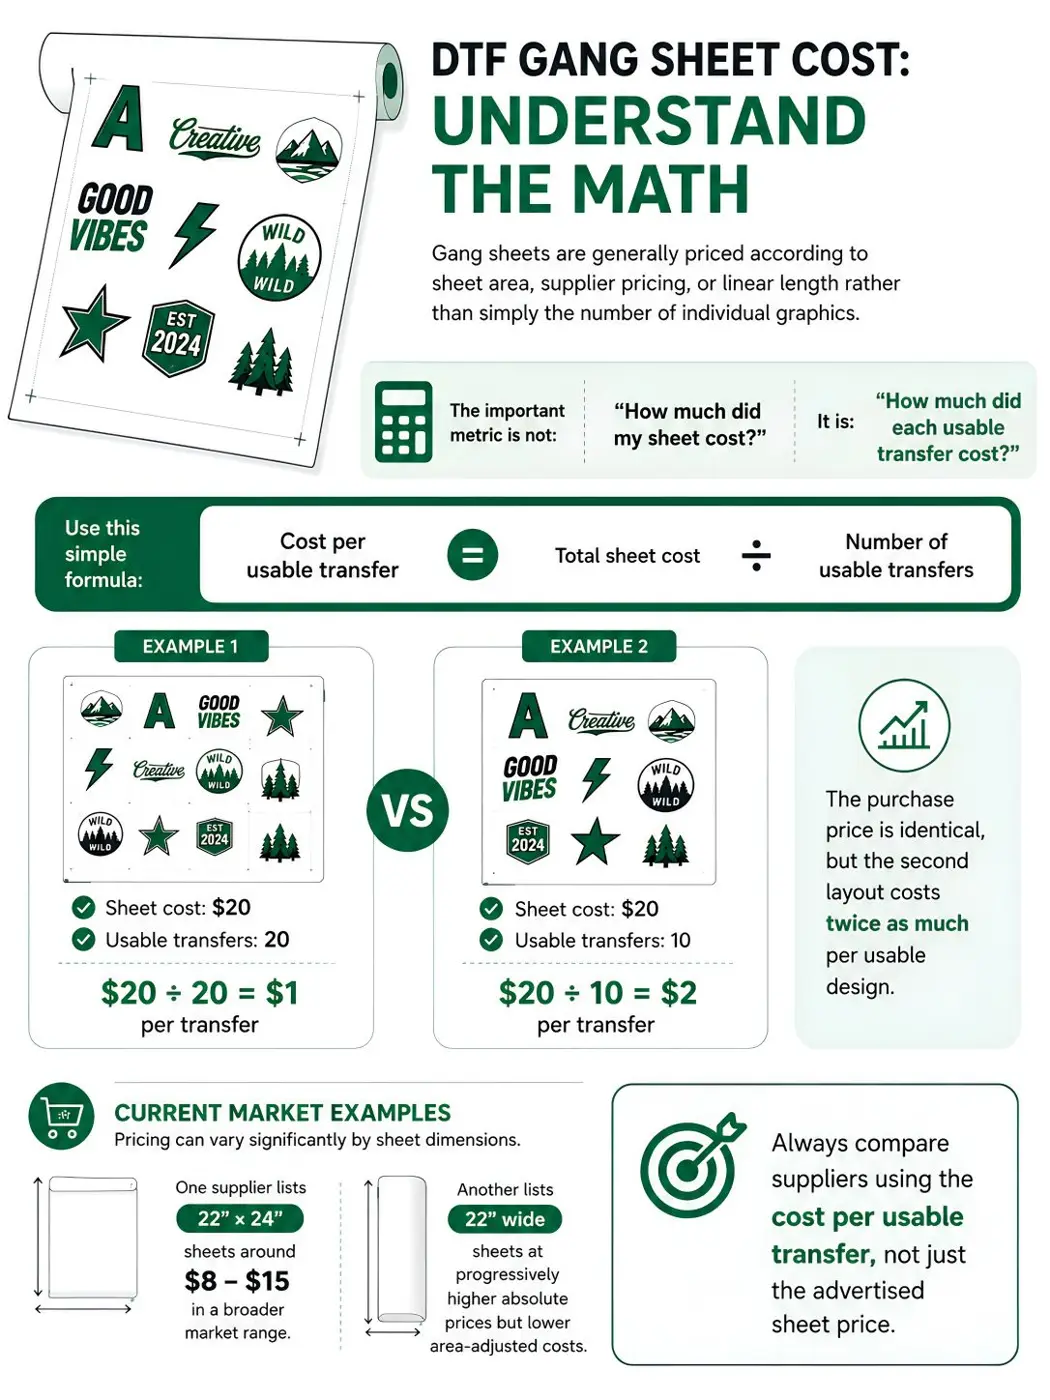
Gang sheets are generally priced according to sheet area, supplier pricing, or linear length rather than simply the number of individual graphics.
That means the important metric is not:
“How much did my sheet cost?”
It is:
“How much did each usable transfer cost?”
Use this simple formula:
Cost per usable transfer = Total sheet cost ÷ Number of usable transfers
Imagine a $20 sheet containing 20 usable transfers:
$20 ÷ 20 = $1 per transfer
Now imagine another $20 sheet containing only 10 usable transfers:
$20 ÷ 10 = $2 per transfer
The purchase price is identical, but the second layout costs twice as much per usable design.
Current market examples show how pricing can vary significantly by sheet dimensions. One current supplier lists 22" × 24" sheets around $8–$15 in a broader market range, while another lists longer 22"-wide sheets at progressively higher absolute prices but lower area-adjusted costs.
Always compare suppliers using the cost per usable transfer, not just the advertised sheet price.
Optimize DTF Gang Sheets for Repeat Orders
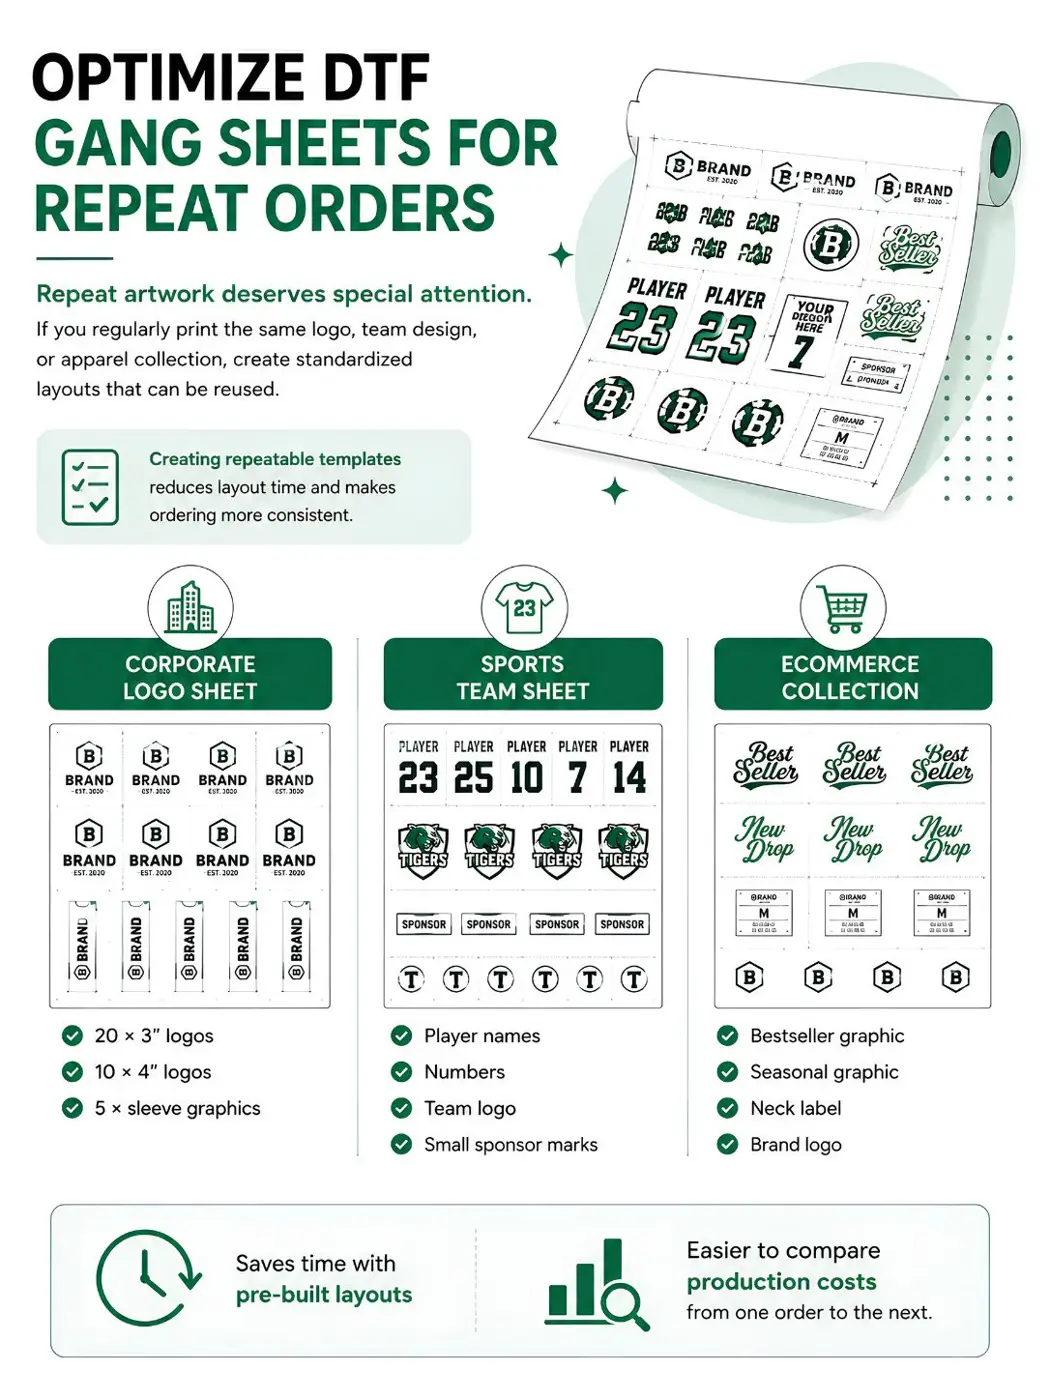
Repeat artwork deserves special attention.
If you regularly print the same logo, team design, or apparel collection, create standardized layouts that can be reused.
For example:
Corporate logo sheet
-
20 × 3" logos
-
10 × 4" logos
-
5 × sleeve graphics
Sports team sheet
-
Player names
-
Numbers
-
Team logo
-
Small sponsor marks
Ecommerce collection
-
Bestseller graphic
-
Seasonal graphic
-
Neck label
-
Brand logo
Creating repeatable templates reduces layout time and makes ordering more consistent. It also makes it easier to compare production costs from one order to the next.
When a deadline is tight, planning the layout early is especially important; businesses can also review how to handle rush orders with outsourced DTF gang sheet printing to reduce avoidable production delays.
DTF Gang Sheet Layout Mistakes That Waste Money
Avoid these common errors:
-
Choosing a sheet that is much larger than the artwork requires
-
Leaving large gaps between designs
-
Using a rigid grid for irregular artwork
-
Forgetting small graphics that could fill gaps
-
Placing large designs last
-
Allowing artwork to overlap
-
Ignoring cutting requirements
-
Using low-resolution artwork
-
Scaling designs without checking intended garment placement
-
Forgetting to preview the complete sheet
A layout can look full while still being inefficient.
The most useful test is to ask: How much of the paid printable area becomes a usable transfer?
DTF Gang Sheet Printing for Small Businesses
Small businesses do not necessarily need giant sheets.
An Etsy seller receiving a handful of weekly orders may benefit from smaller sheets because flexibility and handling speed matter more than maximum density.
A growing boutique printing dozens of designs each week may benefit from larger sheets and more systematic nesting.
High-volume print shops should focus on repeatable templates, batch production, and automated layout where possible.
Current DTF guidance similarly distinguishes between smaller Etsy/POD workflows, growing boutique brands, and high-volume production rather than recommending one universal sheet size.
The right strategy is therefore based on order frequency, artwork mix, handling capability, and utilization, not business size alone.
As order volume increases, bulk DTF printing can make standardized layouts and repeat artwork even more economical.
Gang Sheet for DTF Transfers: Quality Still Matters
Maximum density should never come at the expense of print quality.
Before placing artwork on a sheet, verify:
-
Correct dimensions
-
Transparent backgrounds
-
Clean edges
-
Adequate resolution
-
Correct colors
-
No accidental overlaps
-
No unwanted background pixels
A poorly prepared image can produce a technically efficient sheet that still creates failed transfers.
The best workflow treats artwork preparation and layout optimization as two connected steps.
When Individual Transfers Beat a Gang Sheet
Gang sheets are not always the cheapest option. Individual transfers can make more sense when:
-
You need only one design
-
Artwork is unusually large
-
Orders are highly customized
-
There is little compatible artwork to combine
-
The gang sheet would leave substantial unused space
-
Handling a large sheet adds unnecessary labor
If you only need one or two designs, compare the cost of a gang sheet with individual custom DTF transfers before choosing the production format.
DTFS currently offers both gang sheets and single-design custom transfers, illustrating why buyers can select the production format according to their actual needs.
How Businesses Turn Layout Efficiency Into Real Savings
The biggest savings come from combining several improvements rather than relying on one trick.
A business can:
-
Choose the smallest practical sheet
-
Increase usable area
-
Reduce unnecessary gaps
-
Reuse repeat designs
-
Batch compatible orders
-
Standardize artwork sizes
-
Reduce cutting complexity
-
Compare suppliers using usable-transfer cost
Consider a shop printing 500 transfers per month. If better layouts reduce effective transfer cost by only $0.25, the monthly difference is:
500 × $0.25 = $125
Over a year:
$125 × 12 = $1,500
At higher volumes, even small improvements in utilization can become meaningful.
Why Production Quality Matters Alongside Cost
A low-cost sheet is not a bargain if it creates poor transfers, difficult cutting, inconsistent application, or reprints.
When evaluating a DTF supplier, consider:
-
Film quality
-
Print resolution
-
Color consistency
-
Adhesive performance
-
Production turnaround
-
Gang-sheet pricing
-
Volume discounts
-
Customer support
DTFS currently advertises commercial gang-sheet production, The order minimum is $22, volume options, and gang sheets beginning at 30" × 24", while its broader service offering includes custom and wholesale transfers.
The goal should be lowest cost per successful, usable transfer, not simply the lowest sticker price.
Final Gang Sheet Optimization Checklist
Before submitting your sheet, confirm:
-
Sheet size matches the actual artwork requirements
-
Largest designs are positioned first
-
Smaller designs fill useful gaps
-
Designs do not overlap
-
Spacing is appropriate for cutting
-
Outer margins are sufficient
-
Artwork is correctly sized
-
Transparent backgrounds are clean
-
Repeat designs are grouped efficiently
-
The entire sheet has been previewed
-
Cost per usable transfer has been calculated
This checklist takes only a few minutes but can prevent expensive production mistakes.
Final Thought
A well-built gang sheet is more than a convenient way to combine designs—it is a production-cost strategy. The best results come from choosing the right sheet dimensions, placing large designs first, nesting irregular artwork, maintaining practical cutting gaps, and using small graphics to fill otherwise wasted space.
For small businesses, Etsy sellers, apparel brands, and commercial print shops, these improvements can reduce the effective cost of every transfer. The most important metric is not how full the sheet looks, but how much paid film becomes usable, sellable artwork. Smart DTF gang sheet printing turns better layout decisions into lower waste, faster workflows, and stronger margins.
FAQs
What is DTF gang sheet printing?
DTF gang sheet printing places multiple individual graphics onto one DTF transfer film sheet so they can be printed together. The finished sheet is cut into individual transfers before application.
What is the best DTF gang sheet size?
There is no universal best size. Choose the smallest practical sheet that accommodates your artwork while leaving enough space for cutting and handling. Common formats include 11" × 17", 13" × 19", 22" × 24", and longer 22"-wide sheets.
How much spacing should I leave between DTF transfers?
A practical starting point is approximately 0.25" between designs. Some workflows use up to 0.5" depending on cutting equipment, design complexity, and handling requirements.
Is puzzle nesting better than a grid?
Puzzle nesting can be more efficient when designs have irregular shapes because smaller graphics can occupy spaces that a rigid grid leaves unused. Grid layouts can still be preferable when designs are uniform or fast cutting is the priority.
How many designs fit on a gang sheet?
It depends entirely on the dimensions and shapes of the designs. A 22" × 34" sheet may hold roughly 10–20 medium-sized designs, while smaller logos can allow substantially higher counts.
How do I calculate DTF gang sheet cost per transfer?
Divide the total sheet price by the number of usable transfers. For example, a $20 sheet containing 20 usable designs costs $1 per design. If only 10 are usable, the effective cost becomes $2 per design.
Can small businesses benefit from gang sheets?
Yes. Etsy sellers, print-on-demand businesses, boutiques, and small print shops can combine compatible orders or repeated designs to improve film utilization without purchasing industrial quantities.
Are gang sheets always cheaper than individual transfers?
No. Gang sheets work best when you can use most of the printable area. If a sheet contains substantial unused space, an individual transfer may have a lower effective cost.
What artwork works best on a gang sheet?
Transparent PNG artwork with clean edges and correct dimensions is a common choice. Designs should be prepared at the intended print size rather than relying on excessive enlargement during layout.
How can I maximize DTF printing cost savings?
Start with accurate artwork measurements, choose the smallest practical sheet, nest designs efficiently, maintain sensible cutting gaps, fill dead space with smaller graphics, and calculate the cost per usable transfer before ordering.