
September 29, 2026 · Connor McDonnell
DTF Gang Sheet Layout Rules: Spacing, Nesting, and Waste Reduction
A DTF gang sheet lets you place several designs on one larger sheet instead of ordering every transfer separately. That makes it useful for apparel brands, print shops, schools, teams, events, and wholesale orders. But the sheet only saves time and material when the layout is planned well.
The goal is not to squeeze every design into the smallest possible space. The goal is to create a clean layout that uses the sheet efficiently and still gives you enough room to separate, cut, identify, and press each transfer. A crowded sheet may appear efficient at first, but it can lead to difficult trimming, mixed-up designs, and wasted pieces.
This guide explains the main DTF gang sheet layout rules in plain English. You will learn how to arrange a DTF gang sheet, how much spacing to leave, how nesting works, how to maximize a DTF gang sheet without overpacking it, and how to reduce DTF gang sheet waste before you place an order with DTFS.co.
What Is a DTF Gang Sheet Layout?
A DTF gang sheet layout is the arrangement of multiple designs on one printable sheet. Each logo, graphic, name, or piece of lettering has its own place on the sheet. The layout shows how the designs fit together, how much open space remains, and how easy each transfer will be to separate after printing.
A strong layout balances three things: usable space, safe separation, and easy handling. You want to use the sheet well, but you also want each design to stay intact. Designs that touch or sit too close together may be harder to cut apart. Designs placed far apart may leave more unused material than necessary.
The layout also needs to match the way the transfers will be used. A large back print, a left-chest logo, a sleeve graphic, and a small name may all belong on the same sheet, but they should be labeled and sized for their intended locations. Layout is not only about fitting shapes together. It is also about making the order easy to manage from the sheet to the garment.
How to Arrange a DTF Gang Sheet
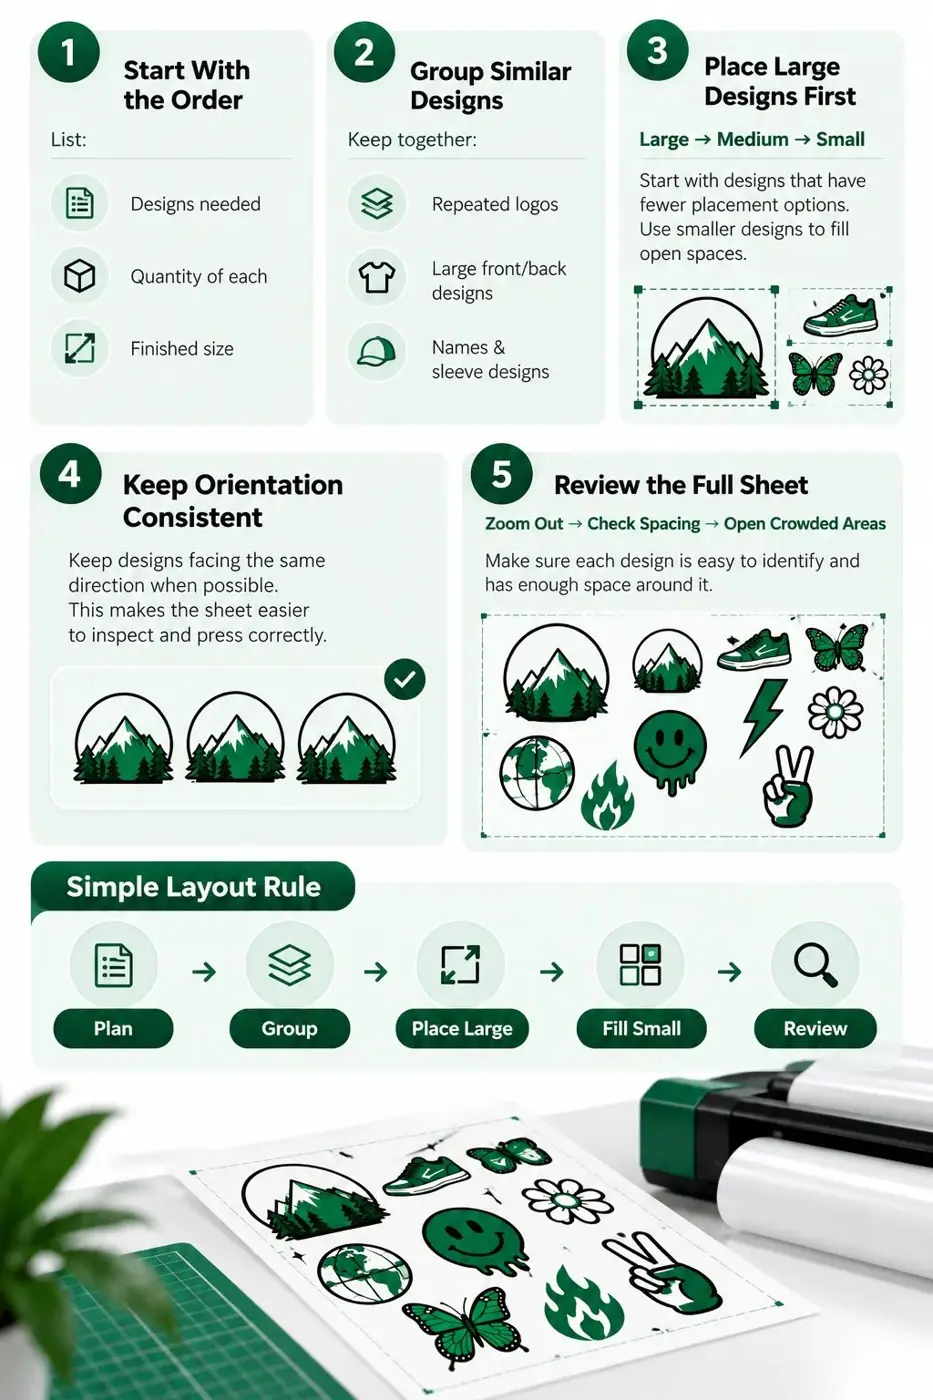
When learning how to arrange a DTF gang sheet, start with the finished garments rather than the sheet itself. Make a list of the designs you need, the number of each design, and the finished width or height for each one. This prevents you from arranging artwork that later turns out to be the wrong size.
Next, group similar designs together. Put repeated logos in one area, large front or back designs in another area, and small names or sleeve designs in their own group. Grouping makes the sheet easier to read and makes it faster to find the right transfer during pressing.
Place the largest designs first. They have fewer placement options and set the structure for the rest of the sheet. Then fill open areas with medium-sized designs. Use the smallest designs last, because they are easier to fit into leftover spaces.
Keep the design orientation consistent when possible. If most designs read from left to right, avoid turning a few sideways unless the space savings are worth it. A consistent layout makes the sheet easier to inspect and reduces the chance of pressing a design in the wrong direction.
Before saving the layout, zoom out and look at the entire sheet. You should be able to see where each design begins and ends. If the sheet looks like one crowded block, open up the tightest areas and move designs into clearer groups.
Plan the Sheet Before You Place Artwork
Create a simple order list before opening the builder or layout file. Include the design name, finished size, quantity, garment location, and any size variation. This list becomes your reference when you review the completed sheet.
For example, a small apparel order might include eight left-chest logos, four large back prints, six sleeve marks, and three different names. Writing that information down first helps you catch missing designs and prevents you from using the same artwork at the wrong size.
Place Large Designs First
Large designs should usually run in the direction that uses the sheet most naturally. Compare their width and height before placing them. Two wide designs may fit side by side, while a wide design and a tall design may fit better when one is rotated or moved to a different row.
Use Small Designs to Fill Open Areas
Small designs can use spaces that would otherwise remain empty, but do not force them into every gap. A small logo still needs room around it for separation and handling. Fill useful spaces, not every visible space.
Review the Whole Sheet Before Export
A final full-sheet review is the easiest way to catch a missing logo, a wrong size, an upside-down design, or a gap that is too narrow. Review the layout at both close range and full-sheet view.
DTF Gang Sheet Spacing Rules
DTF gang sheet spacing is the open room between one design and the next. The right amount of space makes it easier to separate transfers without cutting into nearby artwork. It also gives you room to handle each piece during pressing.
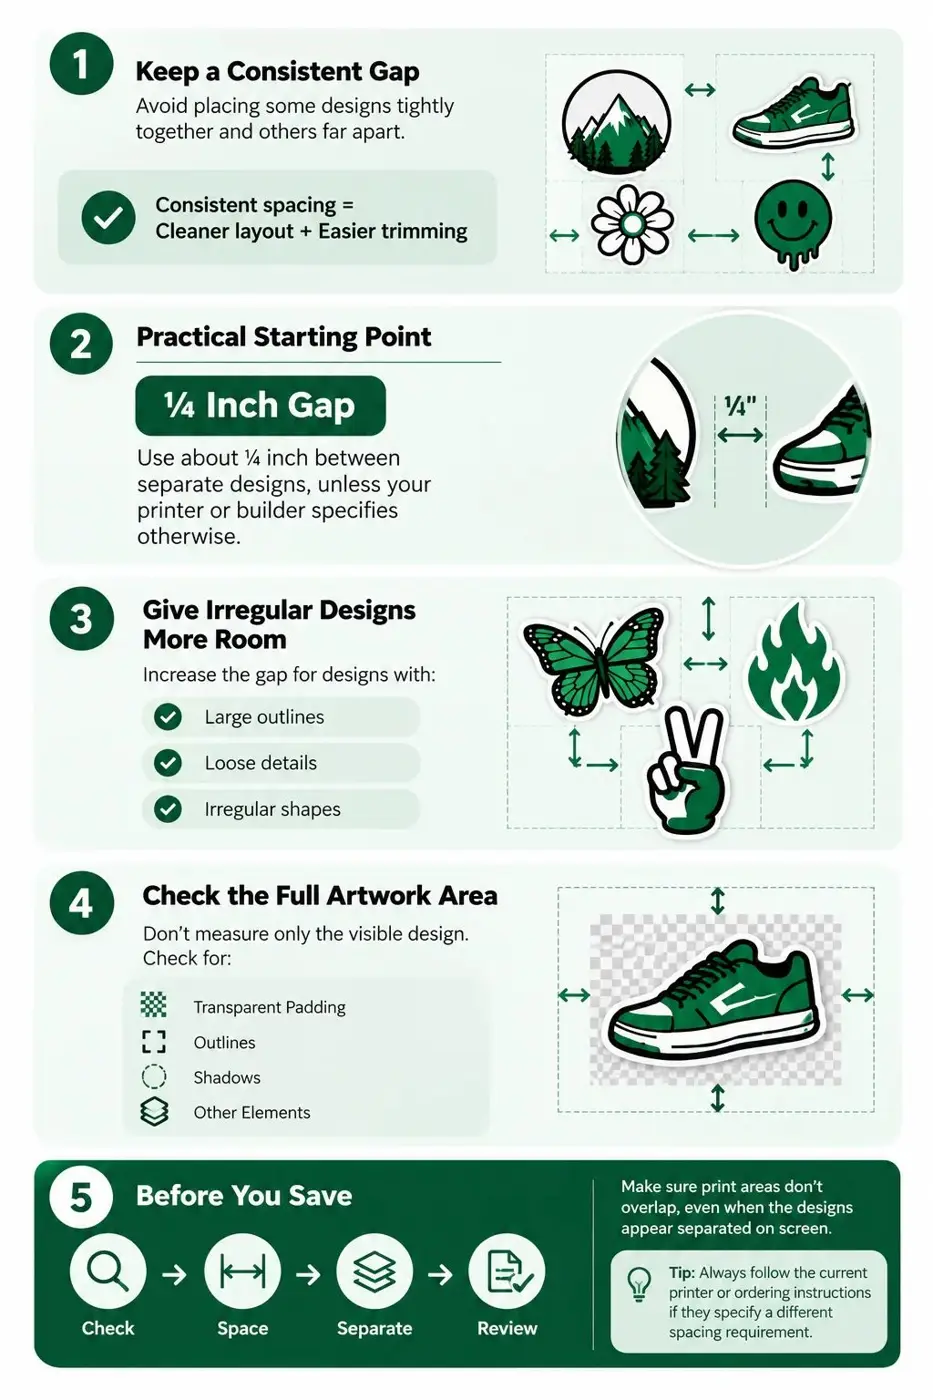
Leave a consistent gap between designs instead of placing some pieces almost together and others far apart. Consistent gaps create a cleaner layout and make the sheet easier to trim. The exact gap may depend on the builder or printer instructions, so always follow the current DTFS.co guidance for the sheet you are ordering.
As a practical starting point, leave about a quarter inch between separate designs unless the ordering instructions specify a different amount. Increase the gap when a design has a large outline, loose details, or an irregular shape. A little extra space is often worth it if it makes the transfer easier to separate.
Do not measure spacing only between the visible colored parts. Check the full artwork area, including transparent padding, outlines, shadows, and other elements that may be part of the file. Two designs may look separated on screen while their actual print areas overlap.
Why Spacing Matters During Cutting
Transfers need to be separated after printing. If designs are too close, a cut may pass through another design or leave a thin edge that is difficult to remove. A clean gap gives you a visual guide and reduces the chance of trimming away part of a logo, letter, or outline.
Spacing also matters when you are pressing several garments in a row. A transfer that is easy to pick up and place saves time. A transfer that is stuck to a neighboring piece or difficult to identify slows down the entire order.
Avoid Overlapping Print Areas
Do not let the actual artwork areas overlap, even if part of a file looks transparent. If the transparent portion contains hidden pixels or a background, the overlap may create a print problem or make separation difficult. Check the edges of every file before arranging it.
How Nesting Works on a DTF Gang Sheet
Nesting means fitting designs together so they use the available sheet area more efficiently. The idea is similar to arranging puzzle pieces, but the pieces do not need to touch. You are looking for open spaces that can hold another design while preserving a safe gap.
Nesting can reduce unused material, but it should not make the sheet hard to work with. The best nesting places compatible shapes near each other. For example, a short wide logo may fit beside the upper part of a tall design. Several small names may fit in a row below a larger graphic.
Irregular designs often create natural open areas. A round logo may leave space near its corners. A design with a curved top may fit beside a straight-edged design. Use those spaces carefully, and keep the designs clearly separated.
Do not rotate artwork if doing so changes how it should be read or used. A sleeve design may be able to turn, but a name, logo, or directional graphic may need to stay upright. Saving a small amount of material is not worth creating a confusing or unusable transfer.
Simple Nesting Examples
A large rectangular back print can sit beside another large rectangular print when both have similar heights. A row of small left-chest logos can fit beneath them. If one design is tall and narrow, it may fit along the side of a wide design instead of occupying a full row.
For names and numbers, keep matching sets together. Do not scatter a team’s names across the entire sheet just to fill small gaps. A slightly less compact layout may save time because the sets are easier to find and sort.
How to Maximize a DTF Gang Sheet Without Overpacking It
To learn how to maximize a DTF gang sheet, focus on usable space rather than total coverage. A sheet that is nearly full but difficult to separate may create more waste in labor and mistakes than it saves in material.
Start by checking whether every design is at the correct finished size. Oversized files take up space that you may not need, while undersized files may require a second order. Confirming sizes first is one of the easiest ways to use the sheet efficiently.
Next, remove unnecessary empty borders inside the artwork files. A transparent border around a design still takes up layout space if the file canvas includes it. Crop the file to the artwork area while keeping the separation gap outside the design. This gives you more control over the layout.
Use rows or groups when the designs are similar. A clean row of small logos may use space better than scattering the same logos around the sheet. A grouped layout is also easier to count and review.
Use the sheet’s width and height intentionally. If your sheet is much longer than it is wide, arrange designs in long rows. If the sheet is closer to a square, compare both directions before deciding where the largest designs should go.
Do not leave a large unused strip because the last design does not fit in the current row. Move smaller designs into that strip or rearrange the row above it. Small changes can turn a nearly full sheet into a well-balanced sheet.
Want help arranging multiple designs?Order Transfers
Reduce DTF Gang Sheet Waste
DTF gang sheet waste usually comes from oversized artwork, excessive gaps, unused sheet length, duplicate mistakes, or designs that were submitted in the wrong version. Waste reduction begins before the sheet is arranged. It starts with a complete order list and correctly prepared files.
Check every design for unnecessary blank space. A file may have a large transparent canvas around a small logo. Cropping that canvas can make the design easier to place and can open room for another transfer.
Combine repeated designs when the ordering process allows it. If you need the same logo in several copies, prepare the correct number of copies on the sheet rather than leaving the printer to guess. Count them before upload and count them again during the final review.
Avoid adding extra copies “just in case” unless you have a clear reason. Extra pieces may be useful for samples or replacements, but unplanned extras take up space that could be used for needed designs. Make the decision before the layout is finalized.
Review the bottom and side edges of the sheet. A thin unused strip may not be a problem, but a large empty area often means the designs can be rearranged. Move the groups closer together while keeping the required spacing around every design.
Waste Is Not Only Empty Material
A layout can look efficient and still create waste if the designs are hard to separate. If a transfer is cut incorrectly, placed on the wrong garment, or damaged during handling, the material and labor are both wasted. A clean layout protects the order from these avoidable problems.
Use a DTF Gang Sheet Template or Builder
A DTF gang sheet template gives you a measured working area. It helps you see the sheet size, keep designs inside the printable region, and repeat a layout for future orders. A builder can make the process easier by allowing you to upload files, set sizes, and arrange designs on screen.
Use the template or builder for the exact sheet size you are ordering. Do not stretch a template to fit a different sheet. A changed template may no longer show accurate dimensions, which can cause incorrect spacing or sizing.
Before exporting a finished layout, confirm that every design is inside the allowed area. Check the top, bottom, left, and right edges. A design that extends outside the printable area may be clipped or may not fit as expected.
If you prefer to let the printer arrange the sheet, send individual files with clear sizes and quantities. If you create your own layout, send one final sheet plus a reference list so the design names and sizes are easy to confirm.
Label Designs for Easy Pressing
A good layout should be easy to understand after printing. Use clear file names and keep related designs together. Names such as “front-large,” “left-chest,” “sleeve,” and “back-small” are more useful than names such as “design1” or “newlogo.”
For a wholesale order, add the finished width to the file name when possible. For example, “brand-mark-left-chest-4in” tells you what the design is, where it goes, and how wide it should be. If you have several garment sizes, include the garment group as well.
Keep a simple layout map or order list next to the final file. The map does not need to be complicated. It only needs to show the design names, quantities, sizes, and intended garment locations. This is especially helpful when several people are cutting and pressing the order.
Review Color, Direction, and Size Before Ordering
Layout is not complete until the artwork itself has been reviewed. Confirm that each design has the correct color, orientation, wording, and version. A perfectly arranged sheet can still be wrong if one logo is outdated or one name is misspelled.
Check designs against the garment color. A design may need a different version for a dark garment than for a light garment. Keep the final artwork simple and clear so the printed transfer matches the intended apparel.
Measure each design at its finished size, not only by how it looks on the sheet. A layout view can make designs appear larger or smaller depending on their neighbors. Use the size information in your file or builder to confirm the actual dimensions.
A Practical Final Layout Checklist
Use this checklist before you submit a gang sheet. It is designed to catch layout mistakes without adding a complicated production process.
Artwork checklist:
-
Every design is the correct finished size.
-
Every design is the correct version, color, and orientation.
-
Unwanted backgrounds and extra blank borders have been removed.
-
Repeated designs have been counted correctly.
-
File names identify the design and intended use.
Layout checklist:
-
The largest designs were placed before the smallest designs.
-
Every design is inside the printable area.
-
The gap between designs is consistent and wide enough to separate them.
-
Nesting uses open areas without forcing designs into tight corners.
-
Related designs are grouped so they are easy to find after printing.
-
The full sheet has been reviewed at close range and zoomed out.
When a Different Transfer Size Makes More Sense
A gang sheet is useful when you have several designs or several copies of one design. If you only need one or two transfers, a transfer-by-size option may be simpler. Choosing the right order type can help you avoid buying more sheet space than you need.
Looking for one specific transfer size? View DTF transfers by size
Get a Clean, Efficient Layout With DTFS.co
A well-planned DTF gang sheet should be easy to read, easy to separate, and efficient without being overcrowded. Start with the largest designs, keep a consistent gap, use smaller designs to fill useful spaces, and review the entire sheet before ordering. These simple rules can reduce material waste and make pressing more organized.
DTFS.co helps businesses and creators order custom, ready-to-press DTF transfers for apparel projects of many sizes. Whether you are preparing a clothing line, a team order, event merchandise, or wholesale production, a clear layout gives your artwork the best starting point.
Ready to plan your next order? Request a quote from DTFS.co
Frequently Asked Questions
How much space should I leave between DTF designs?
Use the current DTFS.co ordering guidance first. As a practical starting point, leave about a quarter inch between separate designs and add more room for irregular shapes, outlines, or designs that will be difficult to trim.
Can DTF designs touch on a gang sheet?
It is better to keep designs separated. Designs that touch can be harder to cut, separate, and handle. A clear gap helps protect the artwork and keeps the pressing process organized.
What does nesting mean on a DTF gang sheet?
Nesting means arranging designs near one another so they use open areas efficiently while still keeping a safe gap. It can reduce unused sheet space when it is done carefully.
How can I maximize a DTF gang sheet?
Use correctly sized artwork, remove unnecessary blank borders, place large designs first, fill open areas with smaller designs, and keep groups organized. Do not sacrifice spacing or readability just to fill every inch.
What causes the most DTF gang sheet waste?
Common causes include oversized files, large blank borders, wrong versions, duplicate mistakes, excessive gaps, and layouts that leave large unused strips. A final count and full-sheet review can prevent many of these problems.